What is a Mobile App Page?
Mobile App Pages let you structure the field worker’s experience step by step. Unlike the Initial Page, they only appear in the mobile app — never in the web admin’s New Task form. Typical reasons to add a Mobile App Page:- Separate stages of work — pickup confirmation, in-transit update, drop-off proof
- Conditional steps — display different next pages depending on a selection (e.g., success vs. failed delivery)
- Display reference info from the Initial Page — show customer name, address, or coordinate without asking the worker to type them again
- Capture media or signatures — group photo, signature, and voice note components onto their own page
Mobile App Page Properties
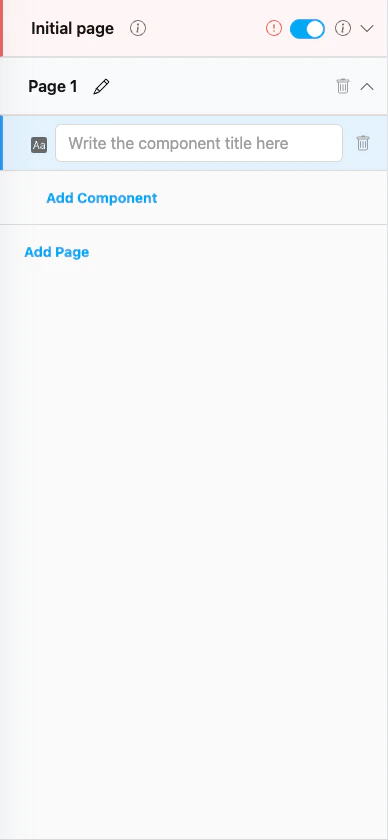
Mobile App Page (Page 1) below the Initial Page in the Pages panel
- Page name — Editable. Click the pencil icon to rename (e.g., from
Page 1toDelivery Info). Use clear names so the steps make sense in the mobile app’s page indicator. - Trash icon — Delete this page. The Initial Page cannot be deleted; only Mobile App Pages have this option.
- Chevron — Expand or collapse the page to see its components.
- Add Component — Add a new component to this page.
- Add Page — Below the last page, click this link to append another Mobile App Page.
Mobile App Preview
The right side of the Flow Builder shows a live preview of the active page on a simulated phone. Use it to verify what the field worker will see before saving the Flow.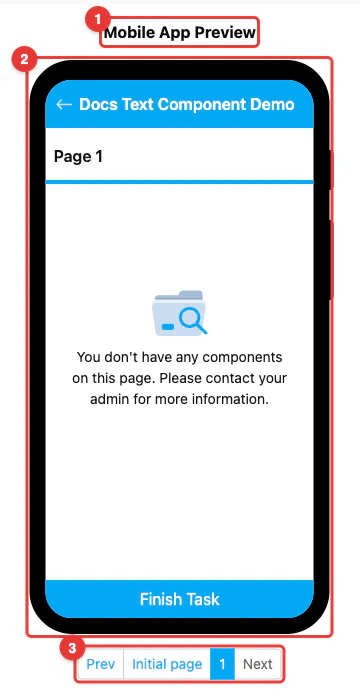
The Mobile App Preview area with the phone simulator and page navigation
- Mobile App Preview label — Marks the preview area. Everything below this label updates in real time as you edit the Flow.
- Phone simulator — The phone-shaped frame renders the active page exactly as it will look on the field worker’s device, including the Flow name at the top and the page’s components below it. The bottom button changes based on the page — Next on intermediate pages, Save Task on the last page.
- Pagination bar — Switch between pages while editing. Use Prev / Next or tap a page name (Initial page, 1, 2, …) to jump to that page in the simulator. The active page is highlighted.
Linking to the Initial Page
A Mobile App Page can pull values from the Initial Page so the field worker does not have to re-enter information that was already captured at task creation. The most common way is using a View component:- Open the Mobile App Page and click Add Component.
- Set Component Type to View and Type Of View to match the source (e.g., String for a text value).
- In Value, select the Initial Page component to reference (e.g., Customer Name).
- The View now displays the Initial Page value automatically for every task created with this Flow.
How to Configure a Mobile App Page
Step 1: Add the Page
In the Pages panel, click Add Page at the bottom of the list. A new page namedPage 1 (or Page N) appears below the Initial Page.
Step 2: Rename the Page
Click the pencil icon next to the page name and type a descriptive name (e.g.,Delivery Info, Order & Proof, Receiver Confirmation). Clear names help field workers know which step they are on.
Step 3: Add Components
Click the chevron to expand the page, then Add Component. Pick the right component type for each piece of information you want the field worker to see or capture.Step 4: Reorder Pages (optional)
Drag a page up or down in the list to change the order it appears in the mobile app. The Initial Page is always first and cannot be moved.Step 5: Preview and Save
Use the Mobile App Preview on the right to verify the page renders as expected, then click Save to persist your changes.Related
- Initial Page — The first page of every Flow
- Component: View — Common way to display Initial Page values on a Mobile App Page
- Previewing a Flow — Tips on using the mobile preview while building
- Flow Builder Overview — Reference for every part of the Flow Builder