-
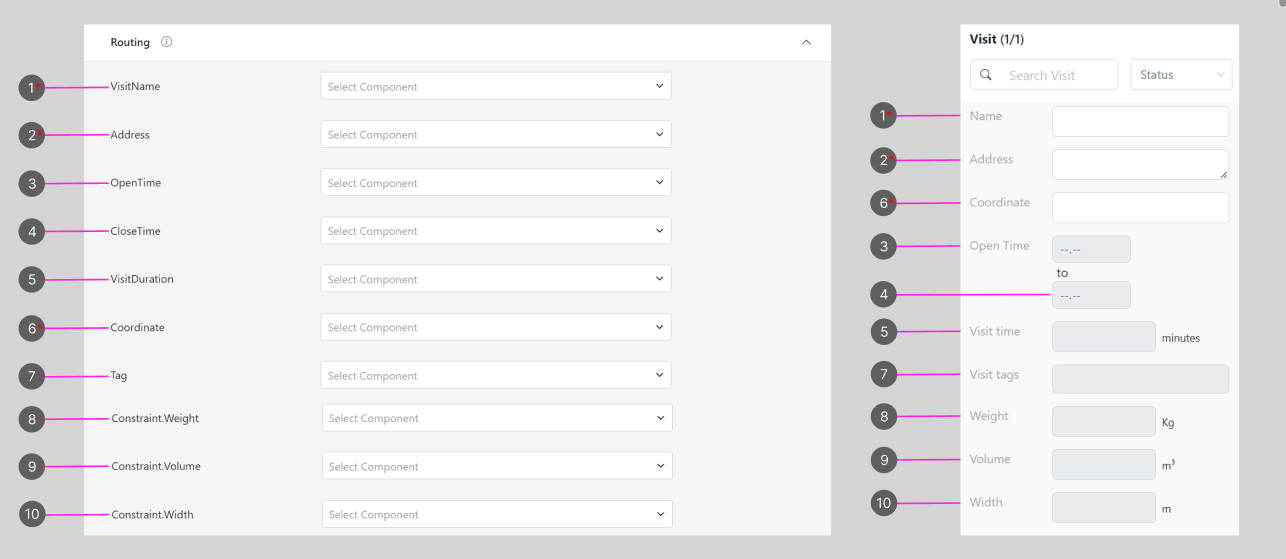
Visit Name
- The component selected as Visit Name will be displayed as the “Name” on a Visit.
- Only input components with the type “Text” can be chosen as the Visit Name.
- If this field is left empty, the name of the visit will be taken from the Title in the Task List configuration.
-
Address
- The component selected as Address will be shown as the “Address” on a Visit.
- Only input components with the type “Address” can be chosen as the Address.
- If this field is left empty, the address will be empty in the visit details, and you will need to input it manually for each visit:
-
Open Time
- The component chosen as Open Time will be displayed as the “Open Time” on a Visit.
- Open Time represents the start of the desired time window for executing the visit.
- Only input components with the type “Time” can be chosen as Open Time.
-
Close Time
- The component chosen as Close Time will be displayed as the time below the Open Time on a Visit.
- Close Time represents the end of the desired time window for executing the visit.
- Only input components with the type “Time” can be chosen as Close Time.
-
Visit Duration
- The component chosen as Visit Duration will be displayed as the “Visit Time” on a Visit.
- Visit Time represents the idle time in minutes after reaching each visit.
- Only input components with the type “Number” can be chosen as Visit Duration.
- Please note that the value for visit time must be an integer, as it represents minutes.
-
Coordinate
- The component chosen as Coordinate will be shown as the “Coordinate” on a Visit.
- We highly recommend using the Input component with the type “Coordinate” and activating the “Geocode” feature. This ensures accurate mapping of the visit’s location on the map.
-
Tags
- The component selected as Tags will be shown as the “Visit tags” on a Visit.
- Visit tags are used to pair visits with vehicles or other relevant criteria. This is essential for optimizing routes by matching tags, thereby ensuring efficient assignments.
- Only input components with the type “Text” or “Select” can be chosen as Tags. You can use text input or a selection list to assign appropriate tags to visits.
-
Constraint: Weight
- The component chosen as Constraint Weight will be displayed as “Weight” on a Visit. This can be used to represent the total weight (Kg) of items included in the visit.
- Only input components with the type “Number” or “Currency” can be selected as the Constraint Weight.
-
Constraint: Volume
- The component chosen as Constraint Volume will be displayed as the “Volume” of a Visit. This can be used to represent the total volume (m³) of items included in the visit.
- Only input components with the type “Number” or “Currency” can be selected as the Constraint Volume.
-
Constraint: Width
- The component chosen as Constraint Width will be displayed as the “Width” of a Visit. This can be used to represent the total width (m) of items included in the visit.
- Only input components with the type “Number” or “Currency” can be selected as the Constraint Width.