When to Use Data Source Binding
- Master data lookups — Customer details, store info, product catalogs, staff records
- Auto-fill on selection — Pick a customer once and have phone, address, and coordinate populate automatically
- Consistent data entry — Field workers select from a validated list instead of typing free text
A Data Source must exist in the Data Source menu before it can be bound to a component. See Data Sources for how to define one.
Binding an Input Component
Data Source binding for an Input component is configured inside the component’s own settings panel, not in the Configuration tab. The settings appear after you turn the Use data source toggle on.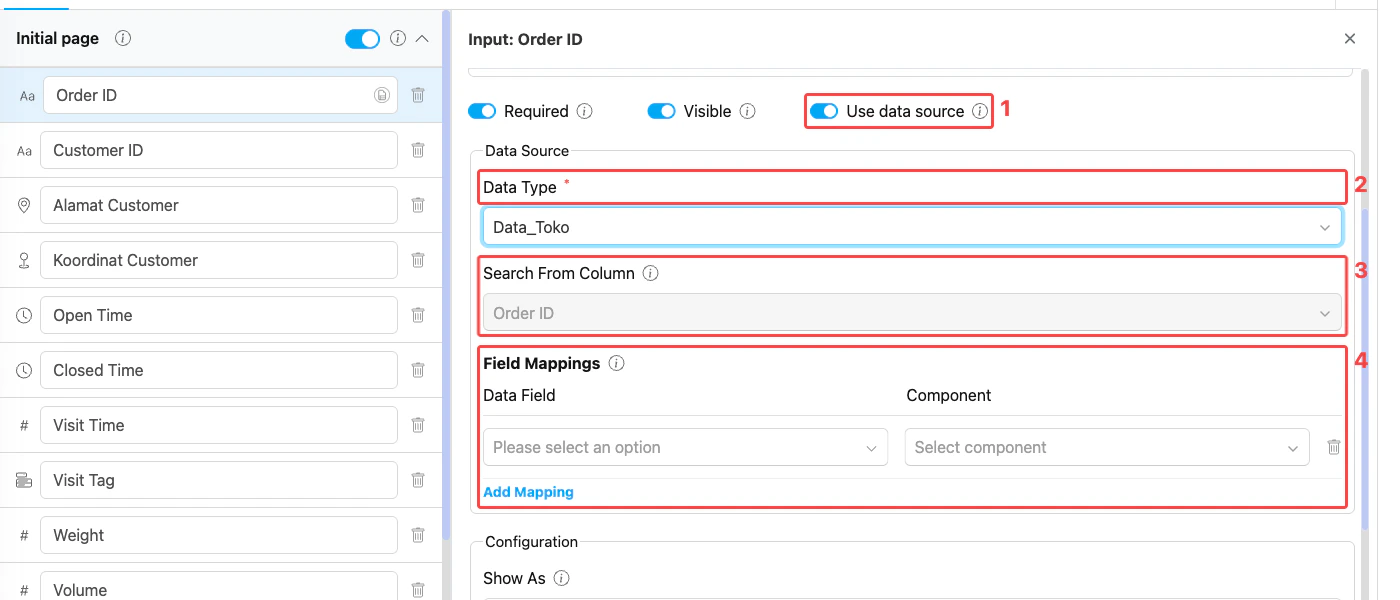
Data Source settings on an Input component
- Use data source — Toggle on to enable Data Source binding. The Data Source section appears underneath the Required/Visible/Use data source row.
- Data Type — Dropdown listing every Data Source defined in your organization. Pick the one to bind to (e.g.,
Data_Toko,staff_data). - Search From Column — Column on the Data Source that the worker searches by. This is the column the mobile app shows in the lookup dropdown — for example “Order ID” lets the worker type or scan an order number to find the row.
- Field Mappings — Each row maps one Data Field (column on the Data Source) to a Component in the current flow. When the worker selects a record, every mapped field’s value is written into the corresponding component on the form. Click Add Mapping to add another row.
How to Configure an Input Data Source
- Open the Input component in the Flow Builder.
- Turn on Use data source.
- In Data Type, select the Data Source to bind to.
- In Search From Column, pick the column the worker will use to find a record. The component the worker is currently editing is the lookup trigger — typing or scanning here opens the Data Source picker.
- Under Field Mappings, click Add Mapping for each value you want auto-filled, then choose a Data Field and the Component to receive its value.
- Click Save.
Binding a List Component
The List component binds to a Data Source so the worker can pick items from a master product list (instead of typing each item by hand). The mapping uses two reserved keys.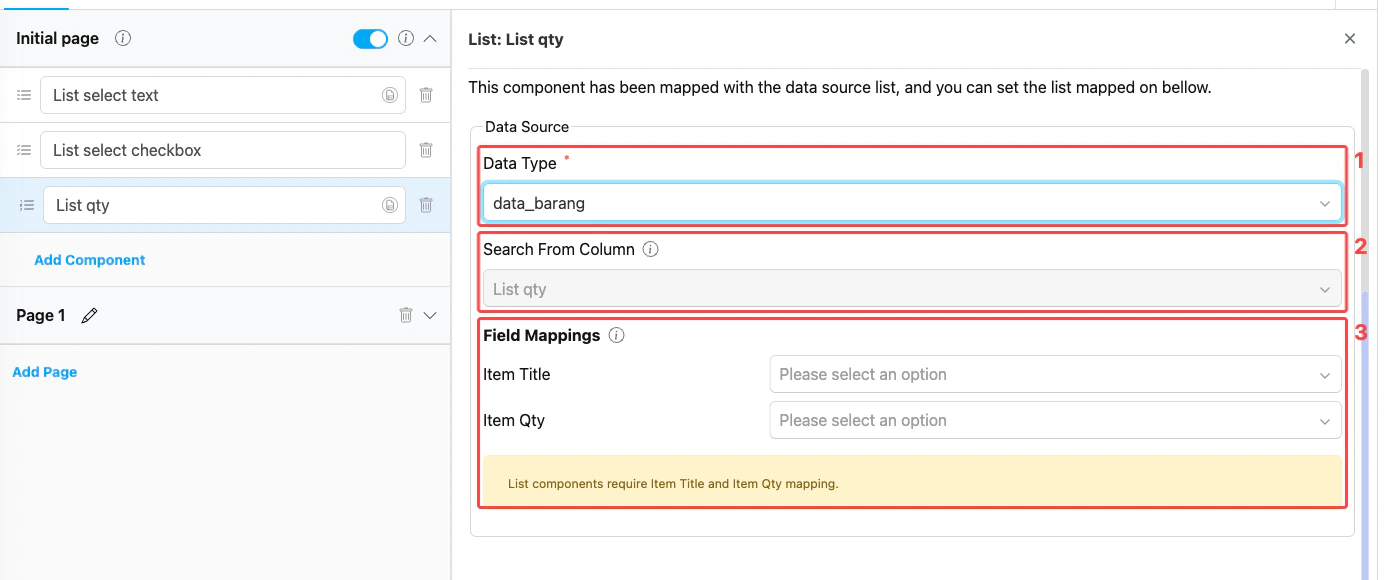
Data Source settings on a List component
- Data Type — Pick the Data Source to bind to. It must have at least one Text field and one Number field.
- Search From Column — Column on the Data Source that the worker searches by when adding a new list row.
- Field Mappings — Two reserved keys must be mapped before the binding works:
How to Configure a List Data Source
- Open the List component in the Flow Builder and turn on Use data source.
- In Data Type, select the Data Source to bind to.
- In Search From Column, pick the column the worker will use to find a record.
- Under Field Mappings, map Item Title to a Text field on the Data Source and Item Qty to a Number field.
- Click Save.
Real-World Example: Warehouse Stock Picking
A warehouse operator runs a daily picking task to fulfill outbound orders. Typing every SKU by hand is slow and error-prone, so the flow uses a List component bound to thedata_barang (product master) Data Source.
Data Source — data_barang:
List component setup:
- Data Type →
data_barang - Search From Column →
sku_code(operator scans the SKU barcode) - Field Mappings:
- Item Title →
product_name - Item Qty →
stock_available
- Item Title →
- The operator scans the product barcode
SKU-1042. - The list automatically adds a new row with the product name
Mie Goreng 85gand a default quantity of250(the current available stock). - The operator changes the quantity to match the actual amount picked from the warehouse shelf.
- The operator scans the next SKU and repeats the same steps until every item on the order is collected.
Other Common List Use Cases
- Field sales canvassing — Sales rep picks products from the company catalog into a daily call list, defaulting each row’s qty to the recommended order size
- Asset inventory — Technician opens a checklist of equipment at a site and confirms the count on hand
- Inspection survey — Auditor uses a fixed list of inspection items pulled from a quality-control master Data Source
Binding a Bill Component
The Bill component is similar to List, with one extra reserved key for pricing. Bill also has an Add-on section where you define discounts or surcharges separately from the Data Source.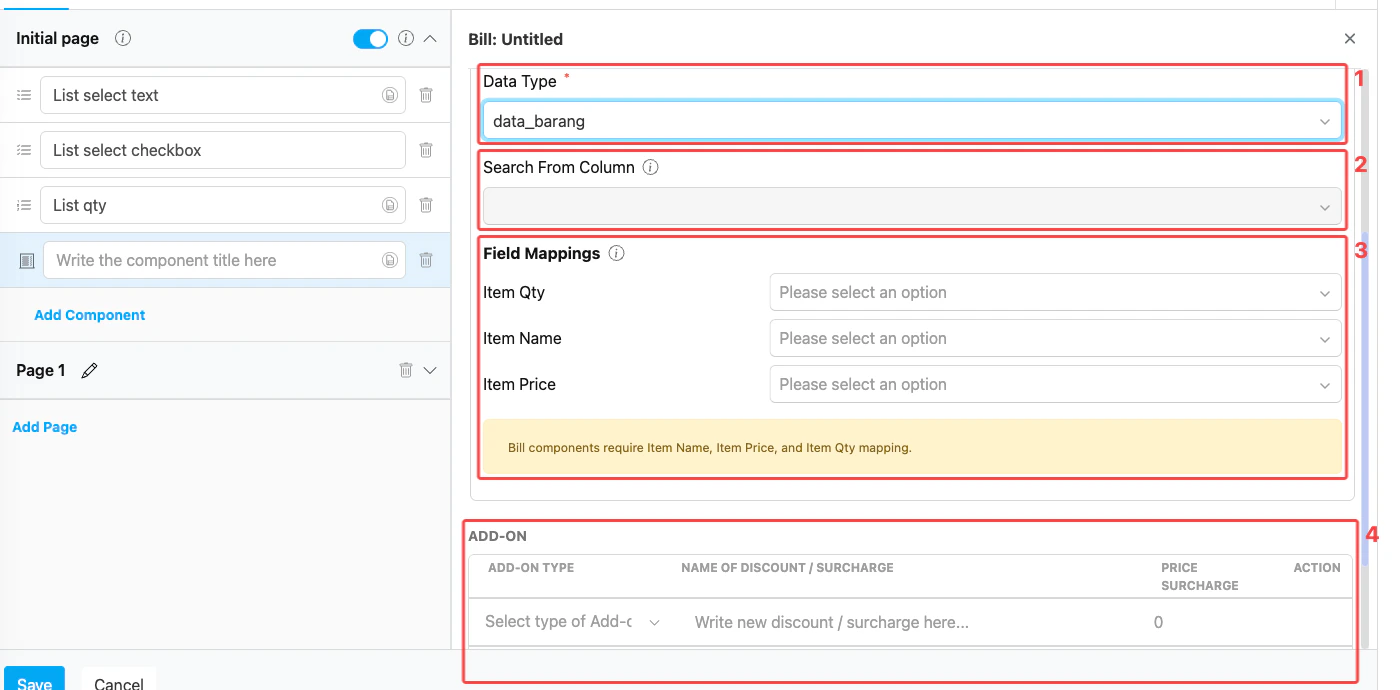
Data Source settings on a Bill component
- Data Type — Pick the Data Source to bind to. It must have one Text field and two Number fields.
- Search From Column — Column on the Data Source that the worker searches by when adding a new bill line.
- Field Mappings — Three reserved keys must be mapped before the binding works:
- Add-on — Optional discounts or surcharges that adjust the bill total. Add-ons are defined directly on the component (not pulled from the Data Source); pick the Add-on Type, name it, and set the price/surcharge.
How to Configure a Bill Data Source
- Open the Bill component in the Flow Builder and turn on Use data source.
- In Data Type, select the Data Source to bind to.
- In Search From Column, pick the column the worker will use to find a record.
- Under Field Mappings, map Item Name to a Text field on the Data Source, and both Item Qty and Item Price to Number fields.
- (Optional) Add any Add-on rows for discounts or surcharges that should apply to every bill created from this flow.
- Click Save.
Real-World Example: Retail Sales Order
A field sales rep visits a retail store and writes a sales order on the mobile app. Prices and product names must come from the company’s authoritative price list — not be typed by hand — so the flow uses a Bill component bound to thedata_barang Data Source.
Data Source — data_barang:
Bill component setup:
- Data Type →
data_barang - Search From Column →
sku_code - Field Mappings:
- Item Name →
product_name - Item Qty →
default_qty - Item Price →
unit_price
- Item Name →
- Add-on:
Discount—Loyal Customer Discount—-5000Surcharge—Delivery Fee—15000
- The sales rep scans the product barcode
SKU-1042. - The bill automatically adds a new line with the product name
Mie Goreng 85g, quantity12, and unit price3500. The line subtotal becomes42.000(qty × price). - The rep can edit the quantity if the customer orders more or less than the default.
- The bill total sums up every line, then applies the configured Add-ons: subtracts
5.000for the Loyal Customer Discount and adds15.000for the Delivery Fee. - When the rep finishes the task, the final bill total and every line item are saved on the task and exported with the rest of the task data.
Other Common Bill Use Cases
- Service technician callouts — Technician picks repair services from a price list; total is calculated for the customer to pay on the spot, with a fixed call-out fee added via an Add-on
- Restaurant / food delivery — Driver records the items delivered, with prices pulled from the menu master; a packaging surcharge can be applied as an Add-on
- Field installation billing — Installer selects parts used from a parts catalog; labor is added as an Add-on surcharge per visit
Related
- Data Sources — Create and manage the Data Sources referenced by these bindings
- Component: Input — Input component that can bind to a Data Source
- Component: List — List component reserved keys
- Component: Bill — Bill component reserved keys
- Flow Builder Overview — Reference for every part of the Flow Builder