- A Hub — the physical location your field team starts from (warehouse, office, depot, drop-off point). MileApp uses the Hub as the geographic anchor for tasks, vehicles, and teams; without one, the rest of the platform has nothing to bind to.
- At least one User — the person who will create tasks, dispatch them, or run them on the mobile app. Every user belongs to one or more Hubs and carries a role that controls what they can do.
Required permission:
- View Hub, Create Hub (to manage hubs)
- View User, Invite User, View Role (to invite teammates)
What is a Hub?
A Hub is the central operational location your field team is based out of. It is usually a warehouse, office, or delivery centre — somewhere your drivers, couriers, or technicians start the day. You can have as many Hubs as you need. Each task you create is tagged to one Hub; each user can be assigned to one or more Hubs. This keeps work in different cities or branches separate without forcing you to run a separate MileApp organization for each. Once you have more than one Hub, the hub switcher in the top-right of every page lets you focus the view on a single Hub at a time.Managing your Hubs
Go to Settings → Hub to see every Hub in your organization. Use this page to add new hubs, rename existing ones, or remove ones you no longer need.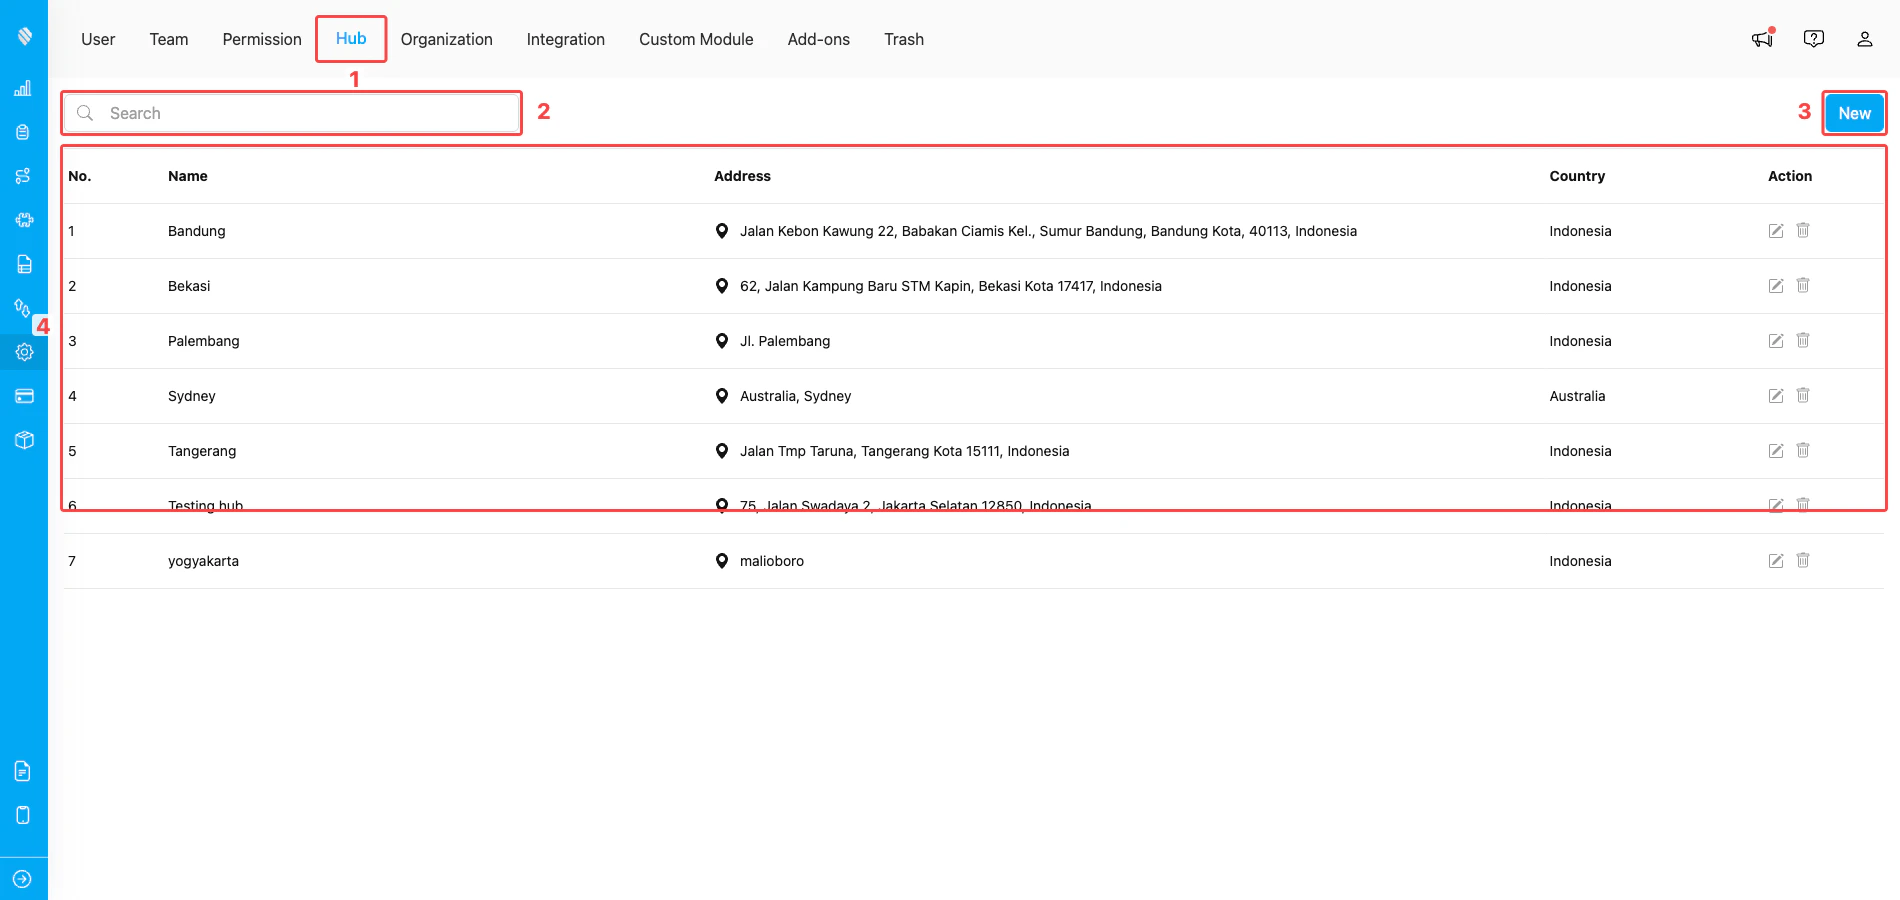
Setting → Hub page listing every hub in your organization
- Hub tab — opens this page from the Settings top navigation.
- Search bar — filter the Hub list by name; useful once you have many hubs.
- New — opens the Create Hub form to add another hub.
- Hub list — every existing hub with its name, address, country, and row actions. The pencil icon edits a hub; the trash icon deletes it (only allowed when no users, tasks, or vehicles still reference the hub).
Creating a new Hub
Click the New button at the top-right. A side panel opens with a form and a live map.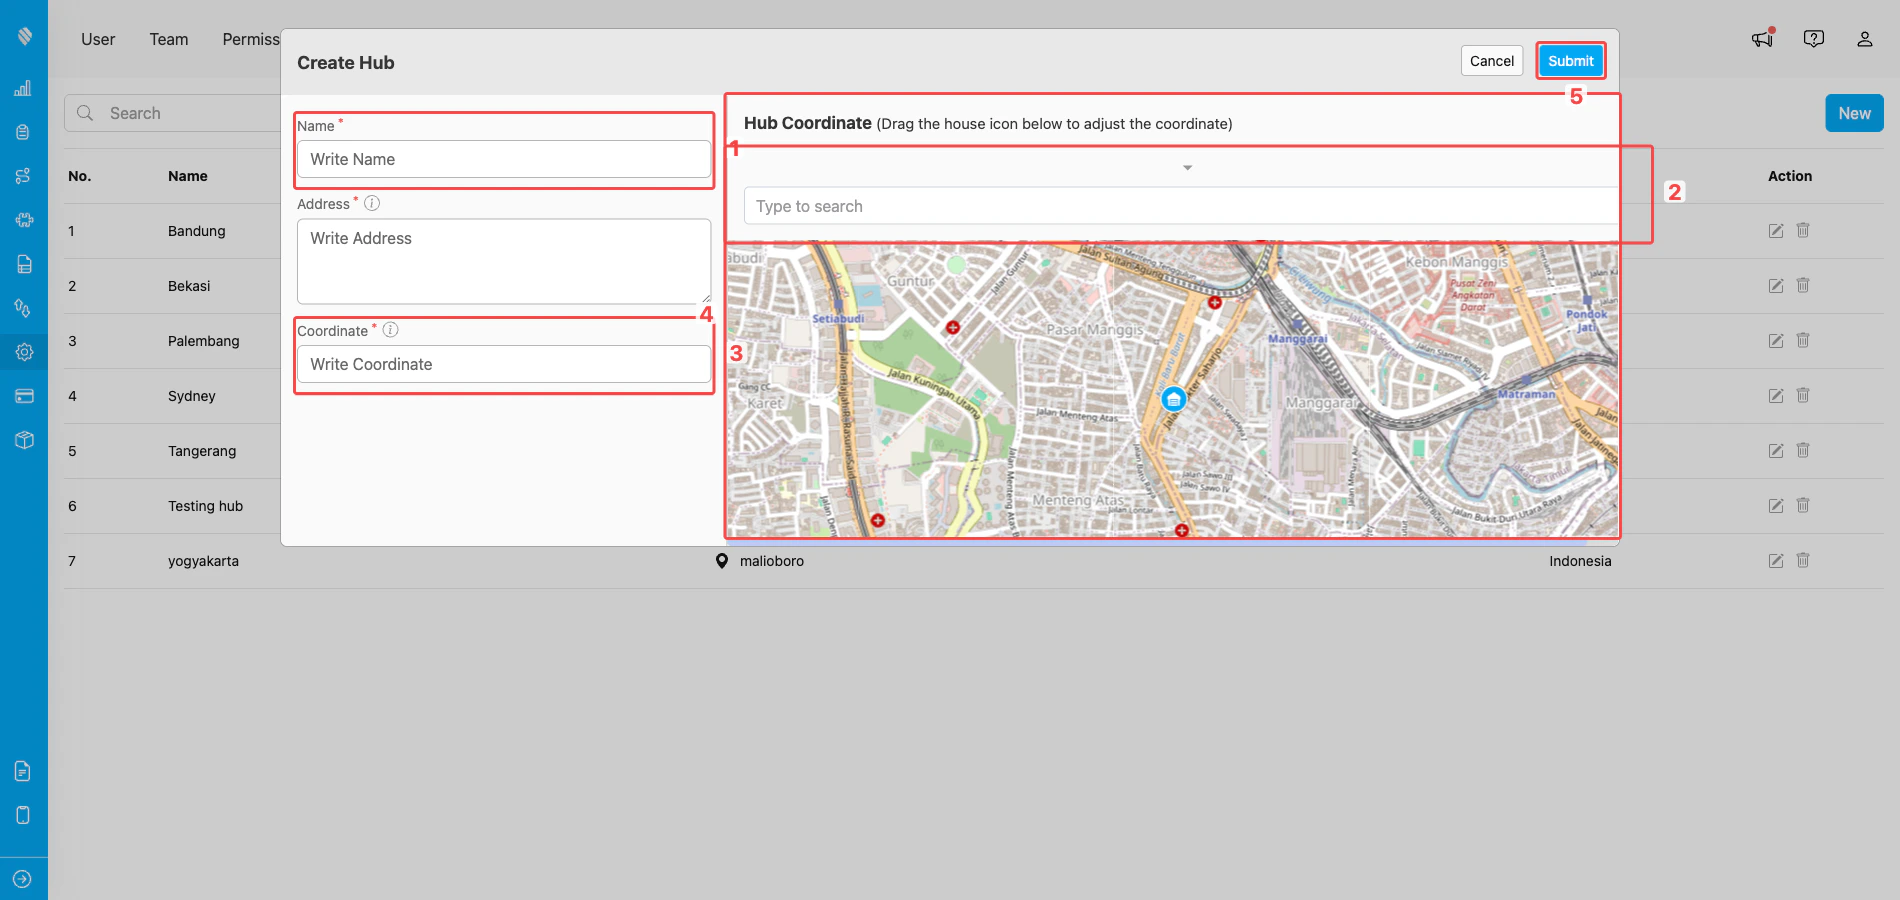
Create Hub form with map preview on the right
- Name — give the hub a clear, unique label (for example “Bandung Warehouse” or “Jakarta Pusat Branch”). The same name will appear in the hub switcher and on every task created from this hub.
- Address — start typing your address in the search box and pick the matching suggestion from the dropdown. MileApp uses the suggestion to fill in the coordinate and centre the map.
- Coordinate — the latitude/longitude of the hub. It is auto-filled from the address you picked but you can edit it manually if you need a more precise location.
- Map preview — confirms where the hub will sit. You can drag the map pin to fine-tune the coordinate; the Coordinate field updates in real time.
- Submit — creates the hub. After saving, the new hub appears in the list and is added to your own hub access automatically.
The address search only suggests locations inside countries supported by MileApp (Indonesia, Singapore, Malaysia, Vietnam, Philippines, Thailand, Australia, New Zealand, Japan, and a few others). You also cannot create a hub outside the country set on your organization profile.
Inviting Users
Hubs become useful only when there are users connected to them. Open Settings → User to invite teammates and configure who has access to which Hub.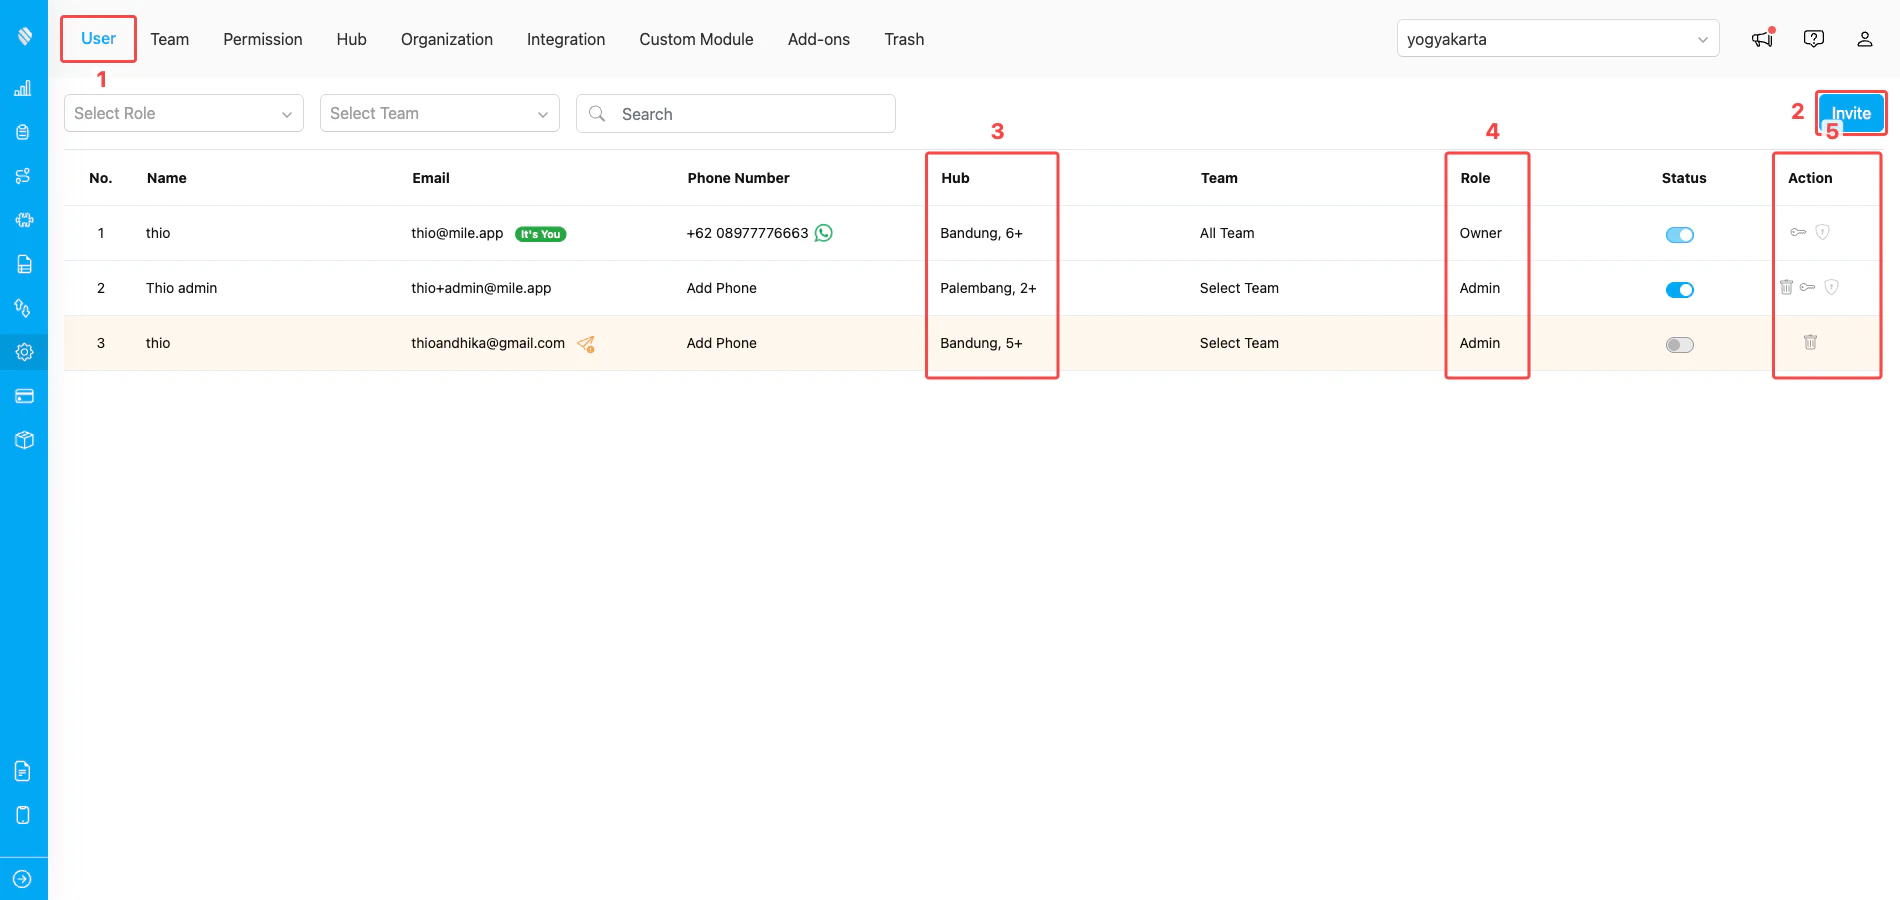
Setting → User page listing the people in your organization
- User tab — opens this page from the Settings top navigation.
- Invite — opens the Invite User dialog so you can add new teammates by email.
- Hub column — shows which Hubs each user can access. A value such as Bandung, 5+ means the user belongs to Bandung plus five other hubs.
- Role column — shows the role assigned to each user (Owner, Admin, Planner, Field User, or any custom role you have created). Click the value to switch a user to a different role.
- Action column — per-row actions: delete the user (trash icon), reset their password (key icon), unlock them after too many failed logins (shield icon).
Sending an invite
Click Invite to open the invite form. You can invite one user or several in one go.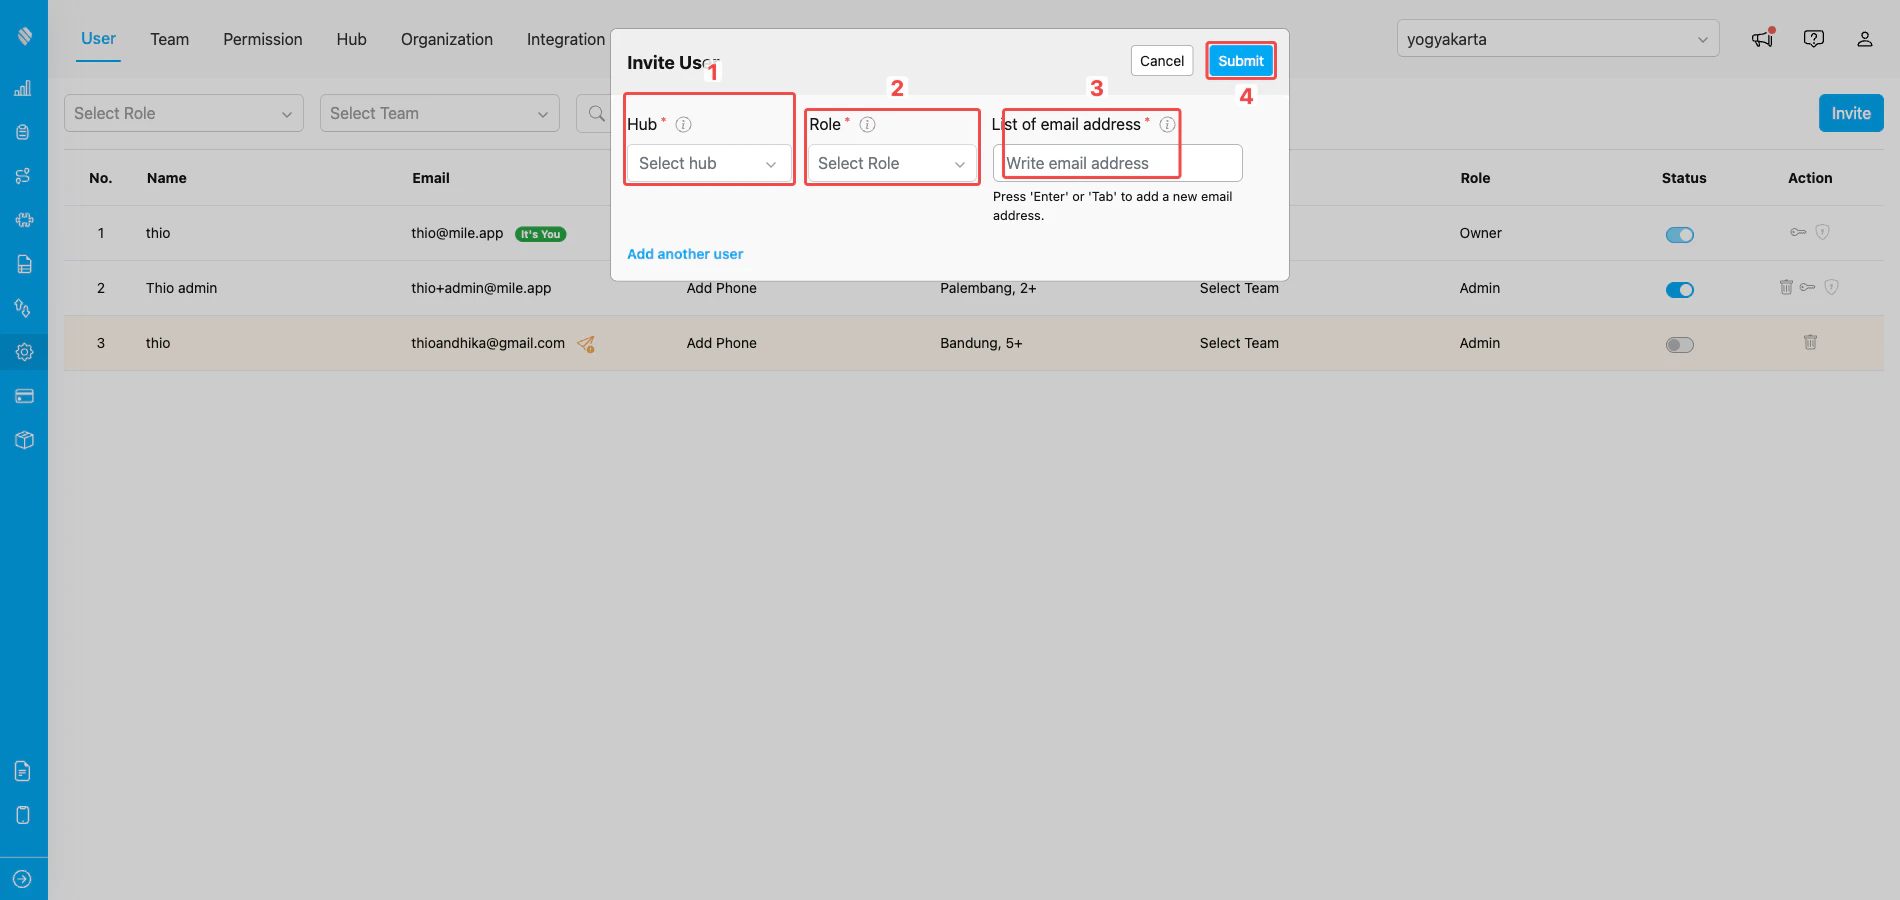
Invite User dialog — pick Hub, Role, and email addresses
- Hub — pick one or more hubs the invited user(s) will belong to. Use Select All Hub if they need access to everything.
- Role — pick the role for the invited user. The role controls every action they can take. See Role and Permission for the full list of built-in roles and how to create custom ones.
- List of email address — type each invitee’s email and press Enter or Tab to add it as a tag. Repeat to invite several people with the same Hub and Role in one operation.
- Submit — sends the invitation emails. Each invitee receives a link to set their password and finish signing up.
Hub access affects what users see
A user’s Hub assignment is the filter that decides which tasks, vehicles, and reports show up for them:- The hub switcher at the top-right of every page only lists the hubs the user belongs to.
- Tasks, dashboards, and route planning are scoped to the hub the switcher is on, so users with no access to a hub never see its data.
- Adding or removing hub access is done by editing the user’s profile from Settings → User.
Frequently Asked Questions
Q: Why don’t I see every Hub in the top-right hub switcher? A: The hub switcher only lists hubs you have access to. If a hub is missing from your switcher, ask your Owner or Admin to add you to that hub from Settings → User. Q: Can I delete a Hub I no longer need? A: You can, but only if no one is still using it. First unassign every user from the hub (from Settings → User), then click the trash icon next to the hub on Settings → Hub. If the hub still has completed tasks, the system blocks the delete and you will need to contact support to clean it up. Q: Can I create a Hub in a country different from my organization’s country? A: Yes. The address search supports global locations, so you can create hubs anywhere — for example a Jakarta-based organization can add a Singapore or Manila hub. Make sure the country shown in the Address field is correct before saving so that downstream features (route optimization, vehicle matching) use the right country code. Q: My invitee never received the invitation email — what should I do? A: From the Settings → User list, find the pending user row and click the resend icon. MileApp generates a new activation link and sends a fresh email. Make sure the email isn’t in their spam folder, and double-check the address you typed. Q: Can I invite a user who has already accepted an earlier invitation? A: No. Once a user verifies their account, their email cannot be re-invited from this dialog. Edit their existing profile from the User list instead — change their hub access, role, or status without sending a new invite. Q: Can I just disable a user temporarily instead of deleting them? A: Yes. Use the Active toggle in the user row to deactivate the account. A deactivated user is immediately signed out and cannot log in to the web admin or the mobile app, but their tasks and history stay intact. Toggle it back on to restore access. Q: Who can reset another user’s password? A: Any user whose role has the Reset Password permission can reset passwords for the users they manage. However, only an Owner can reset the password of another Owner. Q: My account is locked after several failed login attempts. How do I get back in? A: Either wait out the lockout period (typically 30 minutes) or ask an admin to unlock you immediately by clicking the padlock icon next to your row in Settings → User. The number of allowed failed attempts and the lockout duration are controlled by your organization’s password policy.What’s next
- Creating A Flow — design the form your field workers will fill in once your hub and users are ready.
- Creating A Task — start dispatching work to your new hub.
- Role and Permission — fine-tune what each role can do beyond the four defaults.