What is the Voice Note Component?
The Voice Note component renders as an audio recorder on the mobile app. The worker taps the microphone button to start recording, taps again to stop, and the audio file is saved as part of the task. Recordings are bounded by a configurable maximum duration. Use Cases:- Voice notes for complex issues — Field worker explains a problem verbally instead of typing it
- Customer complaints or feedback — Capture the customer’s own words for accuracy
- Audio documentation — Provide context that screenshots and text cannot
- Multilingual support — Record in the customer’s language without forcing translation in the form
Voice Note Component Properties
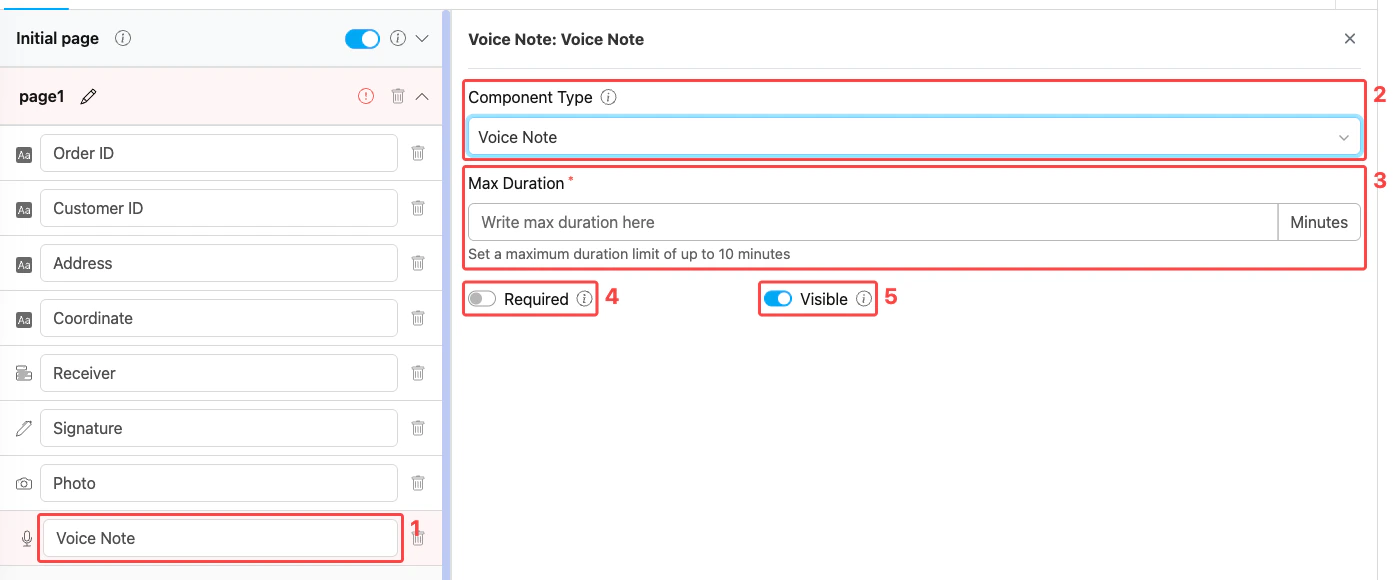
Voice Note component settings panel
- Title — Component label shown above the recorder on the mobile app (e.g., “Voice Note”, “Customer Feedback”)
- Component Type — Set to Voice Note
- Max Duration — Maximum recording length in minutes (range 1–10). Required field. The recorder automatically stops when this limit is reached.
- Required — When on, the worker must record audio before the task can be saved
- Visible — Controls display on Create Task (web and mobile) and View Task (mobile). Hidden components still export their data.
How to Configure the Voice Note Component
Step 1: Add the Component on a Mobile App Page
In the Flow Builder, open a Mobile App Page (e.g., Page 1). Click Add Component, then set Component Type to Voice Note. The Voice Note option is not available on the Initial Page.Step 2: Set the Title
Enter a descriptive Title (e.g., “Voice Note”, “Customer Feedback”, “Complaint Detail”). This label appears directly above the recorder on the mobile app.Step 3: Set Max Duration
Enter the maximum recording length in minutes (1–10). Pick a value that fits the typical recording — short for brief comments, longer for detailed accounts. The recorder stops automatically when the limit is reached.Step 4: Toggle Required and Visible
- Turn on Required when the recording is mandatory for completing the task. Leave it off if the field is optional.
- Leave Visible on for normal use. Turn it off only when the component should be hidden from both the web admin form and the mobile app but still exported on completed tasks.
Step 5: Save
Click Save in the Flow Builder. The voice recorder is now live in any task created from this flow.How the Voice Note Works in Tasks
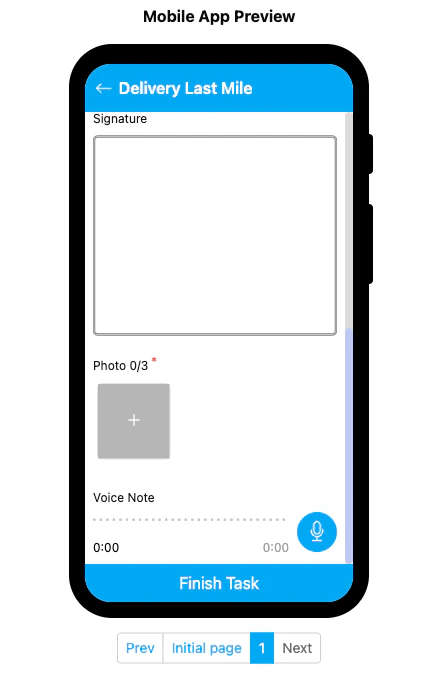
Voice Note component rendered on the mobile preview
- The Voice Note section shows the title, an audio progress bar, and a microphone button on the right.
- Tap the microphone button to start recording. The elapsed time updates in real time.
- Tap the button again to stop. The recording is attached to the task.
- The recorder stops automatically when the Max Duration limit is reached.
- If Required is on, the worker cannot save the task until a recording is captured.
Related
- Component: Video — Record video instead of audio for visual documentation
- Component: Capture — Auto-capture data such as timestamps or barcodes
- Mobile App Page — Where Voice Note components must live
- Flow Builder Overview — Reference for every part of the Flow Builder