Required permission:
- Edit Workflow
- Delete Workflow
Managing Custom Statuses
Status Mapping on each step is picked from a list of statuses defined for the Workflow. Each Workflow starts with three default statuses that come pre-loaded (Unassigned, Ongoing, Done) and cannot be removed. You can add your own custom statuses on top of these defaults — useful when you want domain-specific labels (e.g., Picked Up, In Transit, Delivered) instead of the generic task states.Opening the Manage Status modal
Click Manage Status in the Create / Edit Workflow modal to open the status management modal.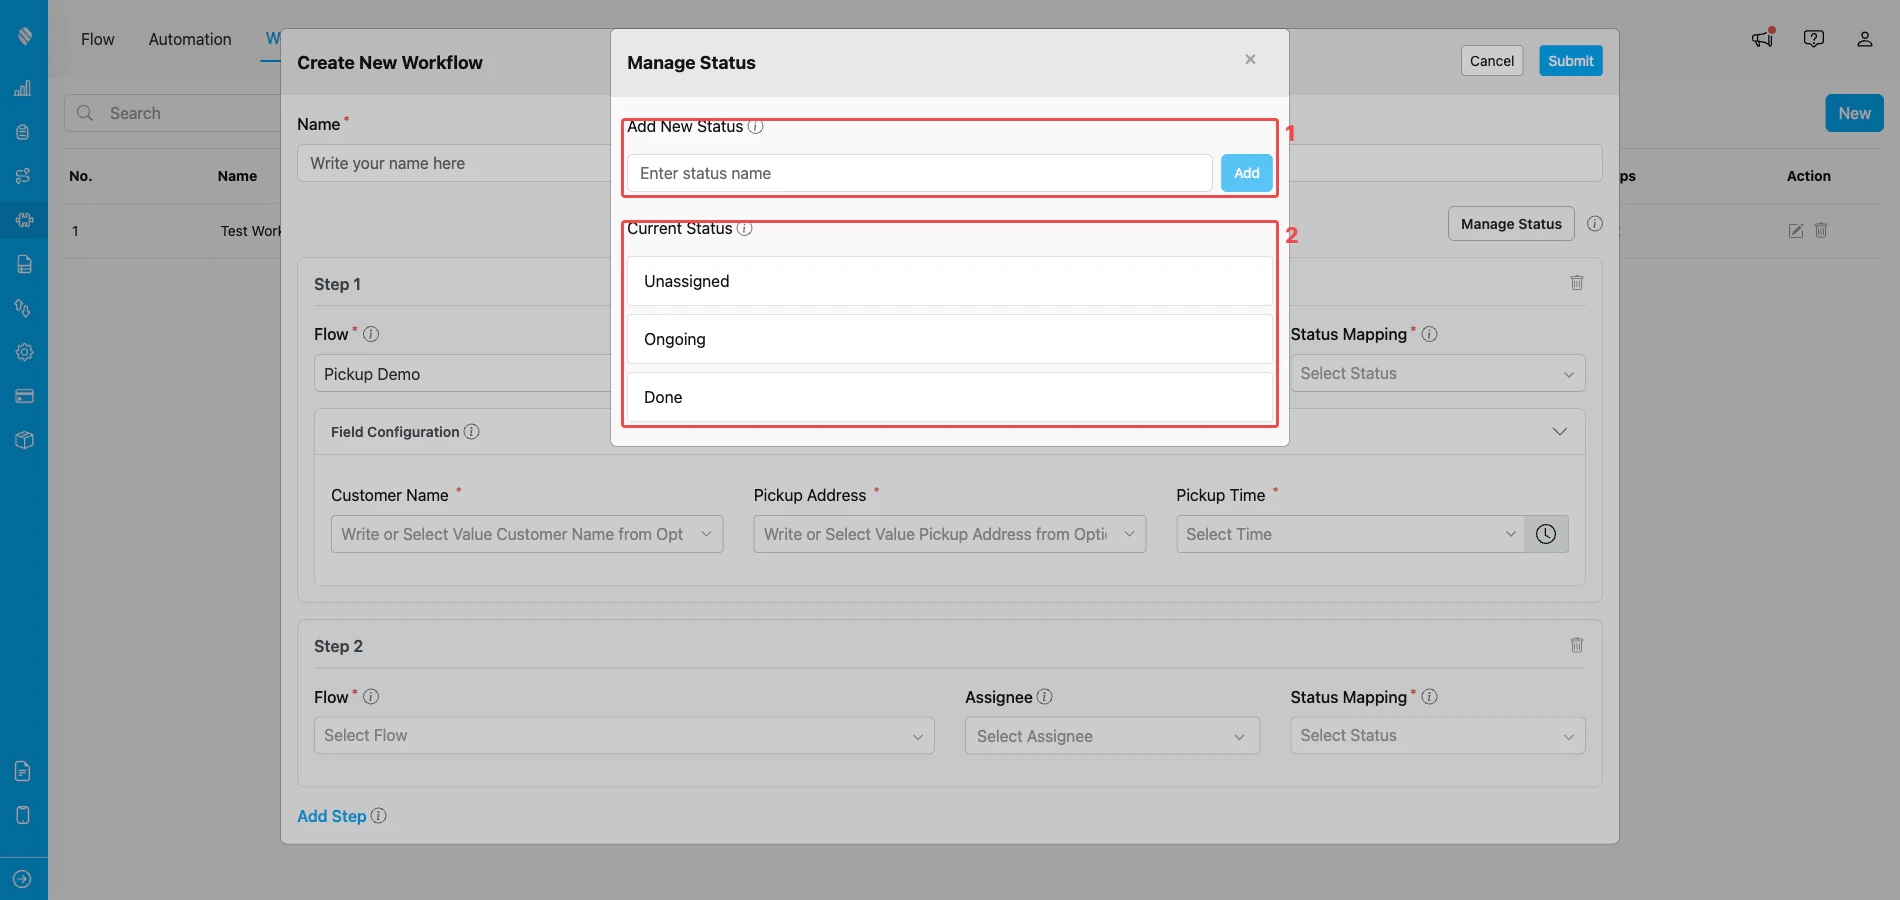
Manage Status modal — Add New Status input and Current Status list
- Add New Status — type the new status name in the input field, then click the Add button on the right. The name only has to be at least 1 character — keep it short and descriptive so it stays readable in the Status Mapping dropdown. The new status immediately appears in the Current Status list below.
- Current Status — the list of statuses available for this Workflow. Default statuses (such as Unassigned, Ongoing, Done) are locked, while custom statuses you added can be renamed (pencil icon) or removed (trash icon).
Adding a custom status
- Enter the status name in the Add New Status field. The name must be at least 1 character. A short, descriptive label is recommended so it stays readable in the Status Mapping dropdown.
- Click Add.
- The new status appears in the Current Status list and can immediately be picked in the Status Mapping dropdown on any step.
Editing or removing a custom status
For statuses you added (not the default ones):- Use the edit (pencil) icon next to a custom status to rename it. Press Enter or click outside the field to save the change.
- Use the trash icon next to a custom status to remove it from the Workflow.
Default statuses are locked — their edit and delete icons are hidden in the Manage Status modal. Only the custom statuses you added can be renamed or removed.
Editing a Workflow
To modify an existing Workflow, click the pencil icon (Edit) on the row in the Workflow list. The Edit Workflow modal opens with the current values pre-filled.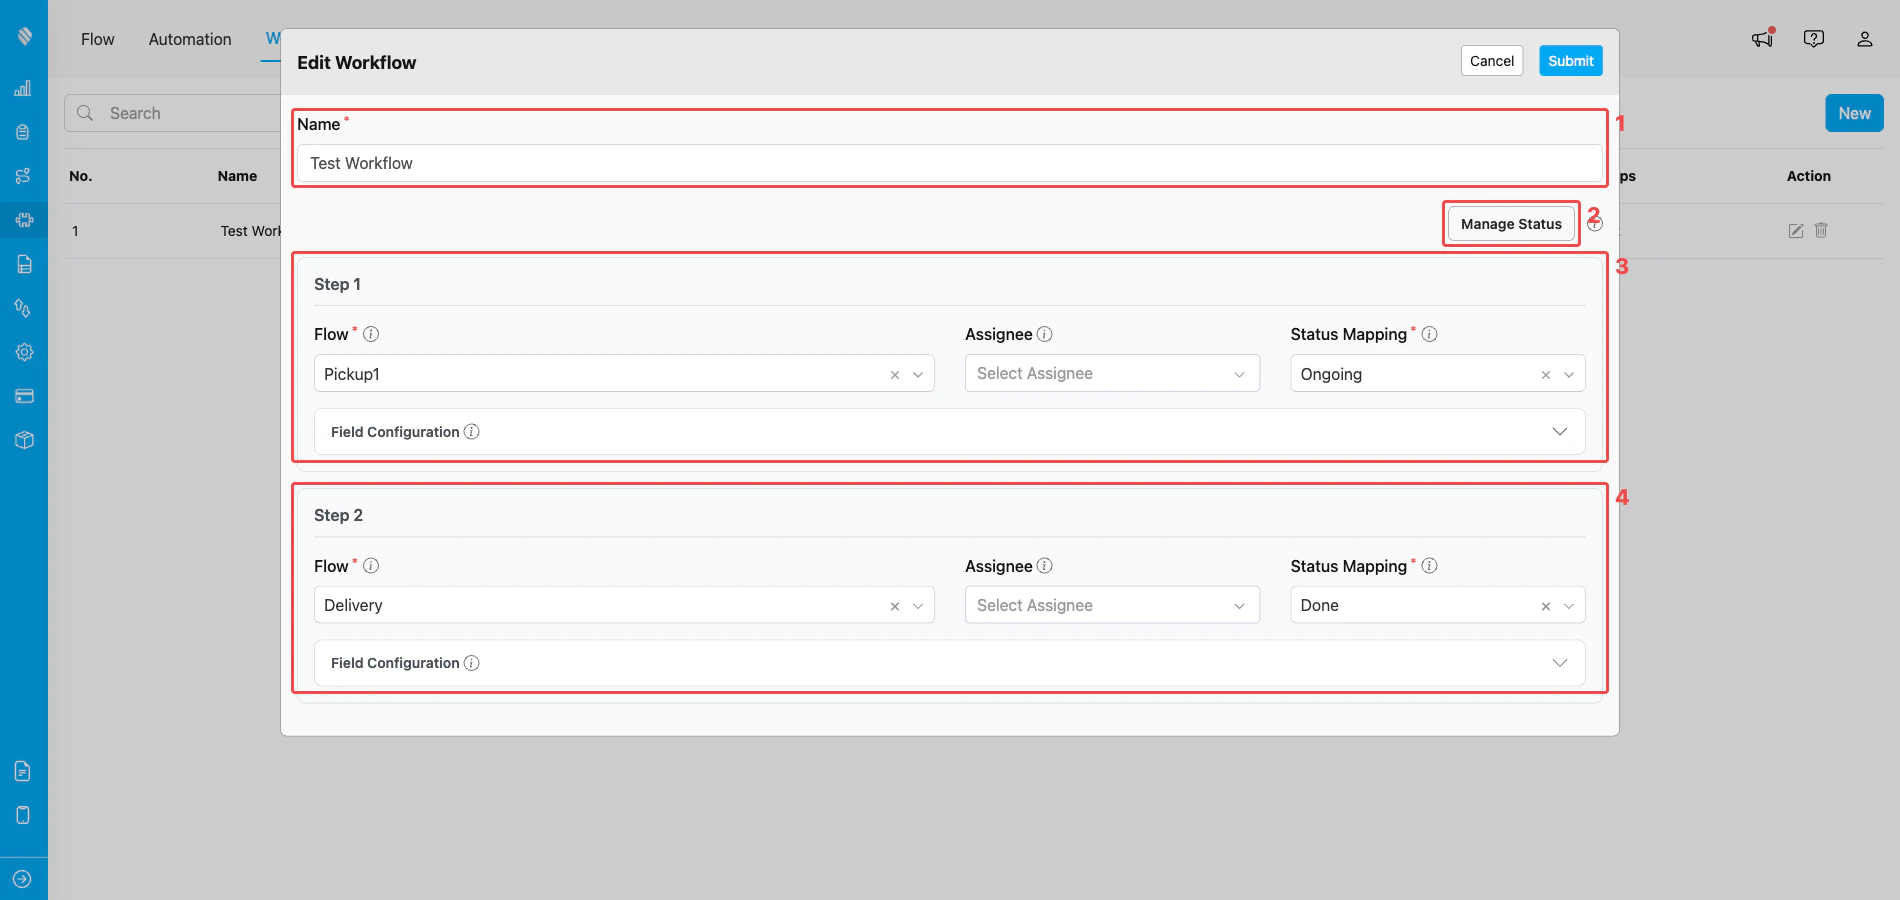
Edit Workflow modal pre-filled with the Workflow’s current configuration
- Workflow Name — rename the Workflow. The new name must still be unique within your organization and between 2 and 100 characters.
- Manage Status — open the Manage Status modal to add, rename, or remove custom statuses used in Status Mapping.
- Step 1 card — change the Flow, Assignee, Status Mapping, or Field Configuration for the first step.
- Step 2 card (and any later steps) — change the Flow, Assignee, Status Mapping, or Field Configuration for each subsequent step.
What you can change
- Workflow Name — rename the Workflow.
- Flow on each step — switch the step to a different Flow.
- Assignee on each step — add or remove the default assignee.
- Status Mapping on each step — change which status the step maps to.
- Field Configuration on each step — change default values or field mappings between steps.
- Custom Statuses — add, rename, or remove statuses via Manage Status.
What you cannot change
Step order also cannot be changed after creation.Saving changes
Click Submit to save the changes, or Cancel to discard them. Saved changes apply to the Workflow definition immediately and affect any new Activity created from this Workflow afterwards.Deleting a Workflow
To remove a Workflow, click the trash icon (Delete) on the row in the Workflow list.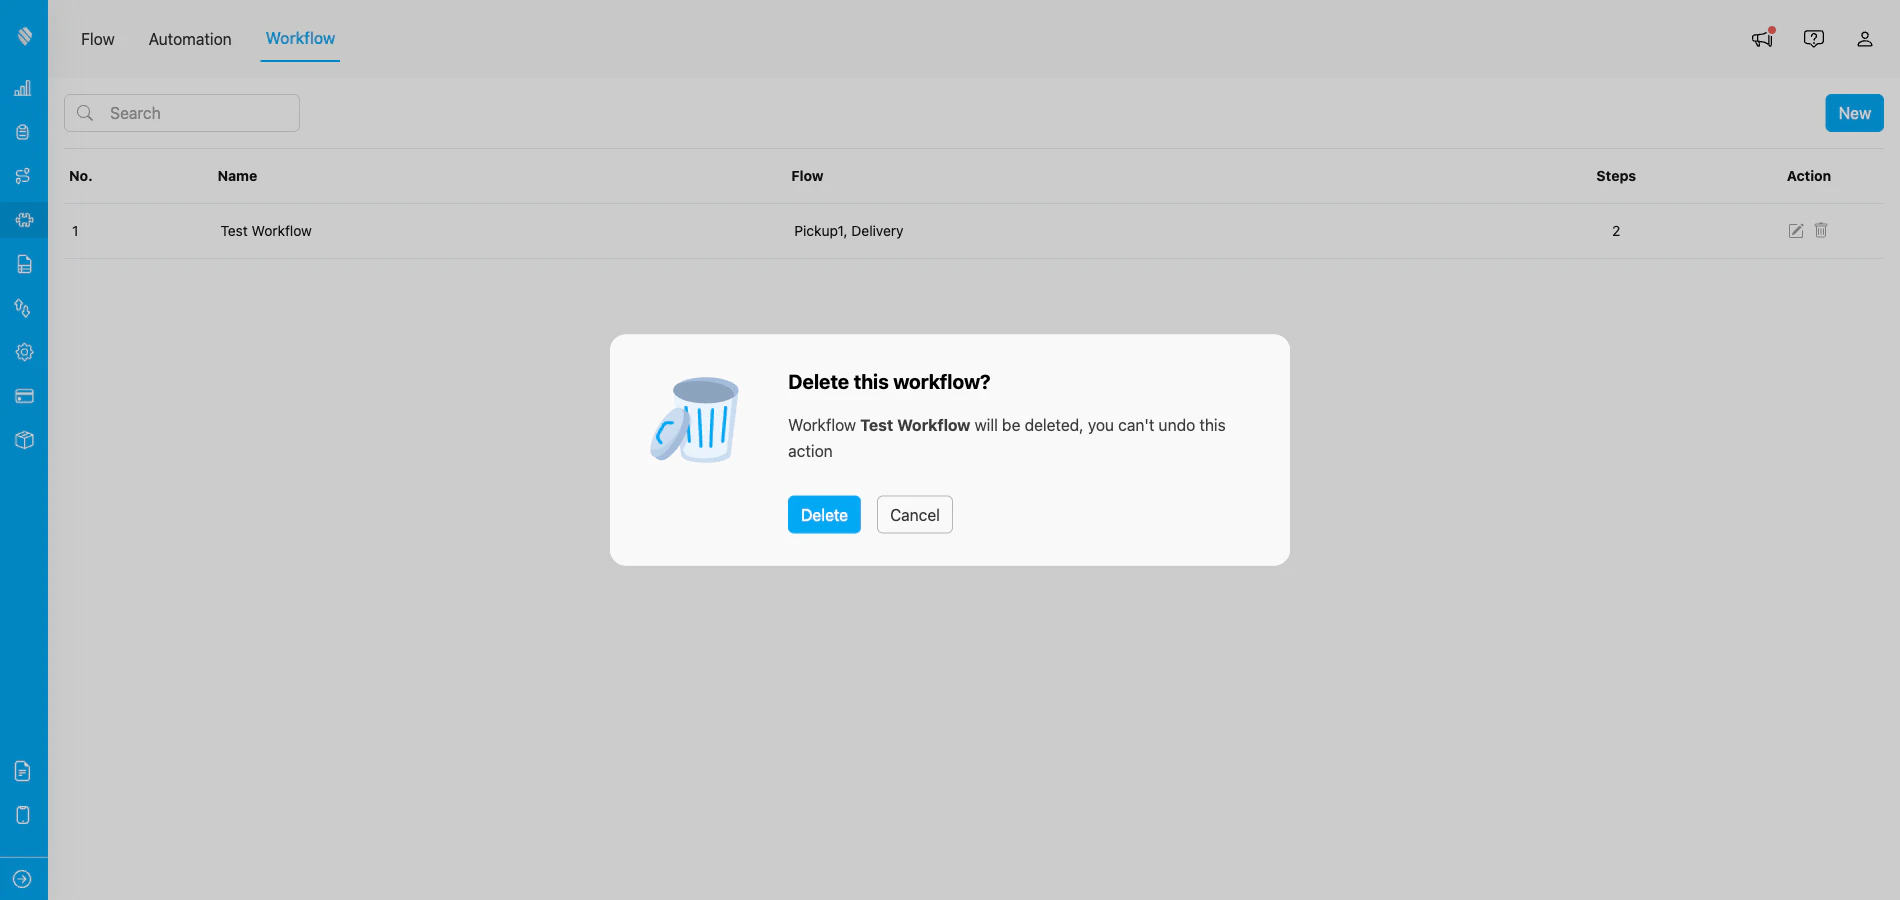
Delete confirmation dialog before the Workflow is removed
Frequently Asked Questions
Q: Can I add or remove steps from an existing Workflow? A: No. The number of steps is fixed after creation. To change the step count, create a new Workflow with the structure you need. Q: Can I rename a custom status that is already in use on a step? A: Yes, you can rename the status from the Manage Status modal. After renaming, review the Status Mapping on every step and pick the renamed status again where needed — step-level Status Mapping references are not updated automatically when a status name changes. Q: Why does the delete button show an error about active tasks? A: The system blocks deletion when there are Activities still using the Workflow, to prevent leaving those Activities in an inconsistent state. Complete or delete the dependent Activities, then retry. Q: Will editing a Workflow change my existing Activities? A: Edits to the Workflow definition apply to new Activities created after the change. Tasks that already exist for in-progress Activities are not re-created, so a step that has already produced a task keeps its current data. Q: Can I duplicate an existing Workflow as a starting point? A: There is no built-in duplicate action. Create a new Workflow manually and reproduce the steps you need. Q: Can I delete a default status? A: No. Default statuses are locked — their edit and delete icons are hidden in the Manage Status modal. Only the custom statuses you added are editable or removable. Q: What characters can I use in a Workflow name, and how long can it be? A: A Workflow name must be between 2 and 100 characters and can only contain letters, numbers, and spaces. Special characters (such as!, @, #, &, *) are rejected on save.