

Required permission:
- View Task
- Do Task
When the “Do Task” icon appears
The Do Task icon is a small clipboard-check icon in the Action column of the Task list. It only shows up when all of these conditions are true:- The task is assigned to the user currently logged in on the web.
- The task’s Start time has already passed (the task has started).
- The task’s End time has not yet passed (the task hasn’t expired).
- The task is not yet Done.
Step 1: Open the task from the Task list
Sign in to web.mile.app, open the Task menu in the sidebar, and locate the task you want to complete.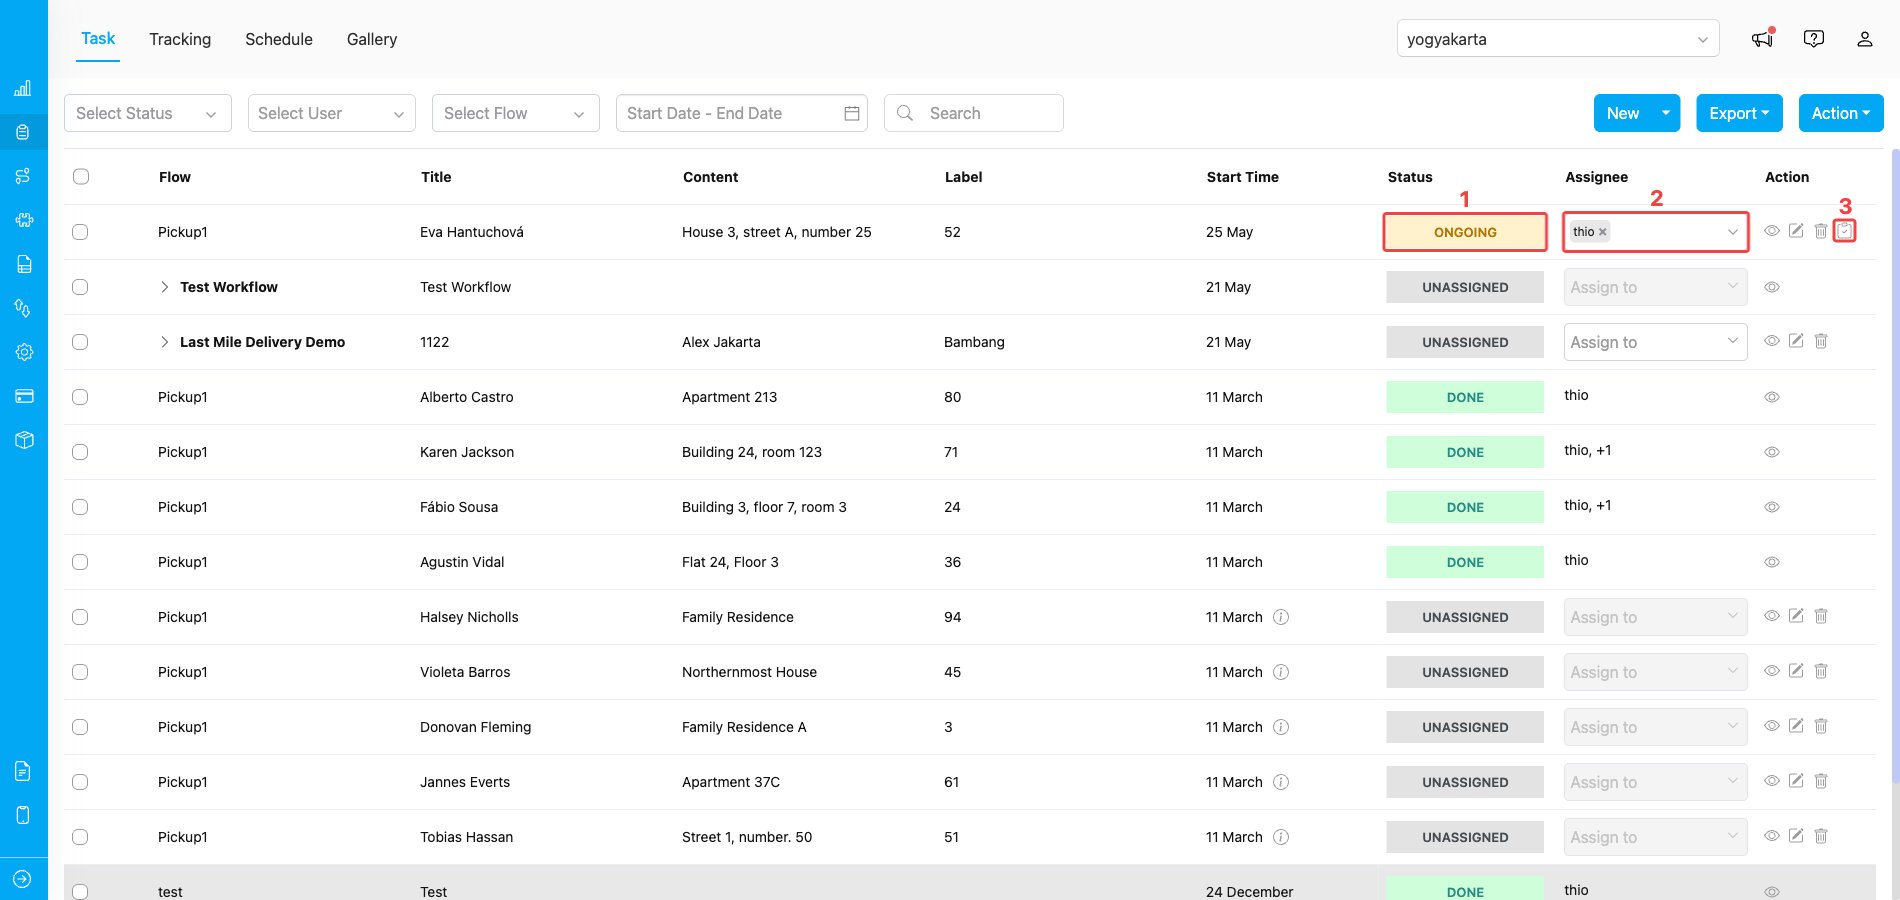
Task list — the row for the active task shows the Do Task icon at the far right
- Status — Ongoing — the task must be in Ongoing status (assigned and within its start/end window). Tasks that are still Unassigned or already Done will not show the Do Task icon.
- Assignee — the task must be assigned to you (the user currently signed in). The Do Task icon only appears on tasks where your own name is in this column; if another person’s name is shown, the icon will not be there for you.
- Do Task icon (clipboard check) — the small clipboard icon at the right of the Action column. Hover to see the Do Task tooltip; click to open the task execution view.
Step 2: Fill in each page of the Flow
Clicking the icon opens the Do Task dialog. It loads the same form the field worker would see on the mobile app — same pages, same components, same validation. Whatever you fill in here gets saved on the task exactly as a mobile submission would.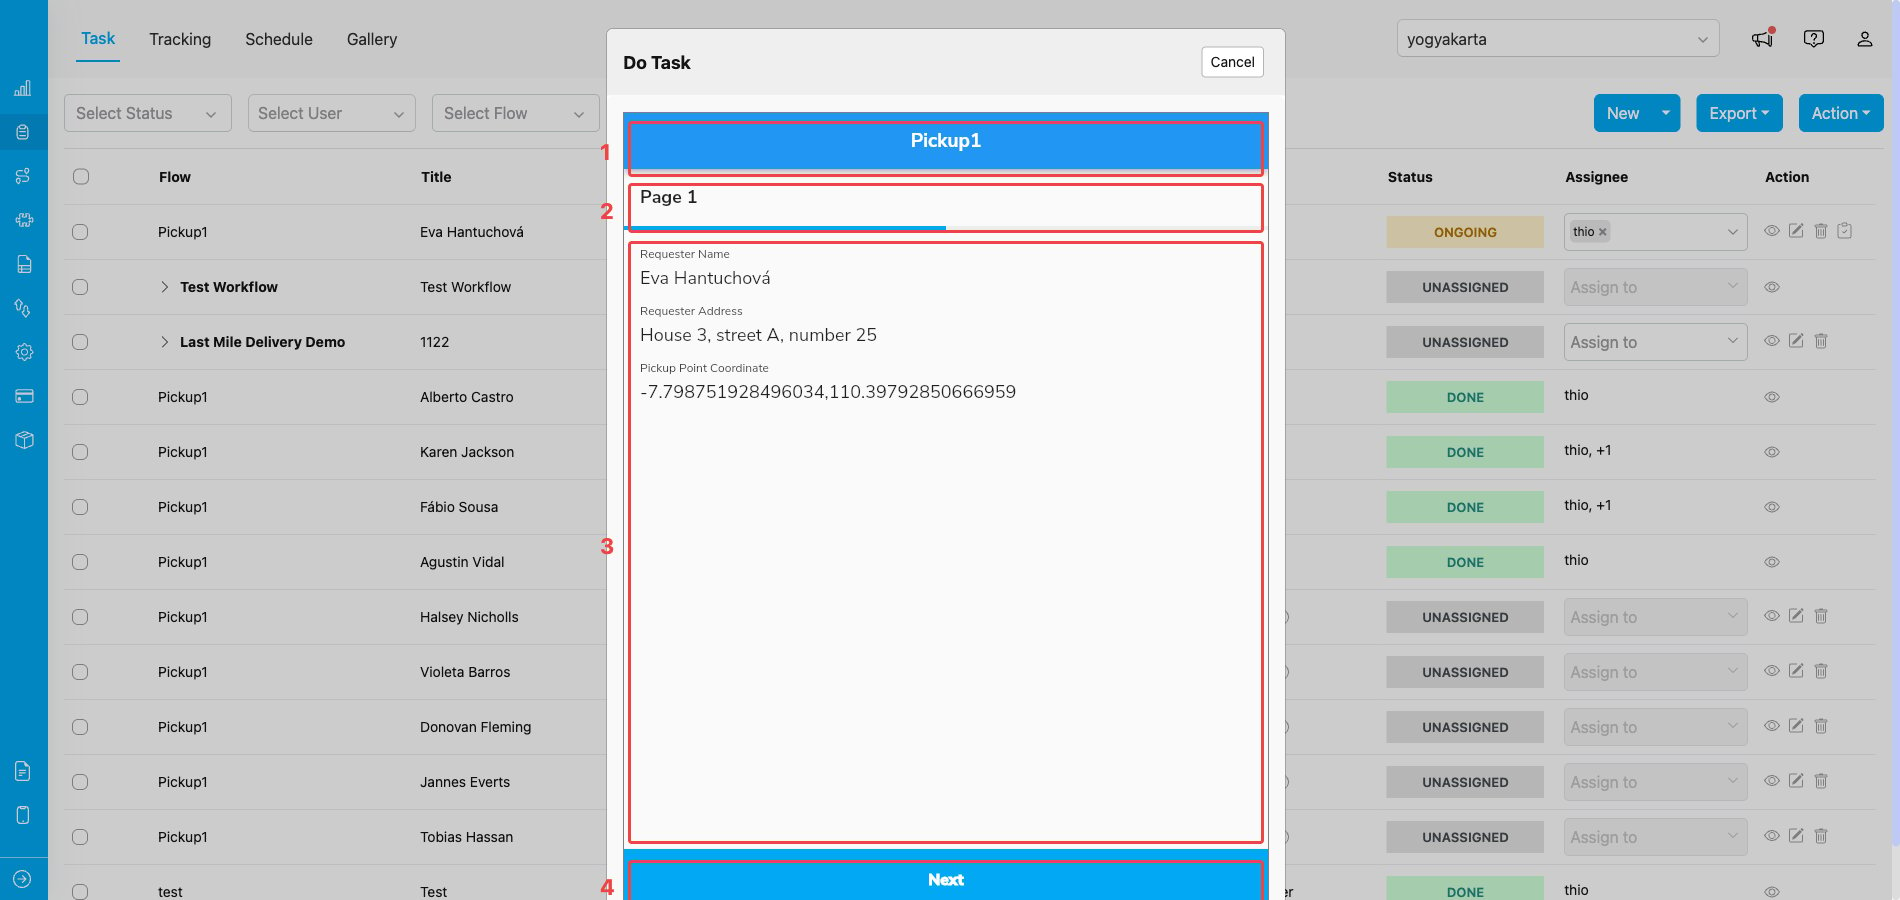
Do Task dialog rendering the first Mobile App Page of the Flow
- Flow name header — the blue bar at the top shows the Flow that drives this task (e.g., Pickup1). It’s a reminder of which Flow you are running, especially if you do tasks from several Flows in a row.
- Page indicator — Page 1, Page 2, and so on. The Flow may have one page or many; MileApp shows them in the order the Flow Builder defines.
- Form fields — every component on the current page (Input, Photo, Signature, List, etc.). Fields that already have data (mapped from the Initial Page or copied from an earlier step) are pre-filled. Required fields must be filled before you can move on.
- Next — the blue button at the bottom advances to the next page. It is replaced by Finish Task on the last page.
Step 3: Finish the task
When you reach the last page of the Flow, the Next button changes to Finish Task. That last page is usually where you capture proof (a photo, a signature, a final value) before completion.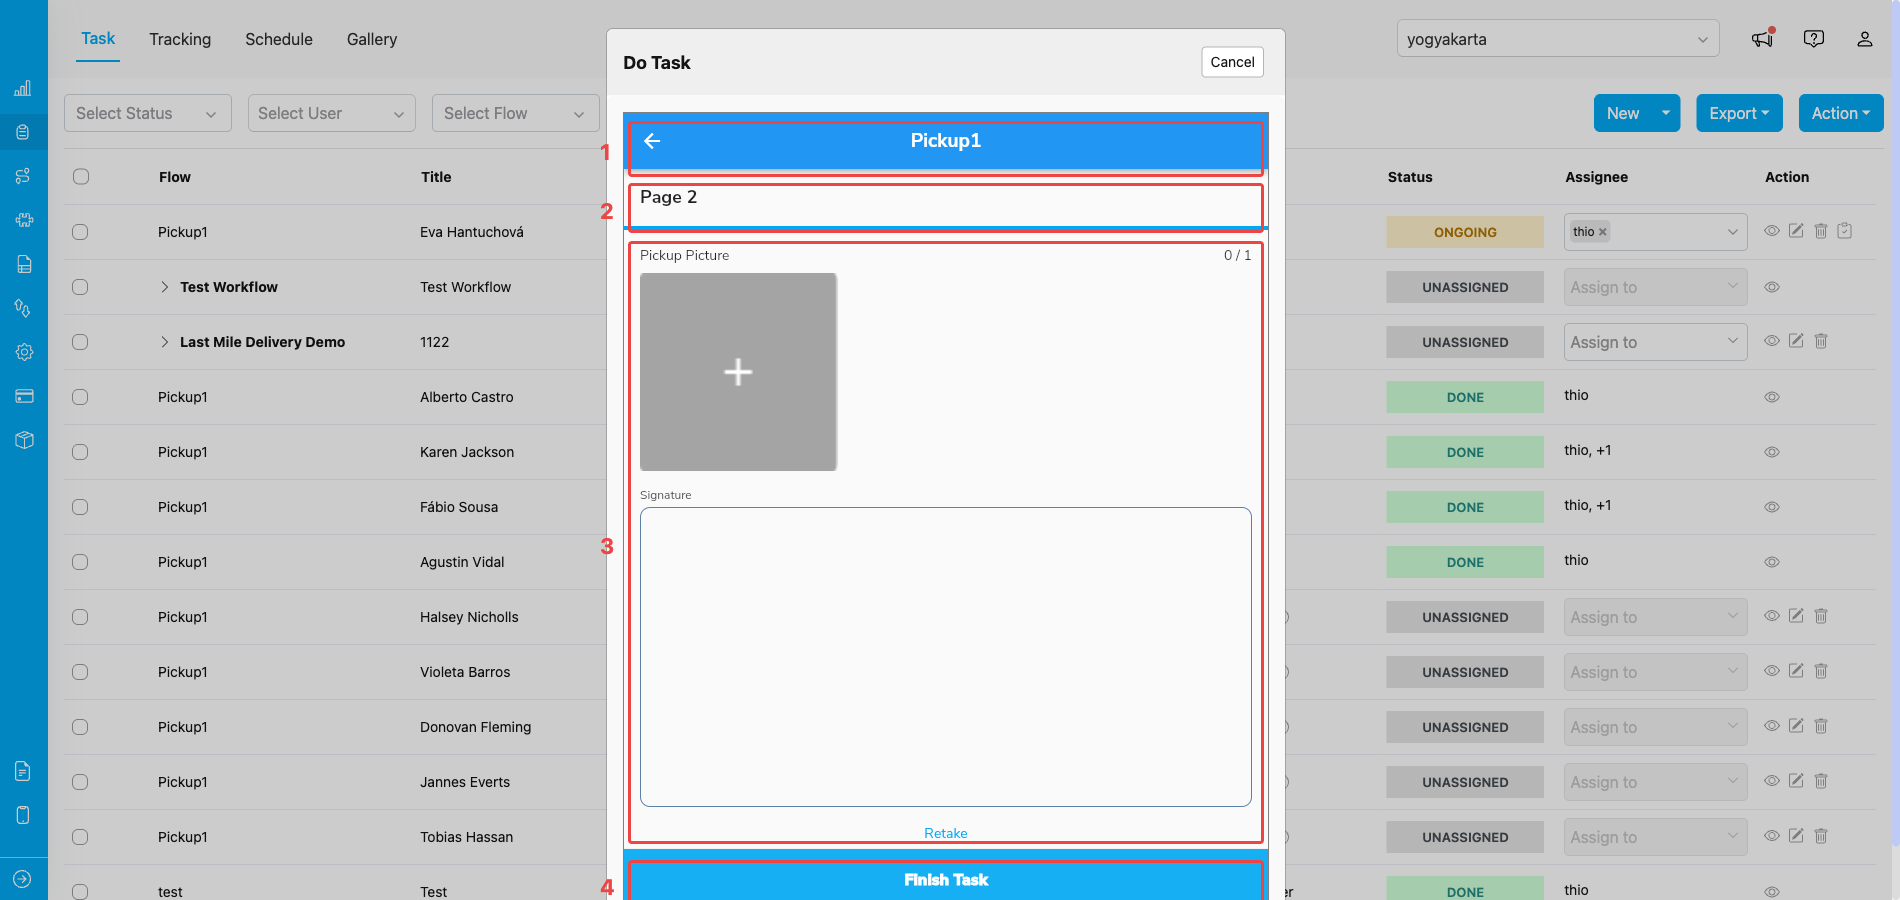
Do Task dialog on the last page — the Next button is replaced by Finish Task
- Back arrow + Flow name — the left arrow next to the Flow name takes you to the previous page if you need to fix something before finishing.
- Page indicator — Page 2 in this example. Every Flow’s last page renders the Finish Task button instead of Next.
- Form fields — the final-page components, often a Photo (e.g., proof of delivery) and a Signature. Both must be filled in if the Flow marks them as required.
- Finish Task — the blue button at the bottom submits the task as Done. Once you click it, MileApp closes the dialog and the task in the list flips from Ongoing to Done.
- The task status changes to Done in the Task list.
- The Do Task icon disappears from that row (because the task is no longer active).
- The task’s detail records Done from: WEB, so admins can distinguish web-completed tasks from mobile-completed ones.
Reviewing what you completed
Open the eye icon on the task row to see its full detail, including the data you just filled in, Done by, Done time, and Done from (which will read WEB for any task finished through this flow). The completed task continues to appear in the Task list (with Done status) so you can refer back to it any time, or export the data along with other tasks.Frequently Asked Questions
Q: I see the task assigned to me but the Do Task icon is missing — why? A: Check the start/end time. If the task hasn’t started yet, or has already expired, MileApp hides the icon. The other common cause is being signed in as the wrong user (the icon only appears for the task’s exact assignee). Q: Can I do a task that’s assigned to someone else? A: Not directly. You need to reassign the task to yourself first from the Task list, then the Do Task icon will appear on your view. Q: I clicked Do Task but the dialog shows a loading screen and never finishes — what should I do? A: This usually means the embedded view didn’t load. Clear your browser cache or do a hard reload (Cmd/Ctrl + Shift + R) and try again. Q: Can I cancel halfway through? A: Yes. Click Cancel at the top-right of the Do Task dialog and the task stays Ongoing — nothing is saved until you click Finish Task on the final page. Q: Does doing a task from the web count differently in billing? A: No. The task is the same regardless of whether it was completed via web or mobile. MileApp simply recordsdoneFrom: WEB versus doneFrom: MOBILE so admins can audit the channel; both count once toward your monthly task quota.
What’s next
- Creating A Task — create the tasks you’ll eventually complete here.
- Assigning Task — make sure the task is assigned to the right person (you) before doing it.
- Do Task reference — fuller reference of the Do Task feature, including the conditions that hide the icon.