What is the Photo Component?
The Photo component renders as a tile in the mobile app. Each tile can hold one image; tapping the + button opens the device camera (and optionally the gallery picker). The component enforces a configurable range for how many photos must be captured and how many are allowed per task. Use Cases:- Proof of delivery — Capture the package at the drop-off location
- Pickup verification — Photograph the parcel and pickup point on collection
- Damage report — Document damaged goods on arrival
- Site inspection — Record the condition of a location during a visit
- Receipt or signed form — Attach a scanned document to the task
Photo Component Properties
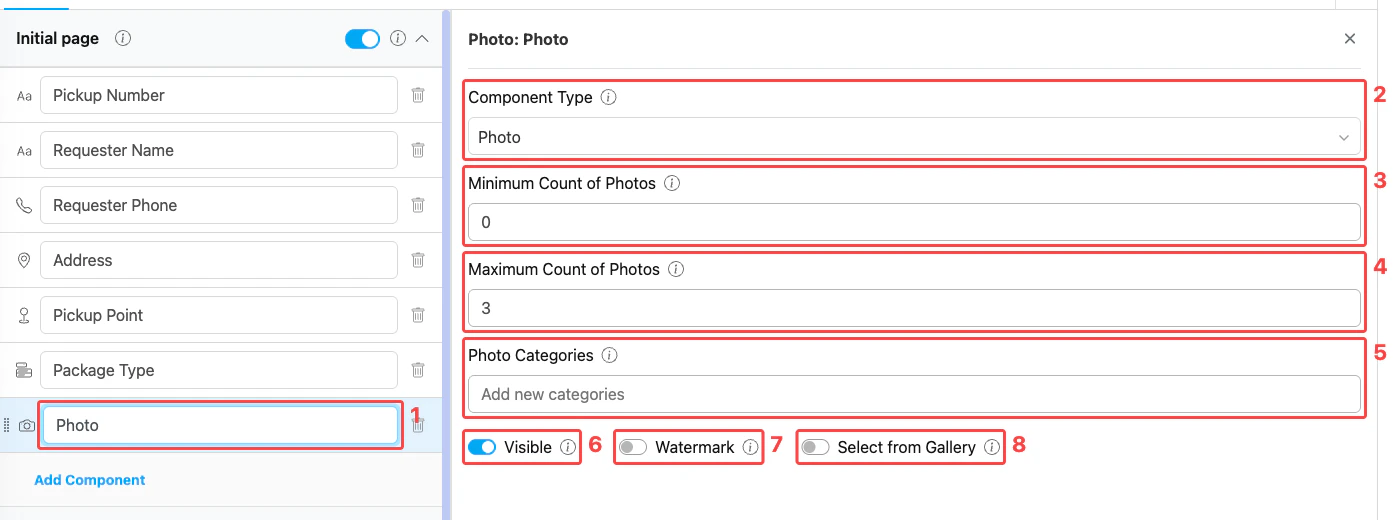
Photo component settings panel
- Title — Component label shown to field workers (e.g., “Pickup Picture”, “Delivery Proof Photos”)
- Component Type — Set to Photo
- Minimum Count of Photos — Minimum number of photos the worker must capture before the page can be completed. Setting this above
0effectively makes the component required. - Maximum Count of Photos — Maximum number of photos allowed for this component (range 1–10, default 10)
- Photo Categories — Optional list of labels that classify each captured photo (e.g.,
front,back,damage). Type a category name and press Enter to add it. - Visible — Controls display on Create Task (web and mobile) and View Task (mobile). Hidden components still export their data.
- Watermark — When on, captured photos are stamped with a timestamp and the device’s GPS location.
- Select from Gallery — When on, the worker can pick an existing image from the device gallery instead of taking a new one.
A Photo component is “required” implicitly: set Minimum Count of Photos to
1 or more, and the worker cannot save the task until at least that many photos are captured.How to Configure the Photo Component
Step 1: Add the Component
In the Flow Builder, open the target page and click Add Component. Set Component Type to Photo.Step 2: Set the Title
Enter a descriptive Title (e.g., “Pickup Picture”, “Delivery Proof”). This label appears above the photo tiles on the mobile app.Step 3: Set Min and Max
- Minimum Count of Photos — How many photos must be captured before the task can be saved (use
0for optional,1+to make it mandatory). - Maximum Count of Photos — Cap the total number of photos the worker can add (1–10).
Step 4: Configure Capture Options
- Turn on Watermark when you need verifiable proof — captured photos get a timestamp and GPS overlay.
- Turn on Select from Gallery to let the worker reuse an existing image instead of forcing a new capture.
- Leave Visible on for normal use. Turn it off only when the component should be hidden from both the web admin form and the mobile app but still exported on completed tasks.
Step 5: Add Photo Categories (optional)
Use Photo Categories when you want to group photos into named slots (e.g.,front, back, damage). Each tile then asks the worker to pick a category when capturing the photo. Leave empty if all photos can be uncategorized.
Step 6: Save
Click Save in the Flow Builder. The component is now live in any task created from this flow.How Photos Work in Tasks
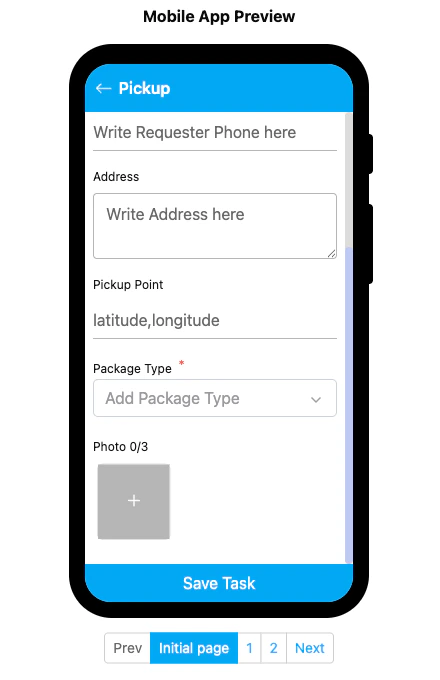
Photo component rendered on the mobile preview
- The Photo section shows the title and a counter such as
Photo 0/3(current/max). - Tap the + tile to launch the camera (or the gallery if Select from Gallery is enabled).
- Captured photos appear as thumbnails on the tile grid; tap a thumbnail to view or delete.
- If Watermark is on, the timestamp and coordinate are baked into the saved image.
- The worker cannot save the task until the Minimum Count of Photos is satisfied.
Related
- Component: Video — Capture or upload short videos for similar field documentation needs
- Component: Signature — Capture a hand-drawn signature instead of an image
- Gallery — Browse all photos attached to completed tasks
- Flow Builder Overview — Reference for every part of the Flow Builder