- See every role currently available (the four built-in ones plus any you have added).
- Toggle which permissions each role has, grouped by module so they are easy to find.
- Create a brand-new role when the built-in four do not match the way your team actually works.
Required permission:
- View Permission
- Edit Permission (only needed to make changes)
Accessing the Permission page
Open the Settings icon in the left sidebar, then click the Permission tab at the top of the page. The page loads with two main areas: the Role list on the left and the permission matrix on the right.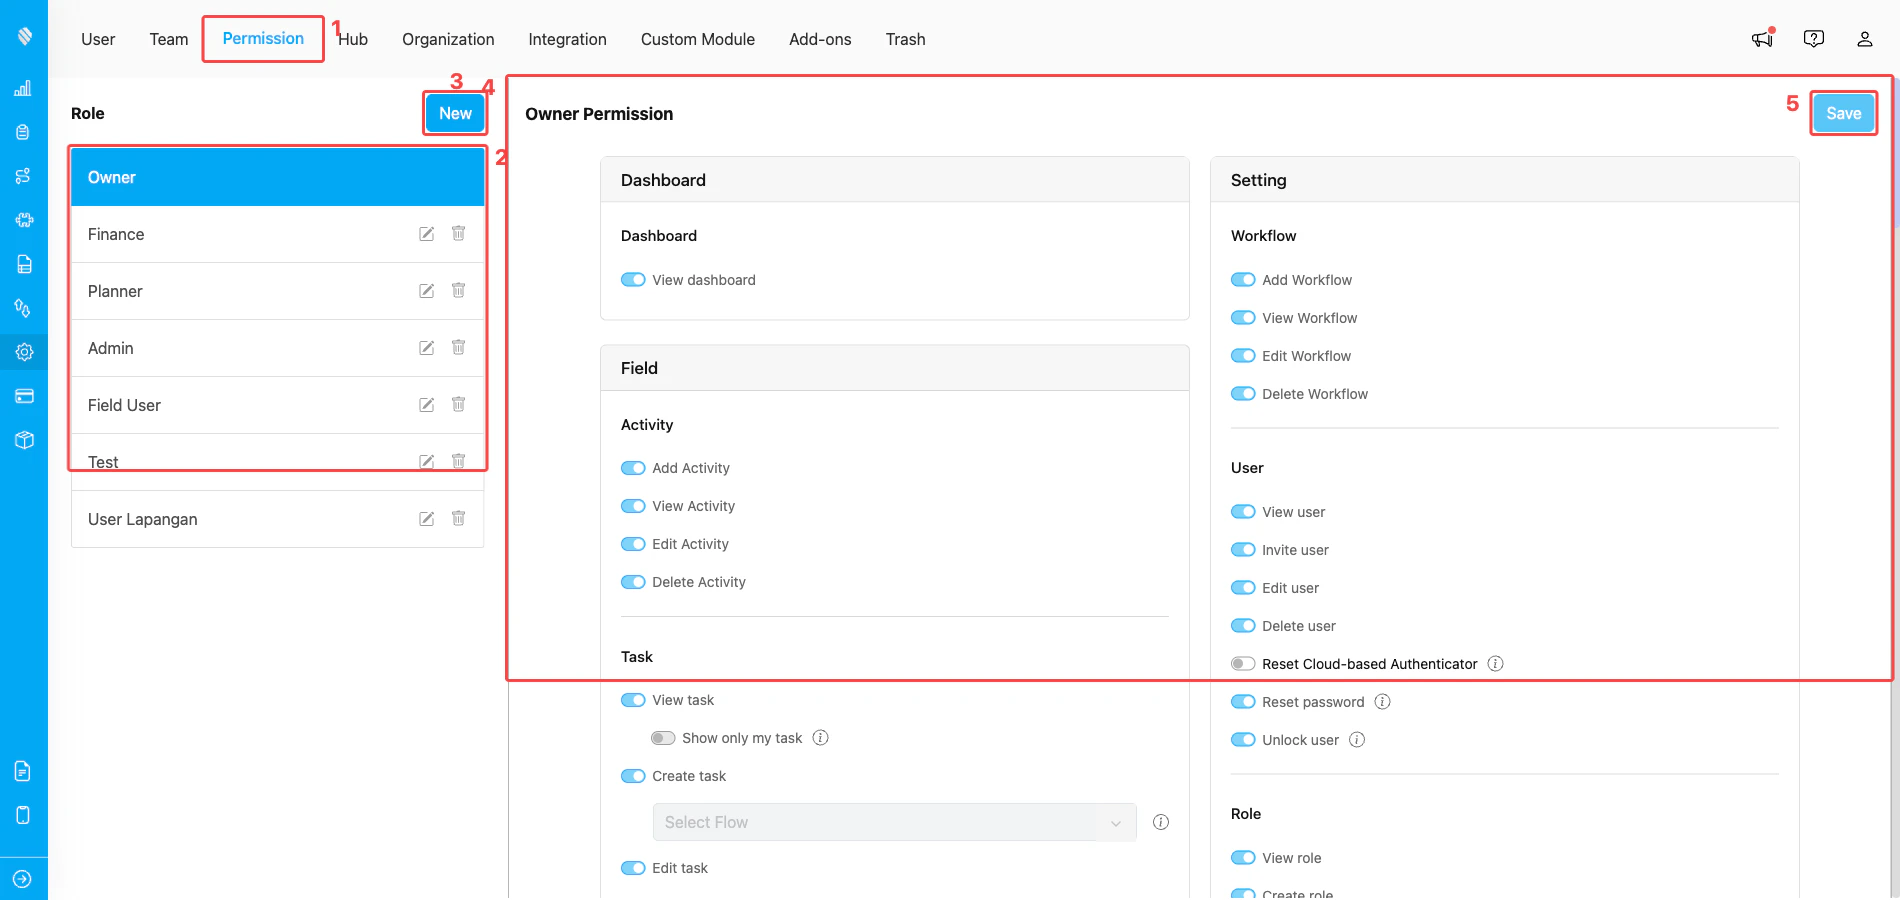
Setting → Permission page — role list on the left, permission cards on the right
- Permission tab — open it from the Settings top navigation. Visibility of this tab is gated by the View Permission slug.
- Role list — every role available in your organization, including the four built-in roles (Owner, Admin, Planner, Field User) and any custom roles you create. Click a role to load its permission matrix into the right side; the pencil and trash icons next to each row open the inline edit and delete actions for that role.
- New — open the Create New Role dialog to add a custom role with its own permission set.
- Permission matrix — every permission for the currently selected role, grouped by module (Dashboard, Field, Setting, etc.). Each toggle turns a permission on or off for the selected role. The Owner role’s toggles are read-only because Owner always has every permission.
- Save — commit the toggles you have changed. The button stays disabled until you actually modify a permission. Switching to another role discards unsaved changes, so click Save before navigating away.
Roles Overview
Every organization starts with four built-in default roles that cover the most common job profiles. You can adjust their permissions and create more roles next to them, but you cannot rename or delete the default ones.- Owner — has every permission and is the only role that can act on billing and organization deletion. There is always exactly one Owner per organization, and the role cannot be turned off, renamed, or deleted.
- Admin — designed for workspace administrators. Comes with broad access to tasks, flows, settings, and billing so an Admin can manage day-to-day setup without being the Owner.
- Planner — designed for users who plan field work: creating tasks, assigning them to field users, and running route optimization.
- Field User — for the people who actually do the work in the field (drivers, sales, technicians). Their default permission set is scoped to mobile-app actions like running tasks and capturing data.
Role Restrictions and Permissions
Owner role:- The Owner cannot be deleted, demoted, or renamed because of billing-related constraints — the organization always needs exactly one Owner.
- Only the Owner can:
- Invite another user as Owner.
- Change another user’s role to Owner.
- Delete the current Owner (by transferring ownership first).
- Non-Owner roles cannot:
- Invite users to the Owner role.
- Change their own role or another user’s role to Owner.
- Modify Owner-only fields such as Name, Phone Number, Hub, or Team.
- Delete an Owner.
Custom role rules
Click New at the top of the role list to open the Create Role dialog. From there you only need to fill in a name and (optionally) seed the new role from another role’s permission set.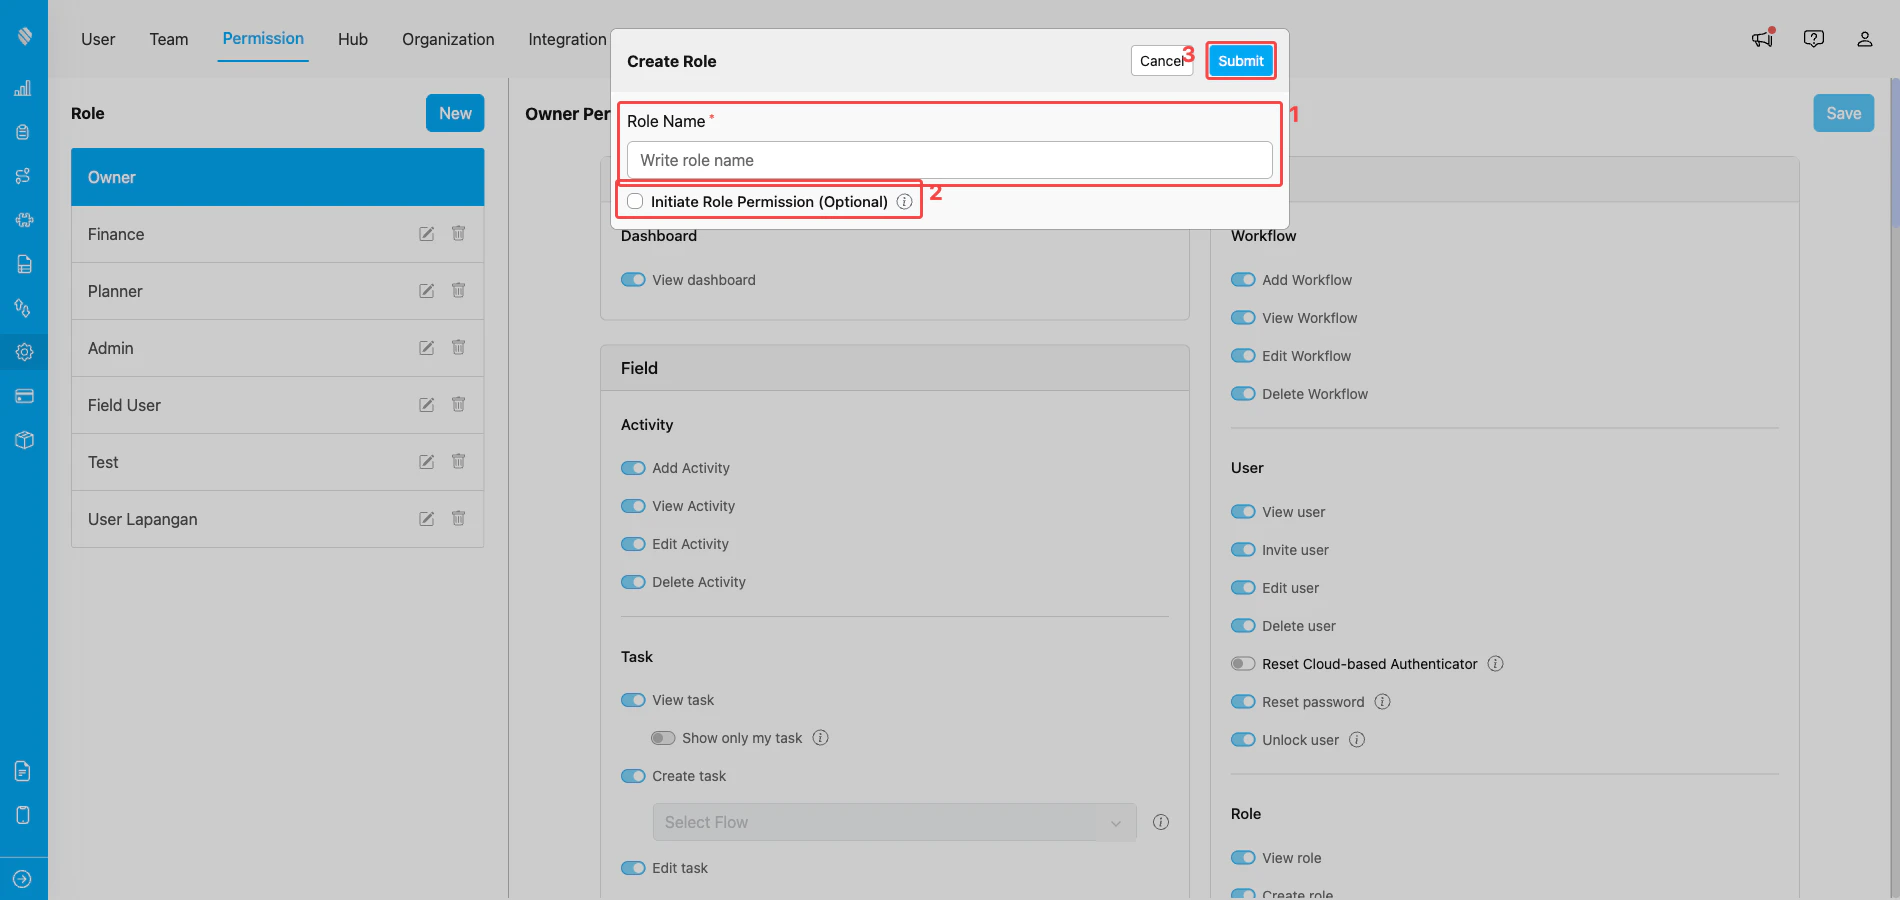
Create Role dialog opened from the Permission page’s New button
- Role Name — the display name of the new role. It must be unique within your organization; duplicate names are rejected with an inline error.
- Initiate Role Permission (Optional) — tick this to copy an existing role’s permissions into the new one as a starting point. When enabled, a Select Role dropdown appears; pick the role you want to clone from. Leave it unticked to start with an empty permission list.
- Submit — saves the new role. It immediately appears in the role list on the left and you can fine-tune its permissions in the matrix on the right.
- The role name must be unique within your organization. Duplicate names are rejected with an inline error.
- A role must have at least one permission assigned before it can be saved.
- A role that is currently assigned to one or more users cannot be deleted — reassign those users to another role first, then retry the delete.
- Default roles (Owner, Admin, Planner, Field User) cannot be deleted, and their names cannot be changed.
What permissions look like inside a role
The permission matrix on the right is split into module sections (Dashboard, Field, Routing, Flow, Setting, Billing, etc.). Each section lists individual permissions as a toggle row — for example View task, Create task, Edit task, and Delete task all live under the Task module. Some permissions also expose per-permission scopes when they are turned on. Scopes let you narrow what the permission actually grants, instead of giving an all-or-nothing grant. The Task module is a good example: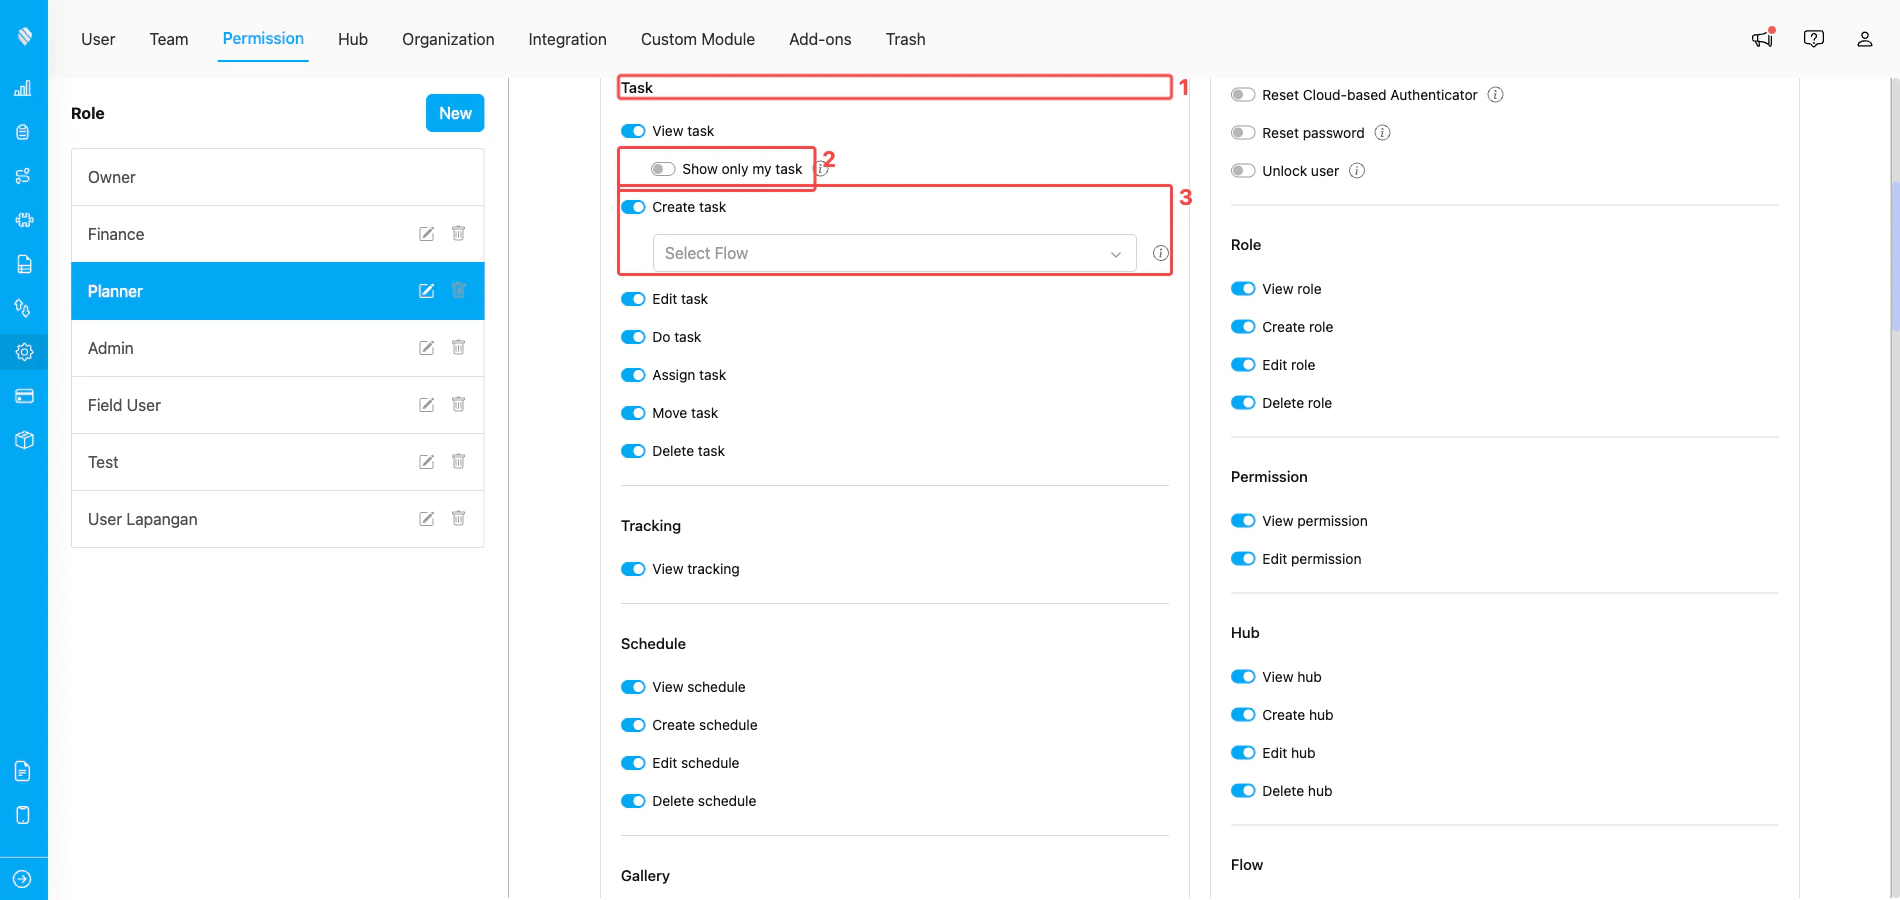
Per-permission scopes inside the Task module on the Planner role
- Task module — the section header that groups every task-related permission together (View, Create, Edit, Do, Assign, Move, Delete).
- Show only my task — a sub-toggle of View task. When on, the role only sees tasks assigned to them; when off, the role sees every task in the organization. Use this to give a Planner view-everything access while restricting a Field User to their own queue.
- Create task → Flow picker — when Create task is on, a Select Flow dropdown appears below it. Pick one or more Flows to restrict which Flow types the role can create tasks for. Leave it empty to allow every Flow.
What happens when a permission is missing
When a user opens a menu or clicks an action that their role does not have, MileApp blocks the request and shows an inline message asking them to contact an admin. The block is enforced both in the UI and on the API, so the same gate stops requests that try to bypass the interface. If you run into one of these messages, note the action you were trying to do, then ask your organization Owner or Admin to enable the matching permission on your role from this Permission page.What’s Next
- Setting Permission — reference of every permission, grouped by module.
- Managing Custom Role — step-by-step guide for creating, renaming, and deleting custom roles.
- Field Accessibility — restrict which Flow or Data Source fields a role can see.
- Access — control whether a role can sign in to the web admin, the mobile app, or both.
- User Management — assign these roles to actual users.
Related
- Organization Management — where the Owner role’s permissions matter most.
- Setting Permission — companion reference for every permission slug.