

- Accurate → MileApp: a Sales Order created in Accurate becomes a MileApp task automatically.
- MileApp → Accurate: finishing that task pushes a Delivery Order back into Accurate.
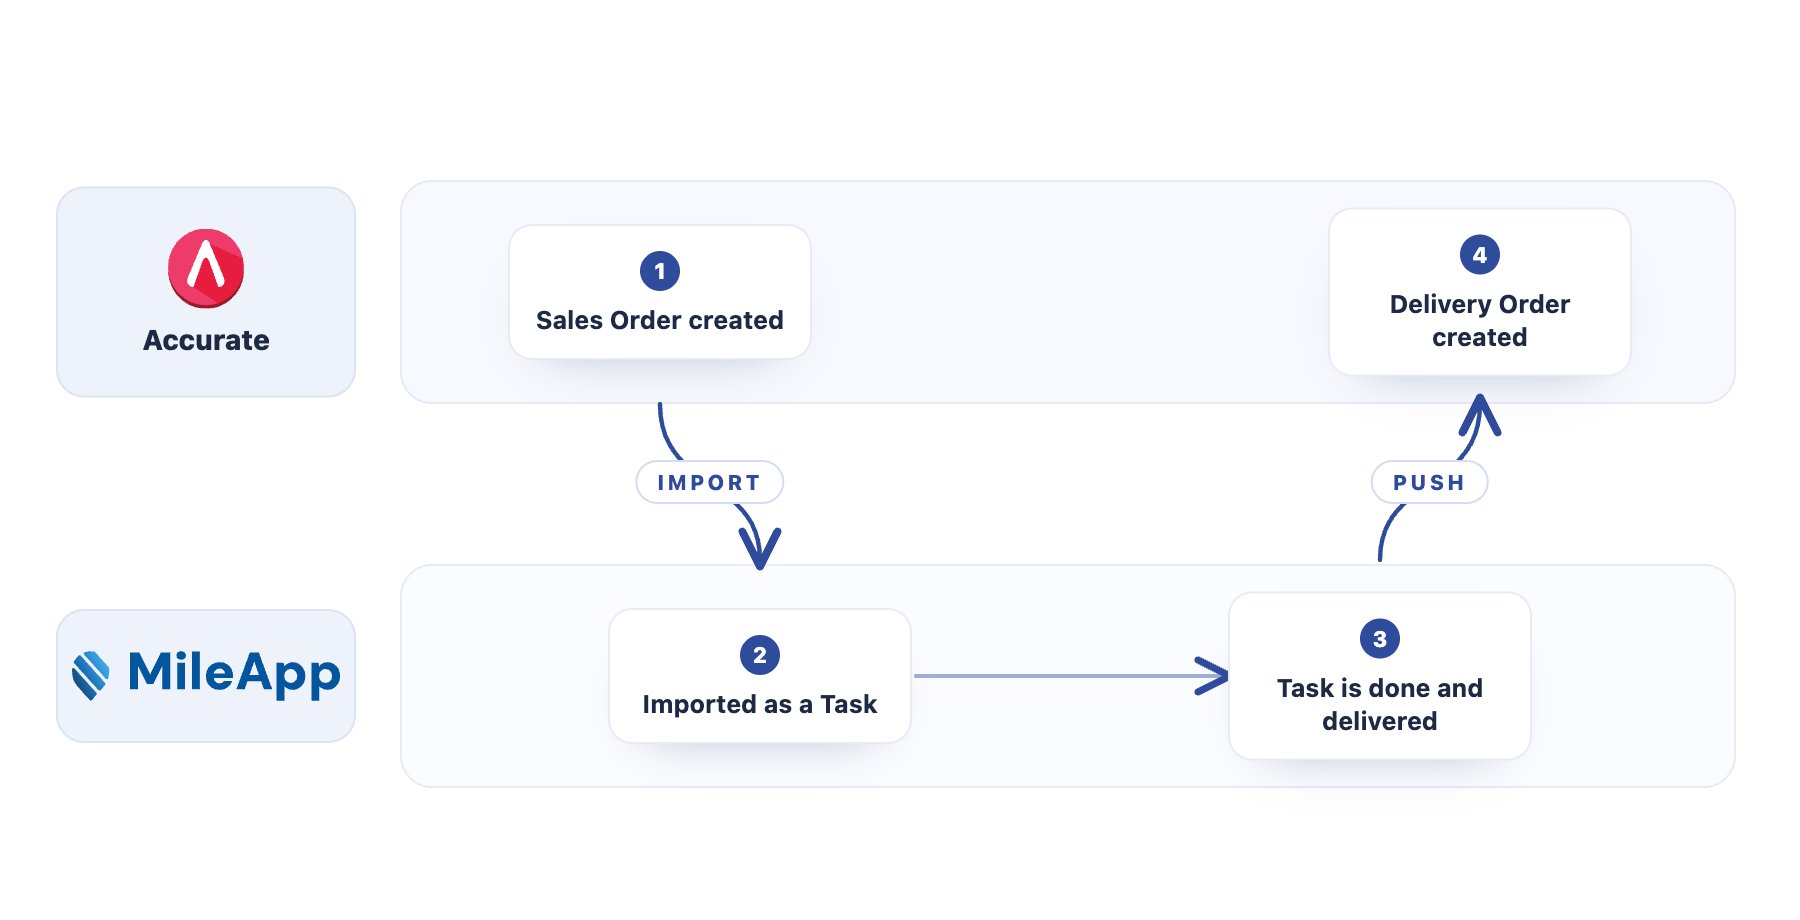
A Sales Order in Accurate imports as a MileApp task; when the task is done and delivered, a Delivery Order is pushed back into Accurate.
- View integration
- Create integration
Prerequisites
Before connecting, confirm you have:- An Accurate Online account: the cloud version, which is the one that provides the Open API this integration uses.
- At least one business data (data usaha) set up in your Accurate Online account.
- Admin access in MileApp: you need Create Integration permission to complete the connection.
- One Accurate account per MileApp organization: an Accurate account holds a single active connection at a time, so connecting it to another MileApp organization ends the first one. Use a separate Accurate account for each organization you want to sync.
Step 1: Connect Your Accurate Account
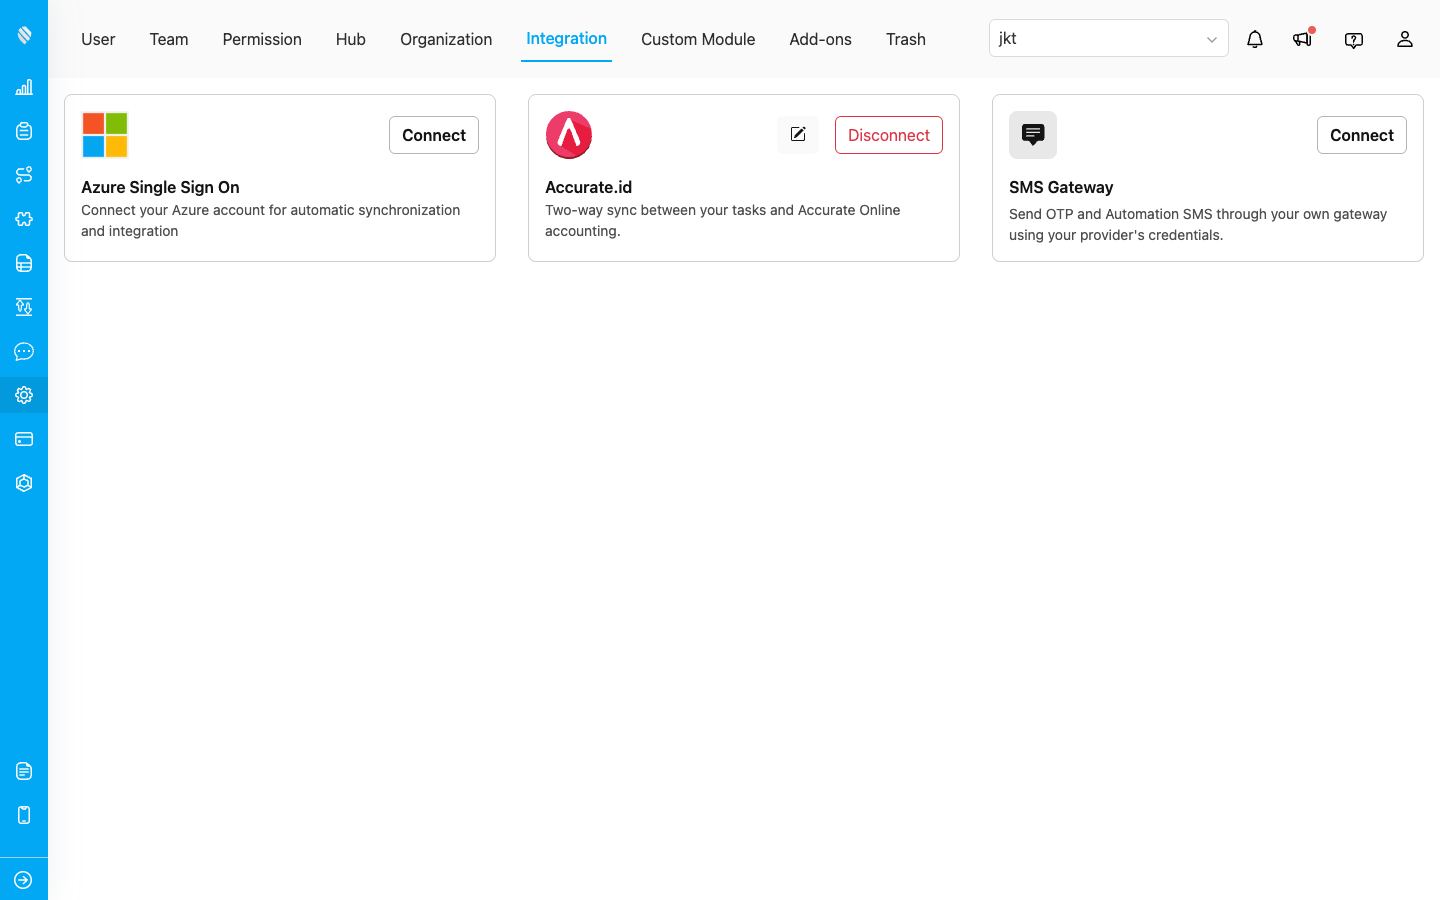
- In MileApp, go to Setting → Integration.
- Find the Accurate.id card and click Connect.
- You are redirected to Accurate’s authorization page. Log in with your Accurate credentials and click Grant Access.
- Accurate redirects you back to MileApp. A success message confirms the connection, and the Accurate.id card shows Connected.
Step 2: Choose Your Business Data
On the Accurate.id card, click the pencil icon to open the rules view. If your Accurate account holds several business data (companies), select the ones you want MileApp to work with. Every sync rule targets one business data, since values such as Customer, Item and Branch are identifiers that live inside a single company. To sync a second company, add a second rule. A business data you create in Accurate after connecting works straight away: add a sync rule for it and its Sales Orders start arriving. There is no need to reconnect.Step 3: Add a Sync Rule
The rules view has one tab per direction. Rules are grouped by business data, so all the rules for one company read together. A badge beside a business data name tells you when its rules cannot run: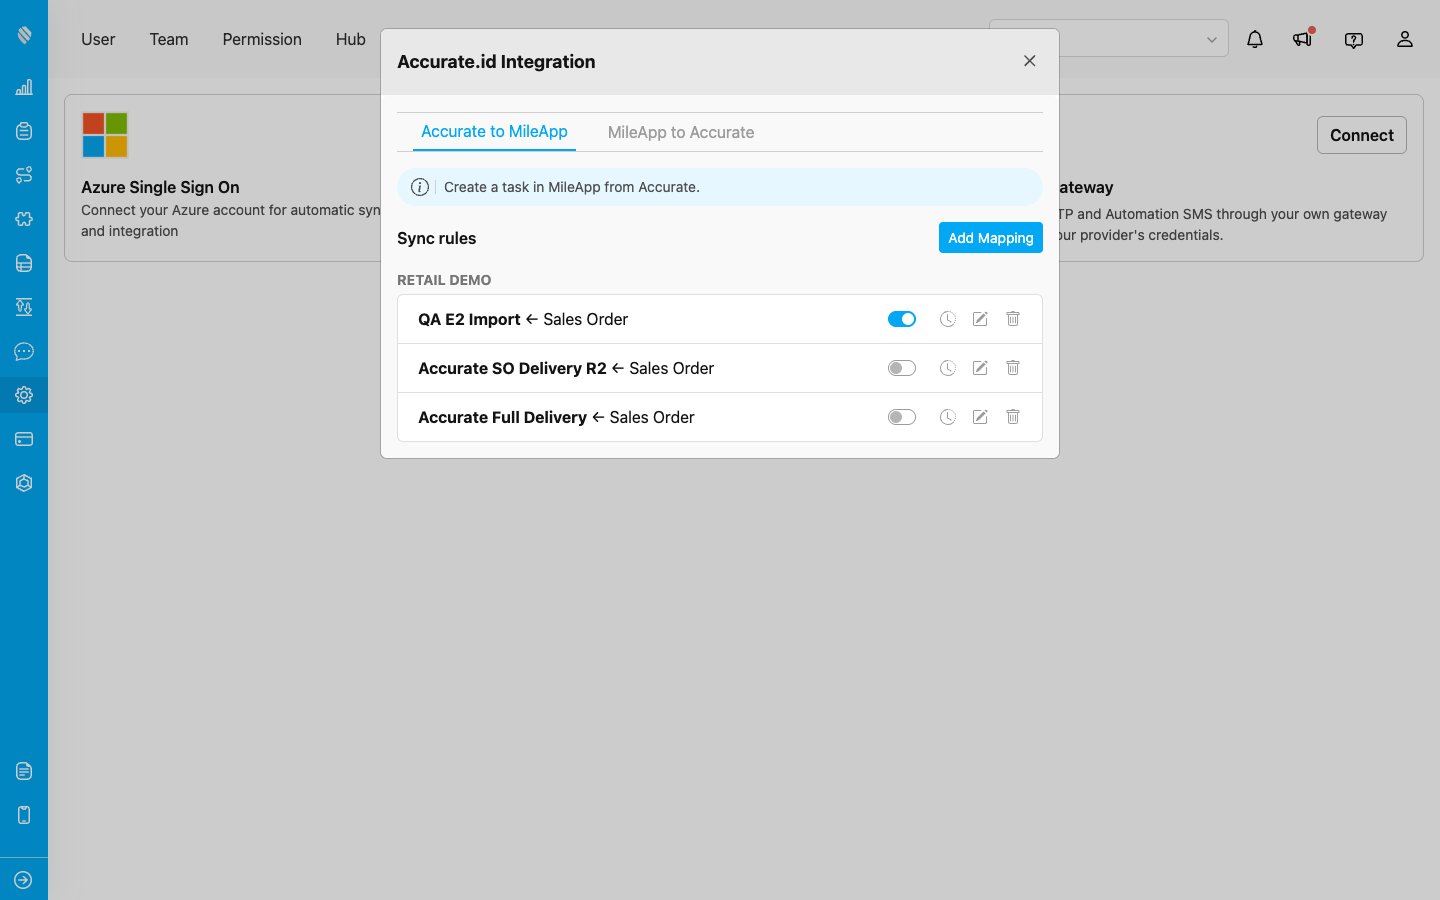
Accurate → MileApp
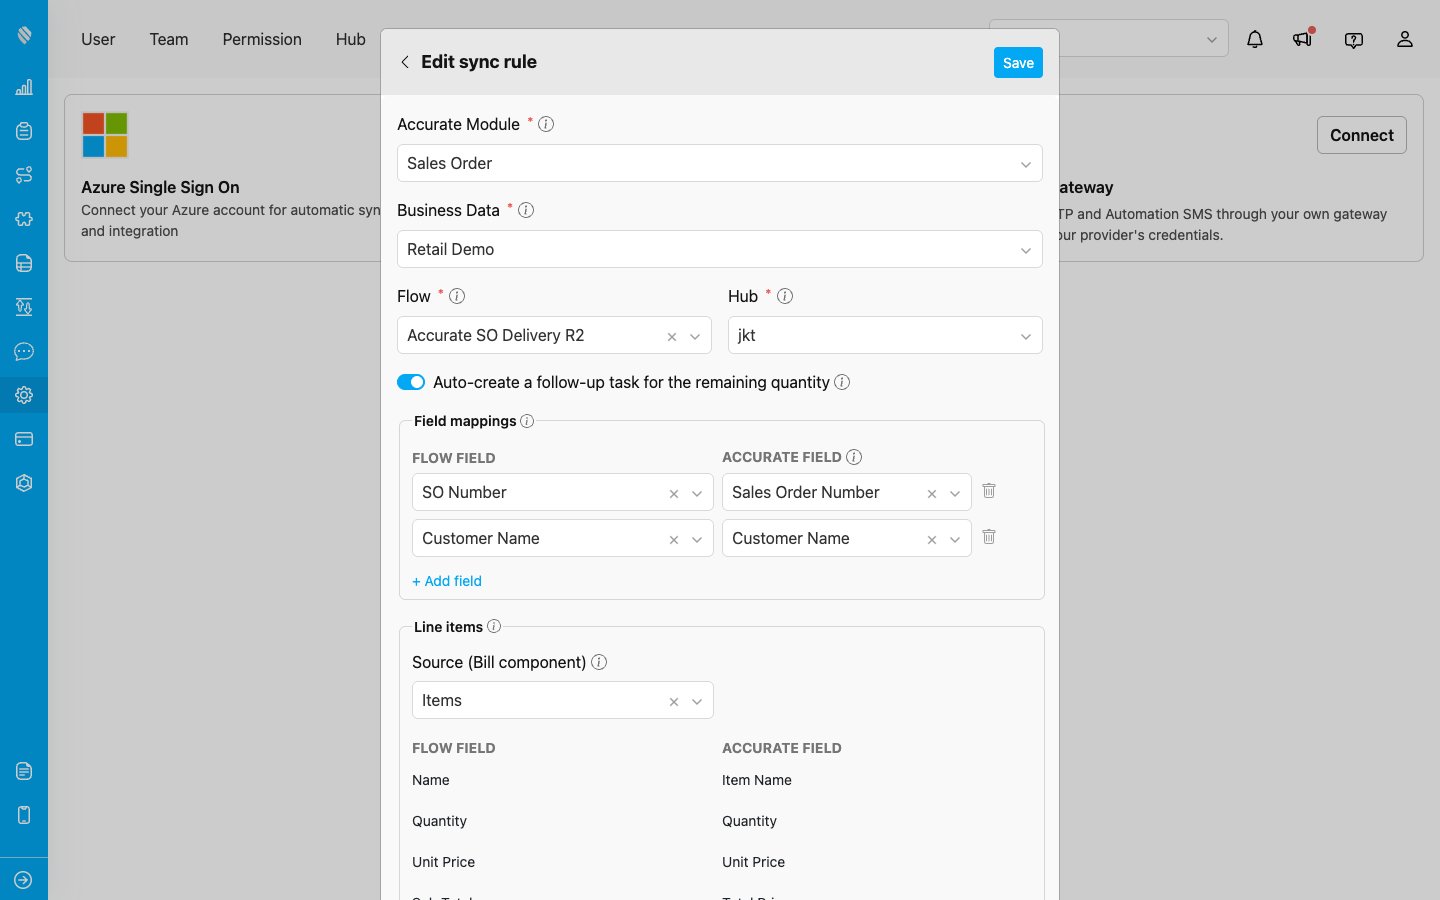
Click Add Mapping on the Accurate → MileApp tab.- Select the Accurate module: Sales Order.
- Select the business data it comes from.
- Select the Flow the new tasks should be created in, and the Hub they belong to.
- Auto-create a follow-up task for the remaining quantity (optional): turn this on and a Sales Order that is only partly delivered raises a new task for the undelivered remainder, so the rest of the order stays on someone’s list. See Partial delivery and the remainder task.
- Map the fields: for each MileApp flow field (on the left), choose which Accurate field it reads from (on the right). Your flow’s required fields appear automatically; you only choose where each one gets its value. Only Accurate fields whose type fits the flow field are offered.
- Map line items (optional): point a MileApp Bill component at the order’s item rows, then map each column (item code, quantity, unit price, and so on).
- Click Save.
MileApp → Accurate
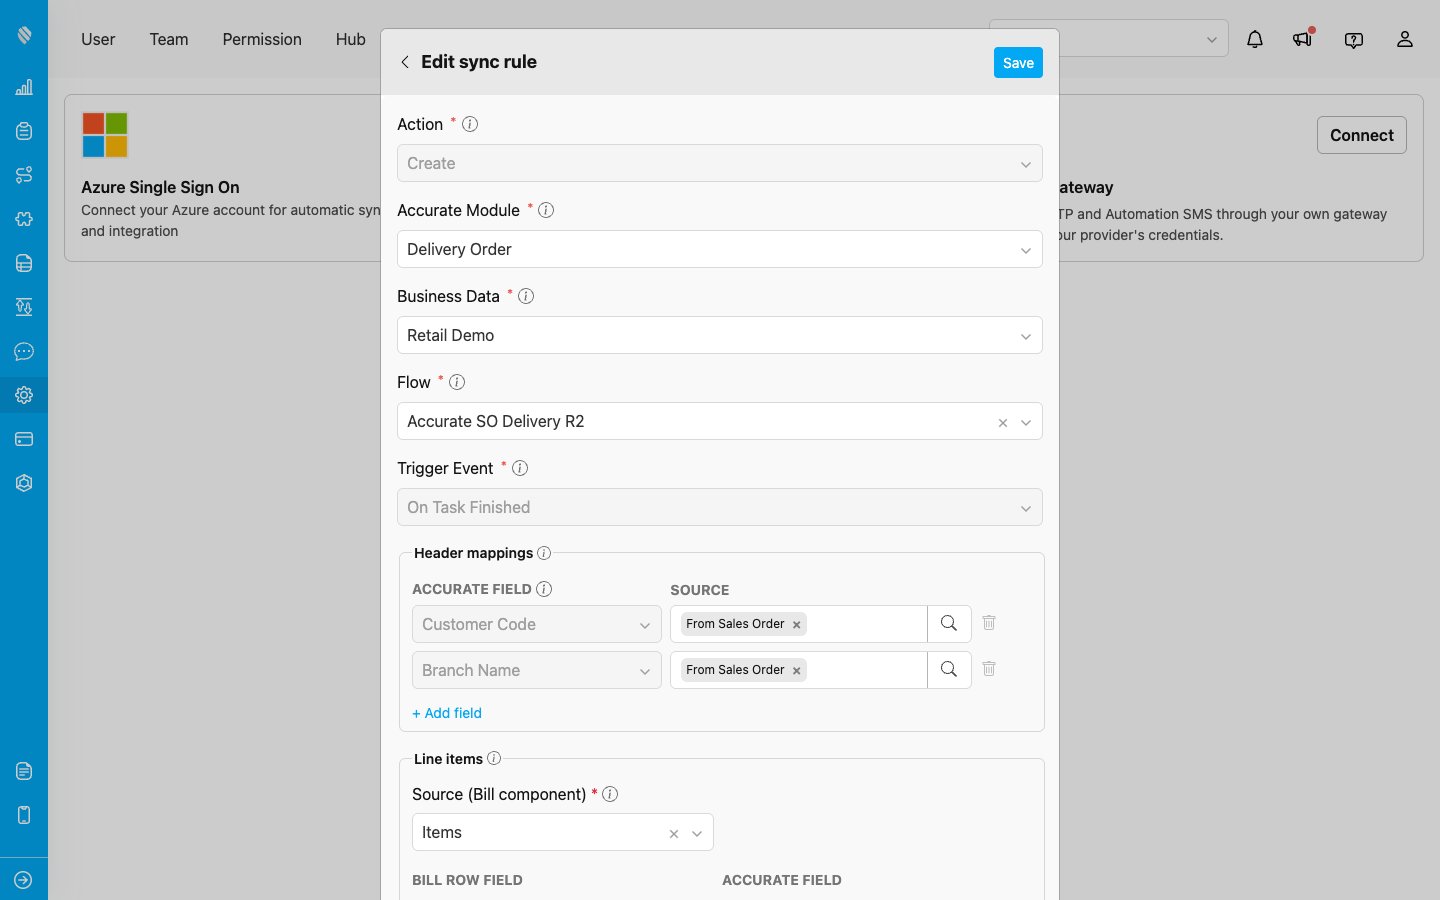
Click Add Mapping on the MileApp → Accurate tab. Each field appears once the one above it is answered, so the form reads as one decision at a time.- Select the Action: Create.
- Select the Accurate module: Delivery Order.
- Select the business data to create the record in.
- Select a Flow: the Flow whose tasks should be pushed.
- Select the trigger event: On Task Finished, so the push carries what the driver actually delivered.
- Map each Accurate field: pick a source from the Source list, which groups your Flow fields and Task system fields. The value type (date, number, currency, text) is detected automatically.
- Fill dependency fields from Accurate: fields such as Customer, Branch, Item or Unit are picked from your live Accurate records using the search button, so the value always matches a real record.
- Map line items: point the flow’s Bill component at the Delivery Order’s item rows. The Bill’s rows are what gets pushed, so the flow needs a Bill component for the rule to save. If any Bill item is serial-managed in Accurate, you also choose how its serial numbers are supplied, see Serial-number capture below.
- Click Save.
Serial-number capture
Some Accurate items are serial-managed (each unit has a unique serial or batch number). When a Delivery Order line uses such an item, Accurate requires one serial number per delivered unit, or it rejects the whole document. A push rule lets you supply those serials in one of two ways, chosen in the Line items section.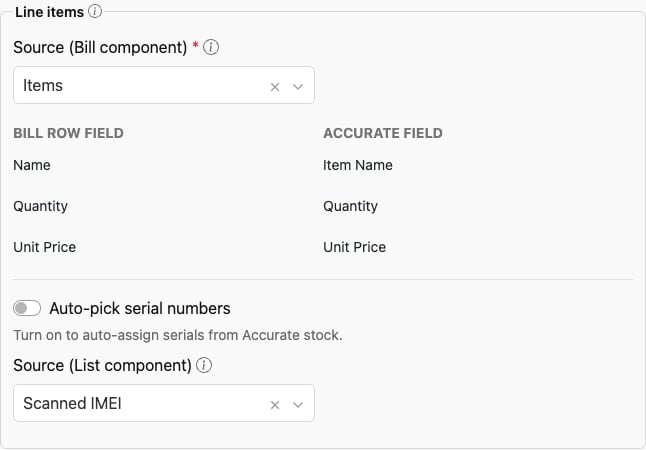
The Line items section: the Bill source and its locked rows, then the Auto-pick toggle, then the Source (List component) used to capture scanned serials.
- Auto-pick from Accurate stock: turn on Auto-pick serial numbers from Accurate stock and MileApp fills each line’s serials automatically from the item’s in-stock serials in the delivery warehouse. A confirmation appears first, because auto-picked serials are simply the ones on hand and may not be the exact units your field team handed over.
- Capture the scanned serials: leave Auto-pick off and map Source (List component) to a flow List component (type Text, with “add new” enabled and set to add an Input). Your field team scans or types one serial per unit into that List, and those exact values are written to the Delivery Order. With Auto-pick off this is where the serials come from, so the form asks for it before saving. A List whose “add new” adds a Select is not offered here. A Select gives a fixed set of choices decided when the flow was built, but a serial number belongs to one physical unit and is read off it in the field, so it can never be one of those choices.
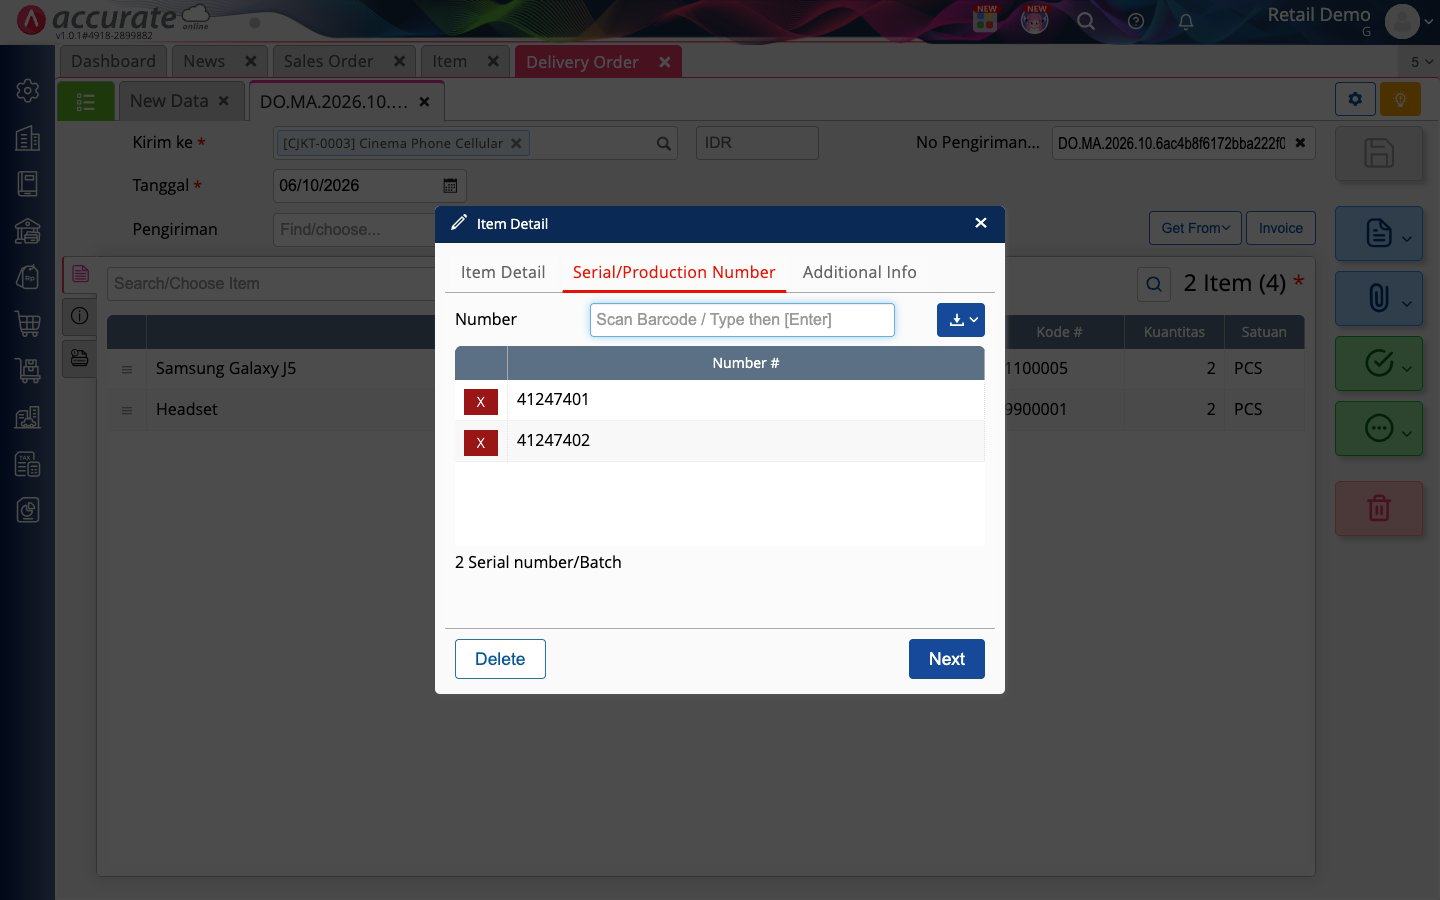
The same serials, now on the Delivery Order in Accurate (Item Detail - Serial/Production Number).
Taxable and Tax Inclusive
On a Delivery Order push, Taxable and Tax Inclusive follow the Sales Order by default: when the task came from a Sales Order and you leave these two fields unmapped, the Delivery Order takes the Sales Order’s own tax settings. You can also set them explicitly. Their Source picker offers From Sales Order, a fixed True or False, or any Flow field. A fixed value or a Flow field always wins over the Sales Order.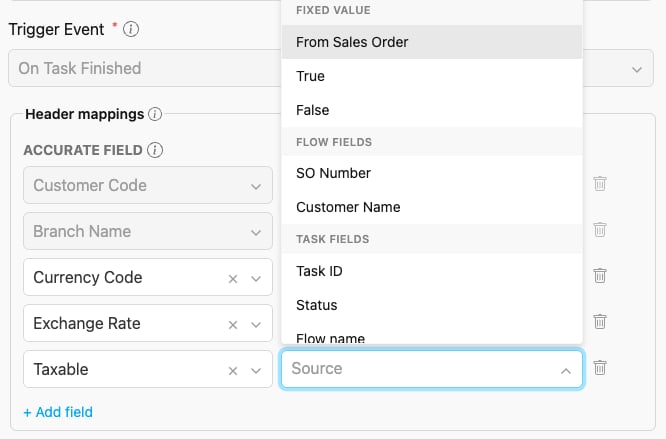
Taxable and Tax Inclusive can follow the Sales Order, or be fixed to True or False.
Currency and exchange rate
A Delivery Order created from a Sales Order keeps that order’s currency and exchange rate by default, so its prices mean the same thing in Accurate. Leave Currency Code and Exchange Rate unmapped, or set them to From Sales Order. Without this, Accurate would apply the customer’s default currency to prices that were written in the order’s currency. A fixed value or a Flow field still wins if you map one.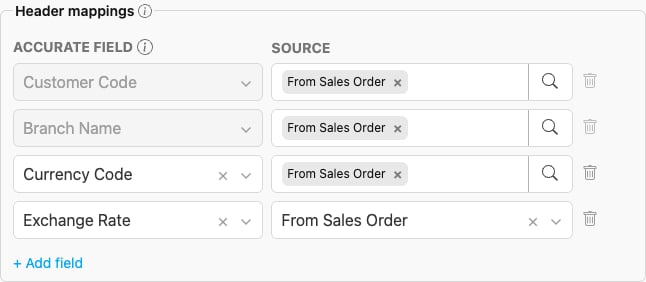
Currency Code and Exchange Rate set to From Sales Order, beside the customer and branch.
Auto-resolve customer and branch from a Sales Order
When a task was created from a Sales Order (the Sales Order to Delivery Order flow), its Customer and Branch already belong to that Sales Order. Rather than mapping them, you can have the Delivery Order take them straight from the originating Sales Order. On the Customer Code and Branch Name rows, open the Source picker and turn on Auto-resolve from Sales Order (off by default). The field then reads From Sales Order, and no manual mapping is needed.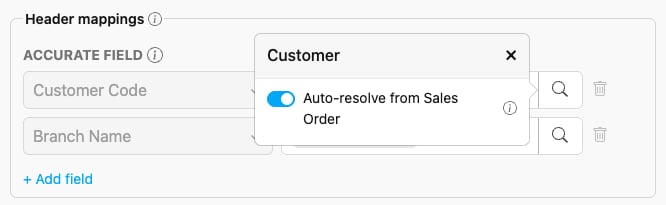
Auto-resolve from Sales Order sits at the top of the Customer Code / Branch Name source picker.
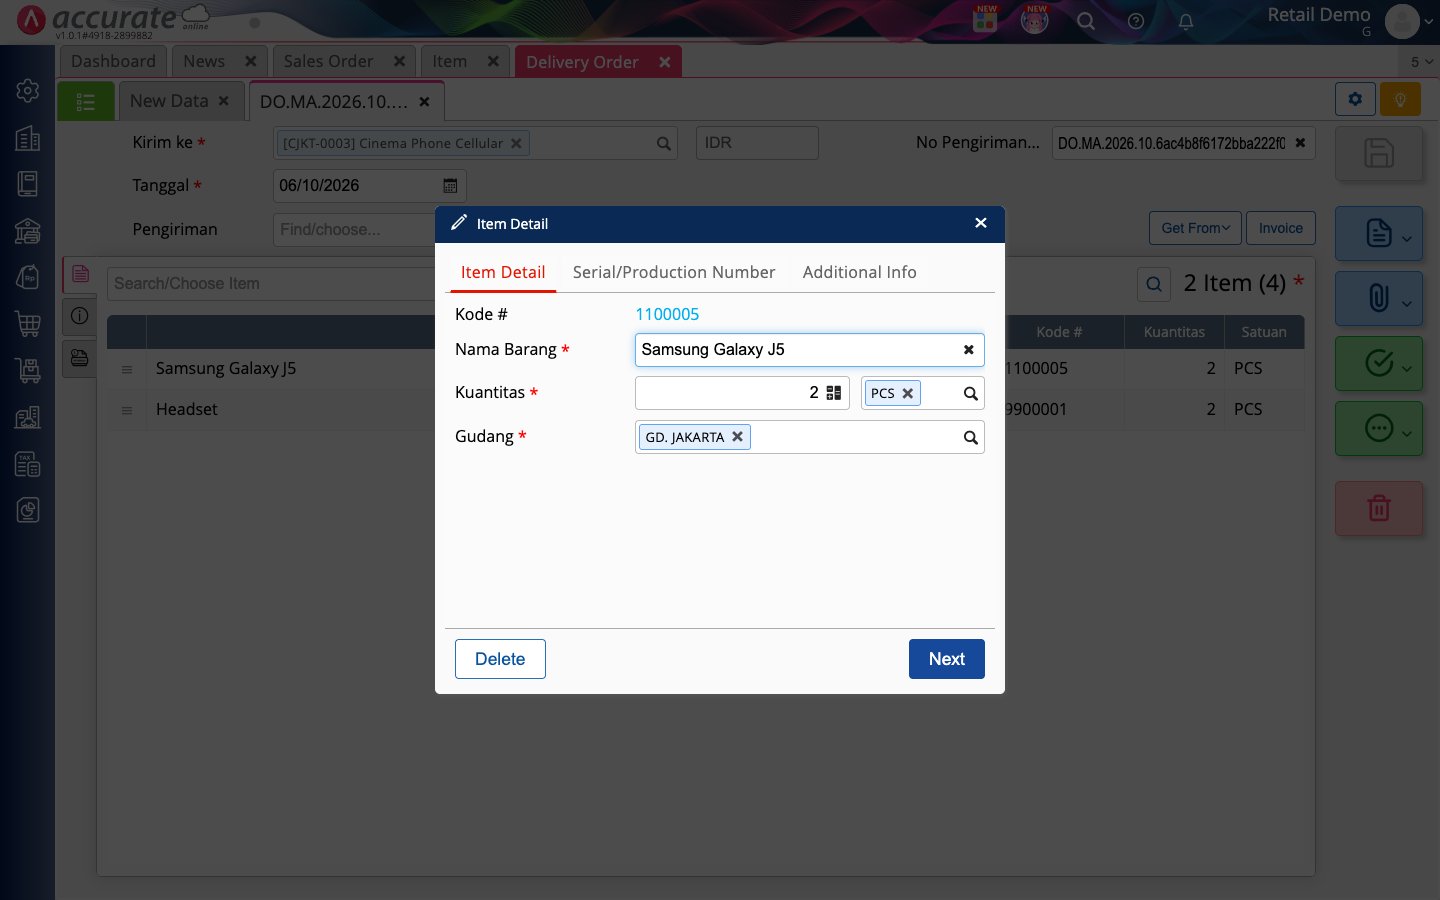
The Delivery Order created from the task carries the originating Sales Order’s own customer; its branch is taken from the same Sales Order (shown on Accurate’s Additional Info tab).
Which Flow Components Can Be Mapped
Accurate stores five kinds of value: text, whole number, money, true/false and date. A MileApp component can be mapped only if it holds one such value, so not every component in your flow appears in the mapping pickers. The rules below are the same in both directions. Input components, by their Type:Step 4: Syncing Happens Automatically
MileApp → Accurate. Saving a rule creates a webhook automation in the background, named “[Accurate] → ”. You can see it in the Automation list, but you do not need to manage it. From then on, every task in that Flow that reaches the trigger event is pushed to Accurate. Accurate → MileApp. Once a rule exists, Accurate notifies MileApp whenever a Sales Order in that business data changes:- Created → a task is created in each mapped flow.
- Edited → the linked task is updated. No duplicate is created, however many times the order changes.
- Deleted → the linked task is deleted.
When an imported task is scheduled
A task created from a Sales Order is scheduled for the day the goods ship, not for the moment the order reached MileApp:When Accurate’s notification does not arrive
Accurate occasionally fails to deliver a notification. Every two hours MileApp checks Accurate’s own delivery history for the last six hours and creates any task that never arrived, so a missed Sales Order catches up on its own. An existing task is never duplicated, and a task someone deleted on purpose is not brought back. This recovery only catches up on what a rule was already meant to receive. A Sales Order created before a rule was added, switched on, or pointed at another Flow is not imported into that rule afterwards. Switching a rule on starts it from that moment, so turning a rule off and on again never creates tasks for older Sales Orders.Partial delivery and the remainder task
A driver can deliver less than the order asked for. When that happens, the Delivery Order records what was actually handed over, and the Sales Order keeps the difference outstanding. If you turned on Auto-create a follow-up task for the remaining quantity on the import rule, MileApp raises a new task for that outstanding quantity as soon as the first one finishes. It carries the same customer, address and mappings, with a Bill holding only what is still owed. Deliver it partly again and the cycle repeats, each round leaving a smaller remainder, until the Sales Order is fully delivered and reads Processed in Accurate. Leave the toggle off and a partial delivery simply closes the task. The Sales Order still shows the outstanding quantity in Accurate, and you decide what happens next.Example Flow: A Complete Round Trip
This walkthrough follows one order the whole way: from the two mapping rules, through a Sales Order in Accurate, to a delivered task, and back to a Delivery Order in Accurate. Every screen below is a real run.1. The integration is connected
Setting → Integration shows the Accurate.id card in its connected state, with a pencil icon for the rules and a Disconnect button.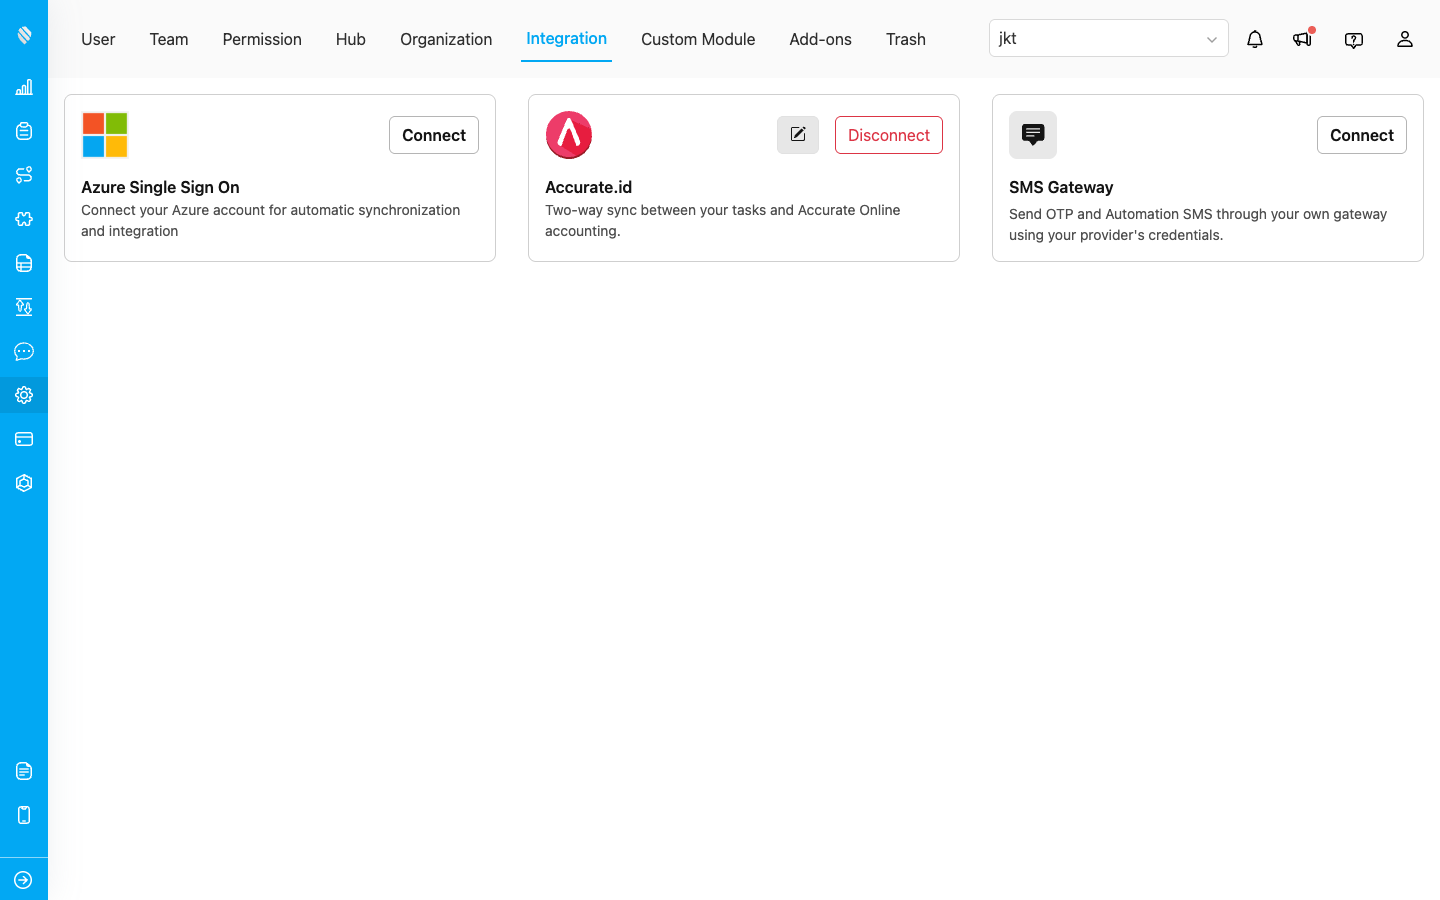
Once connected, the card gives you the pencil icon and Disconnect.
2. Two rules, one per direction
Click the pencil icon. Rules are grouped by business data, with one tab per direction. Here a single flow named Delivery carries both an import rule and a push rule.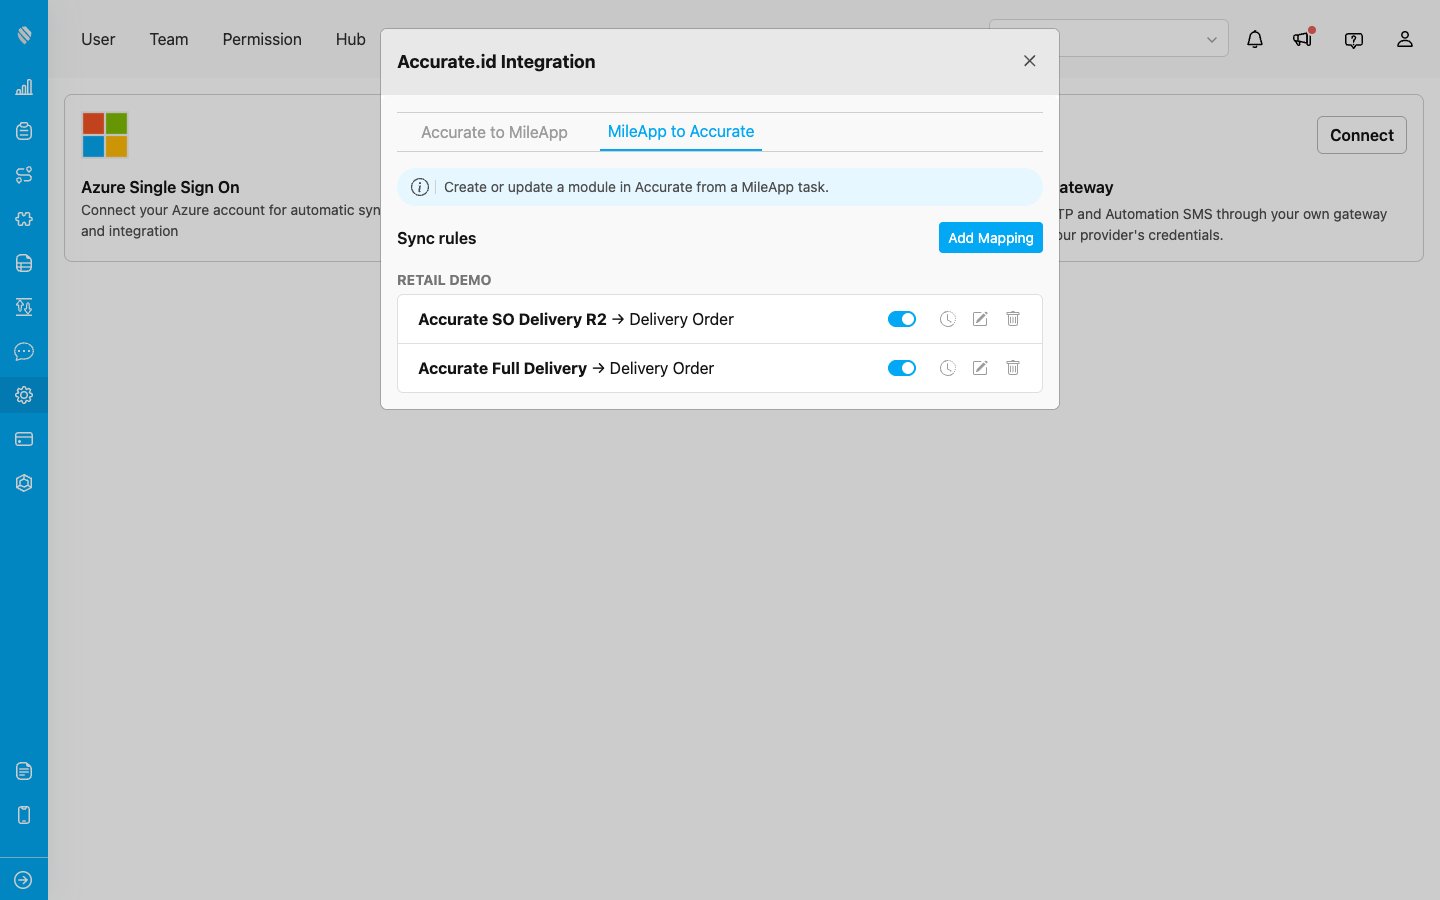
Both directions live side by side, each on its own tab.
3. The import rule: Accurate → MileApp
The import rule decides what a Sales Order becomes in MileApp. Header fields such as Customer Name and Customer Address map to flow fields, and the Line items section points at a Bill component so each order line arrives as a bill row.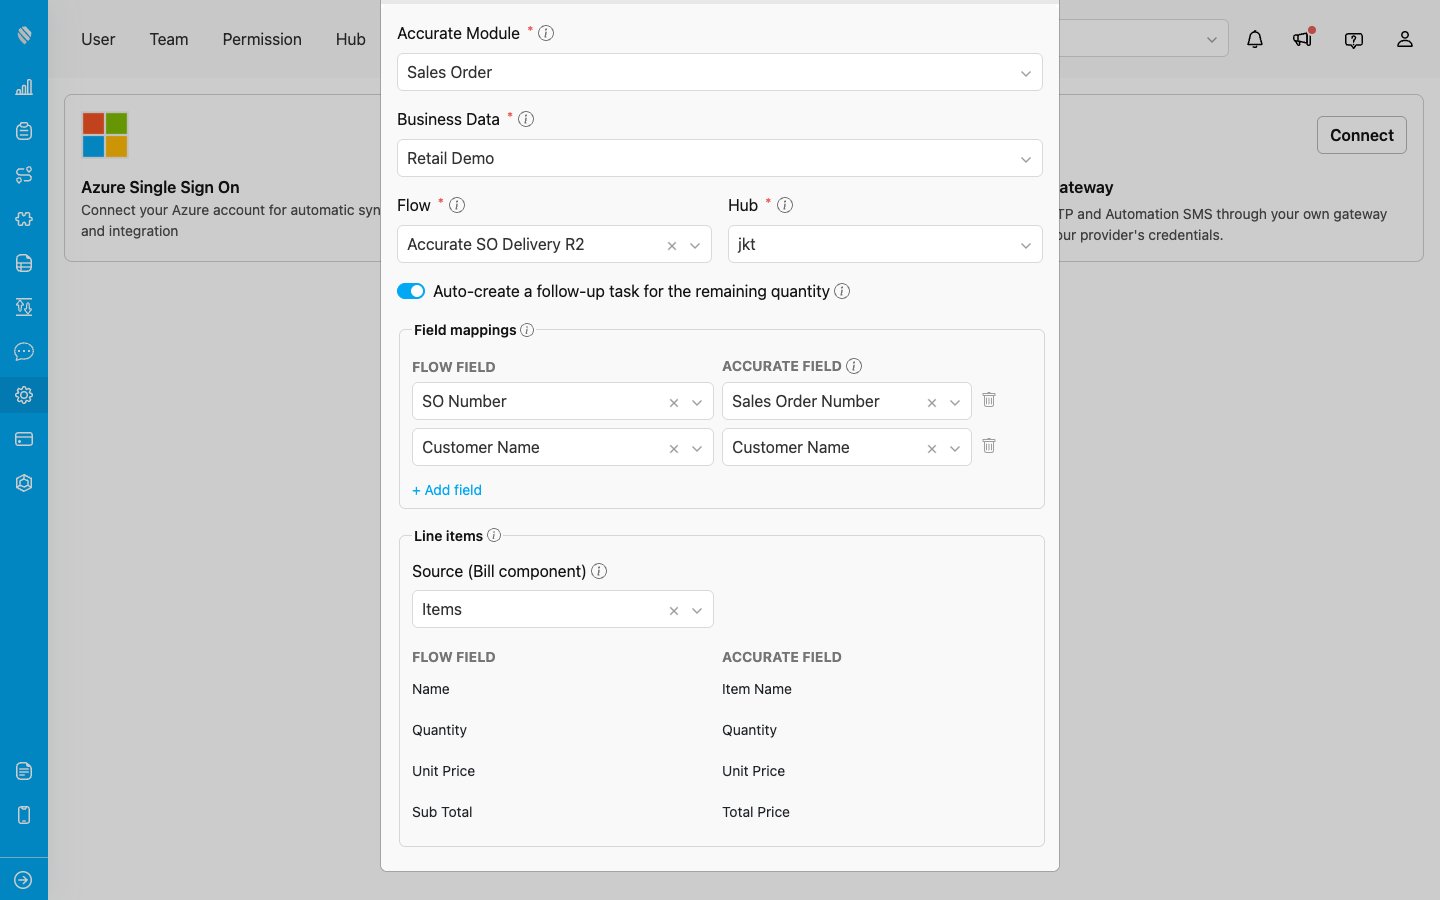
Header mappings at the top, line items below, with Name, Quantity, Unit Price and Sub Total each mapped to a bill column.
4. The push rule: MileApp → Accurate
The push rule decides what a finished task creates in Accurate. Choose the Action (Create), the Accurate Module (Delivery Order), and the Trigger Event (On Task Finished). Customer Code and Branch Name can resolve themselves from the originating Sales Order.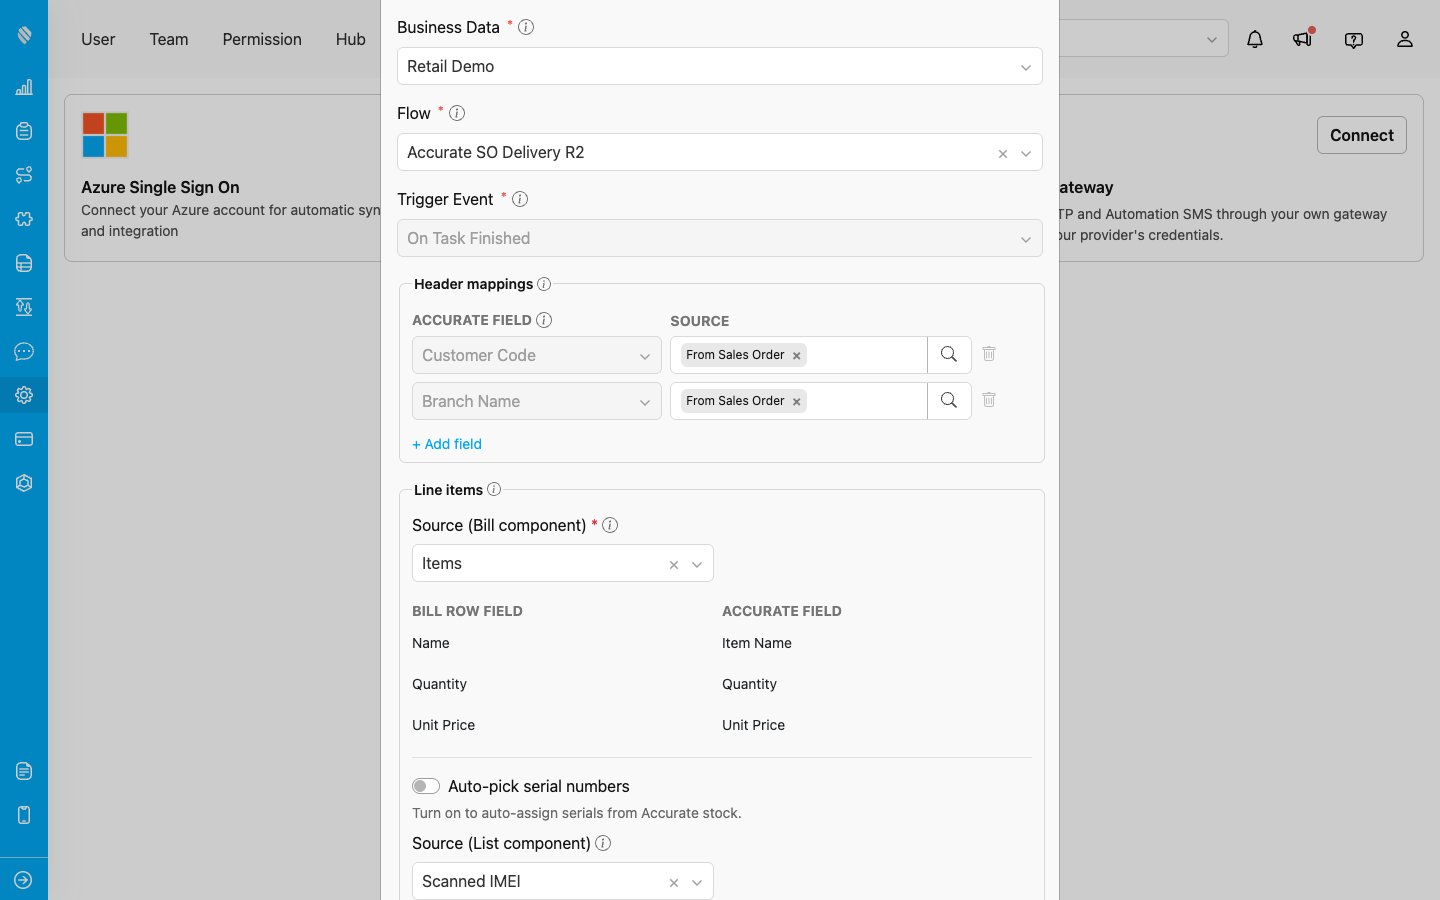
Action, module and trigger event at the top, header mappings below.
5. Create a Sales Order in Accurate
Now work in Accurate as you normally would. Pick a customer, add the items and quantities, and save.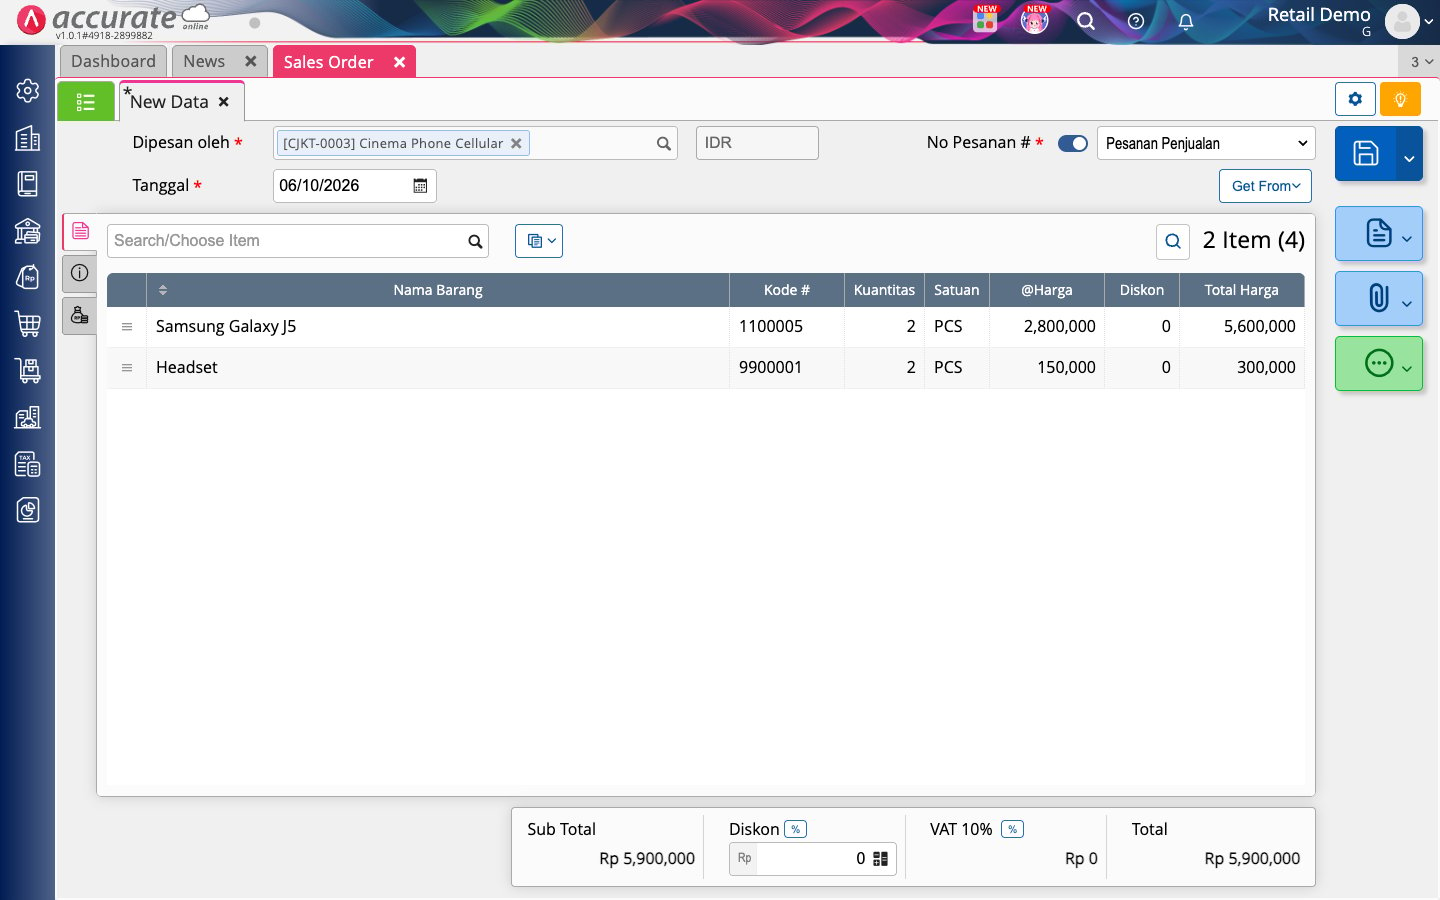
An ordinary Sales Order, one customer and one line item.
The saved order appears at the top of the Sales Order list with its number and a status of Waiting on Process.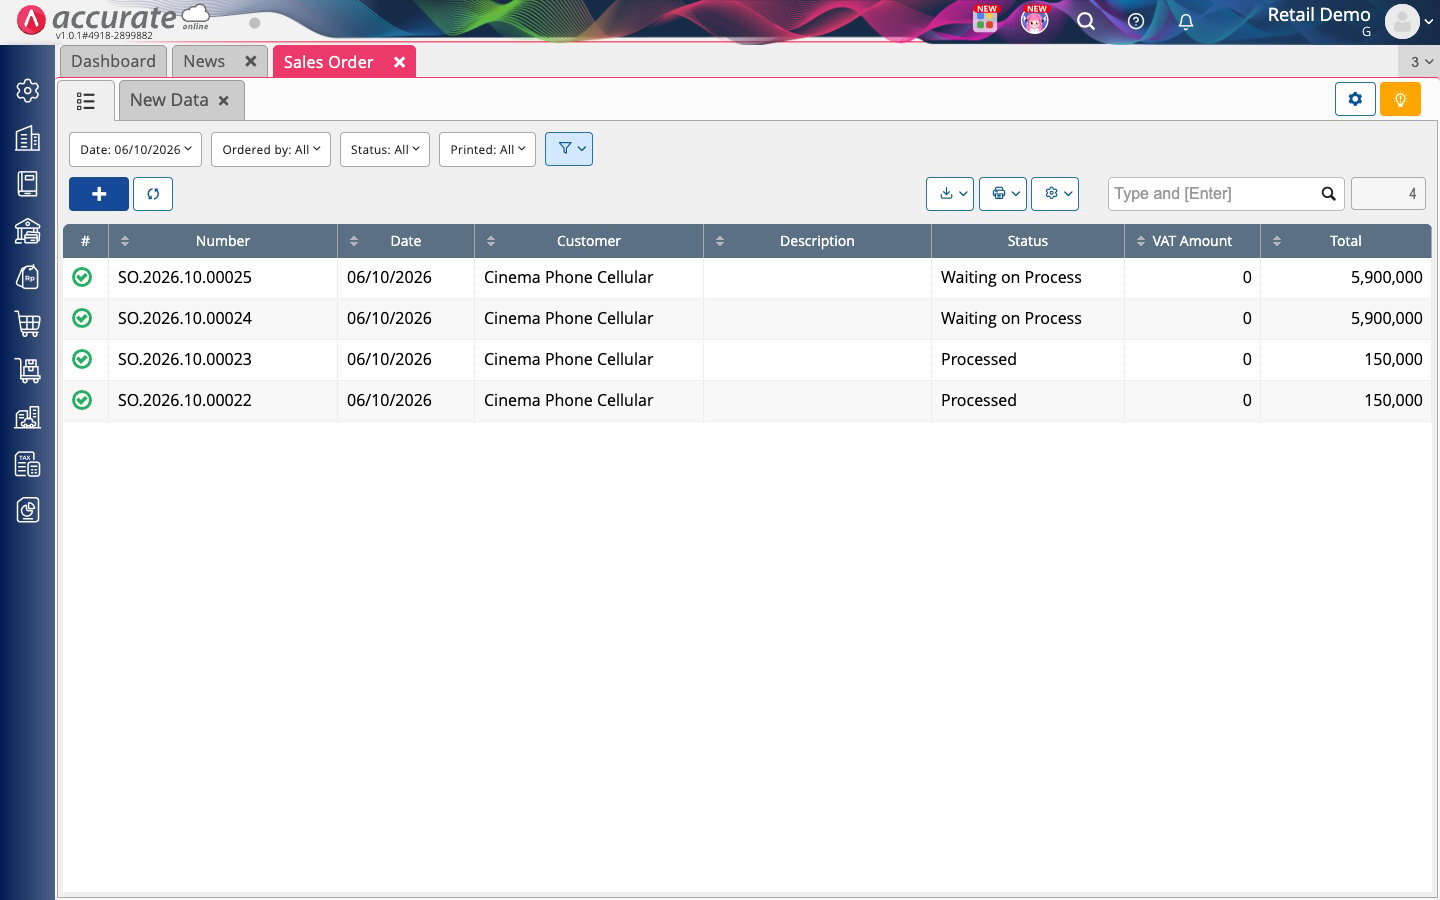
The new order, waiting to be delivered.
6. The task appears in MileApp
Within about half a minute the task is in your task list, created from API, titled with the customer name and addressed with the delivery address.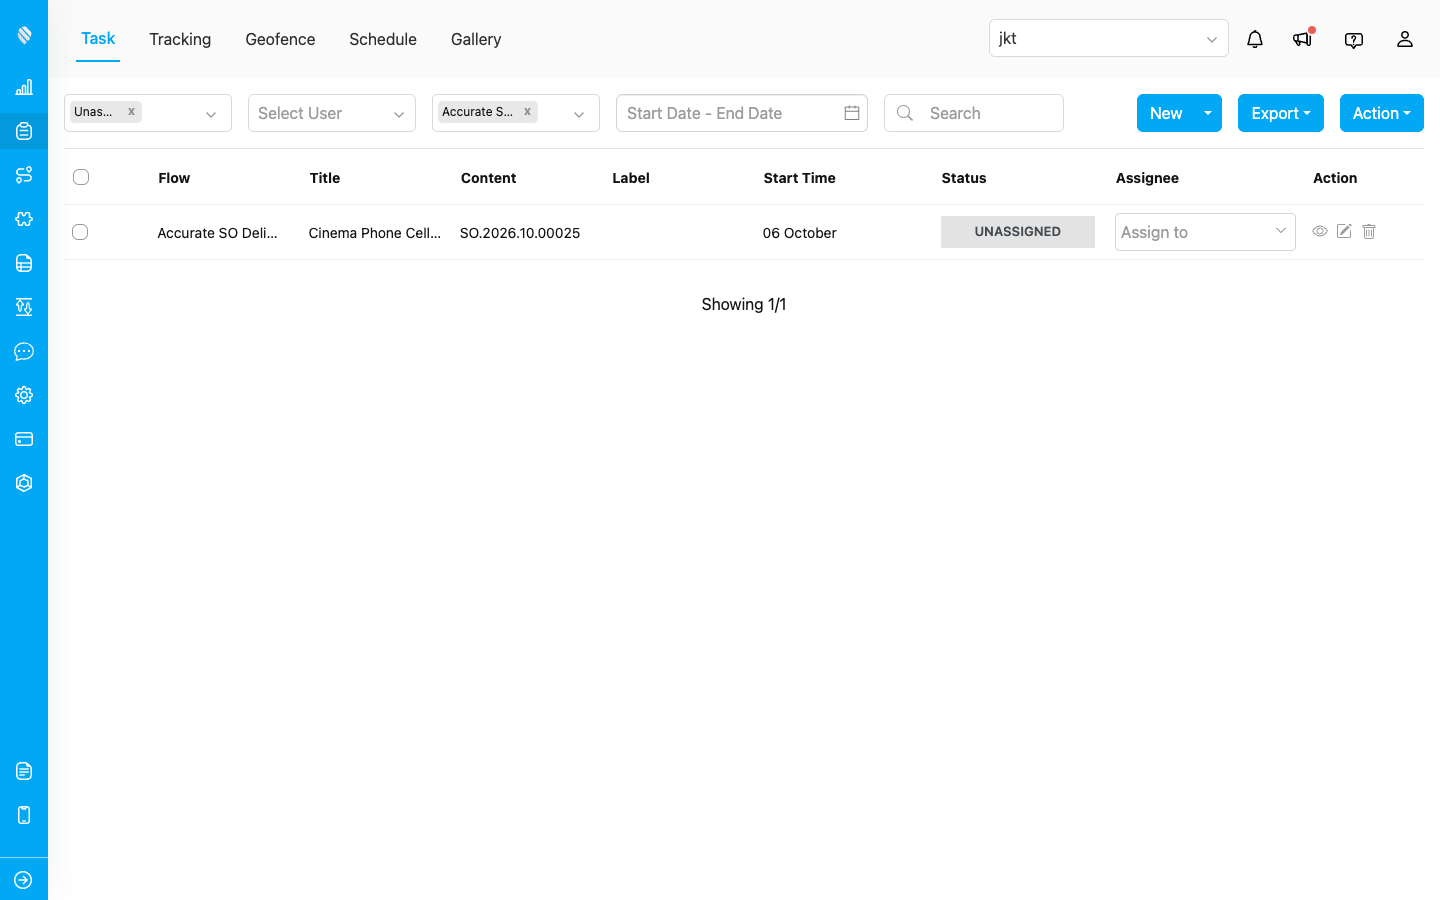
No action needed. The task arrives on its own.
Open the task and switch to the Bill tab to see the order lines that came across, with item name, quantity and price.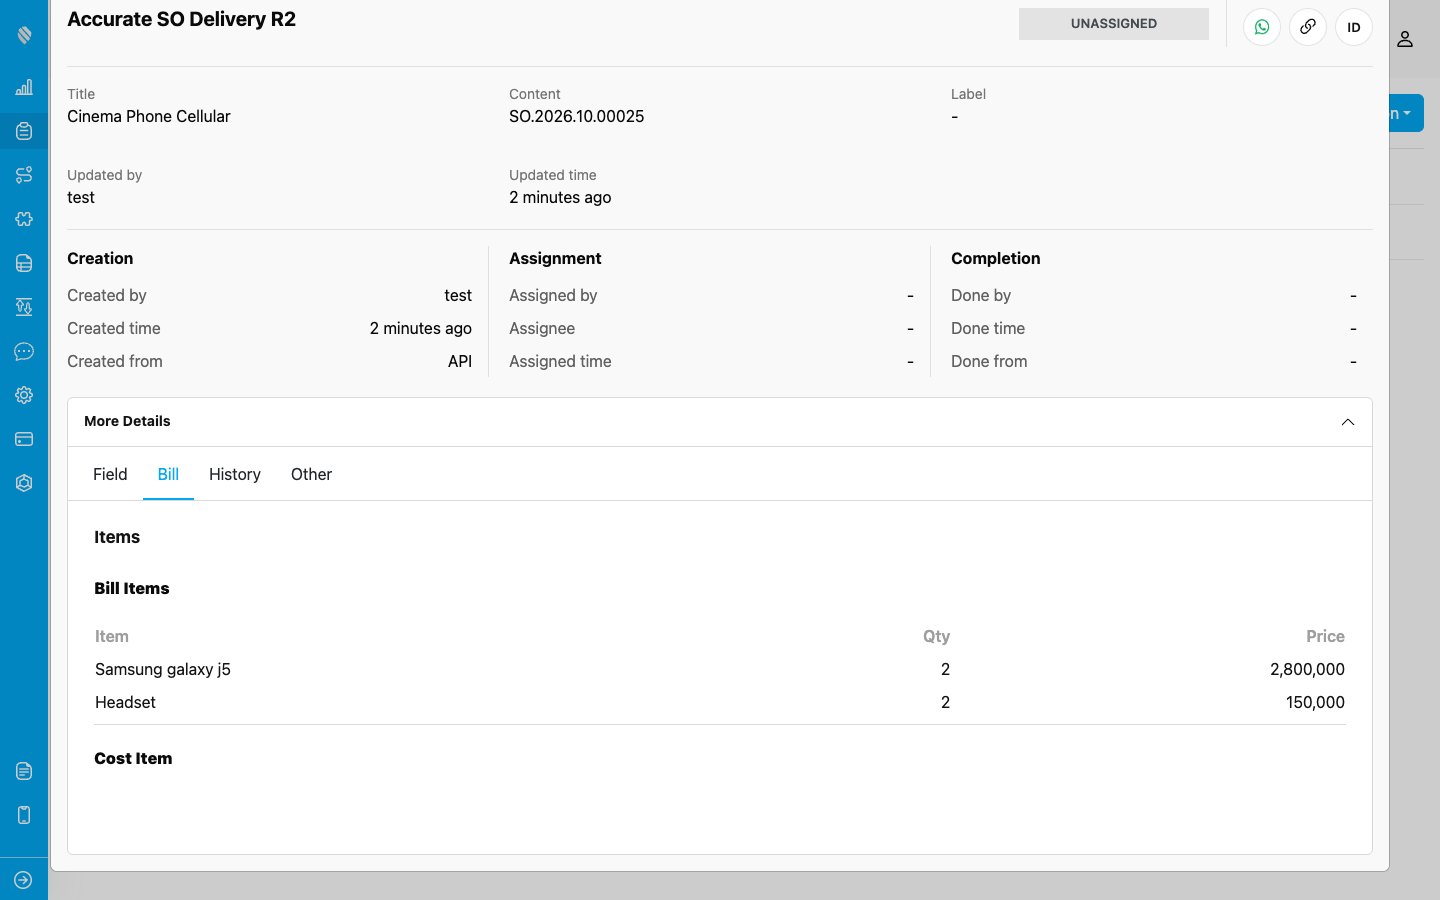
Every Sales Order line becomes a bill row, ready for the driver.
7. Do the task
Assign the task, then click Do Task. The flow runs exactly as it does for any other task.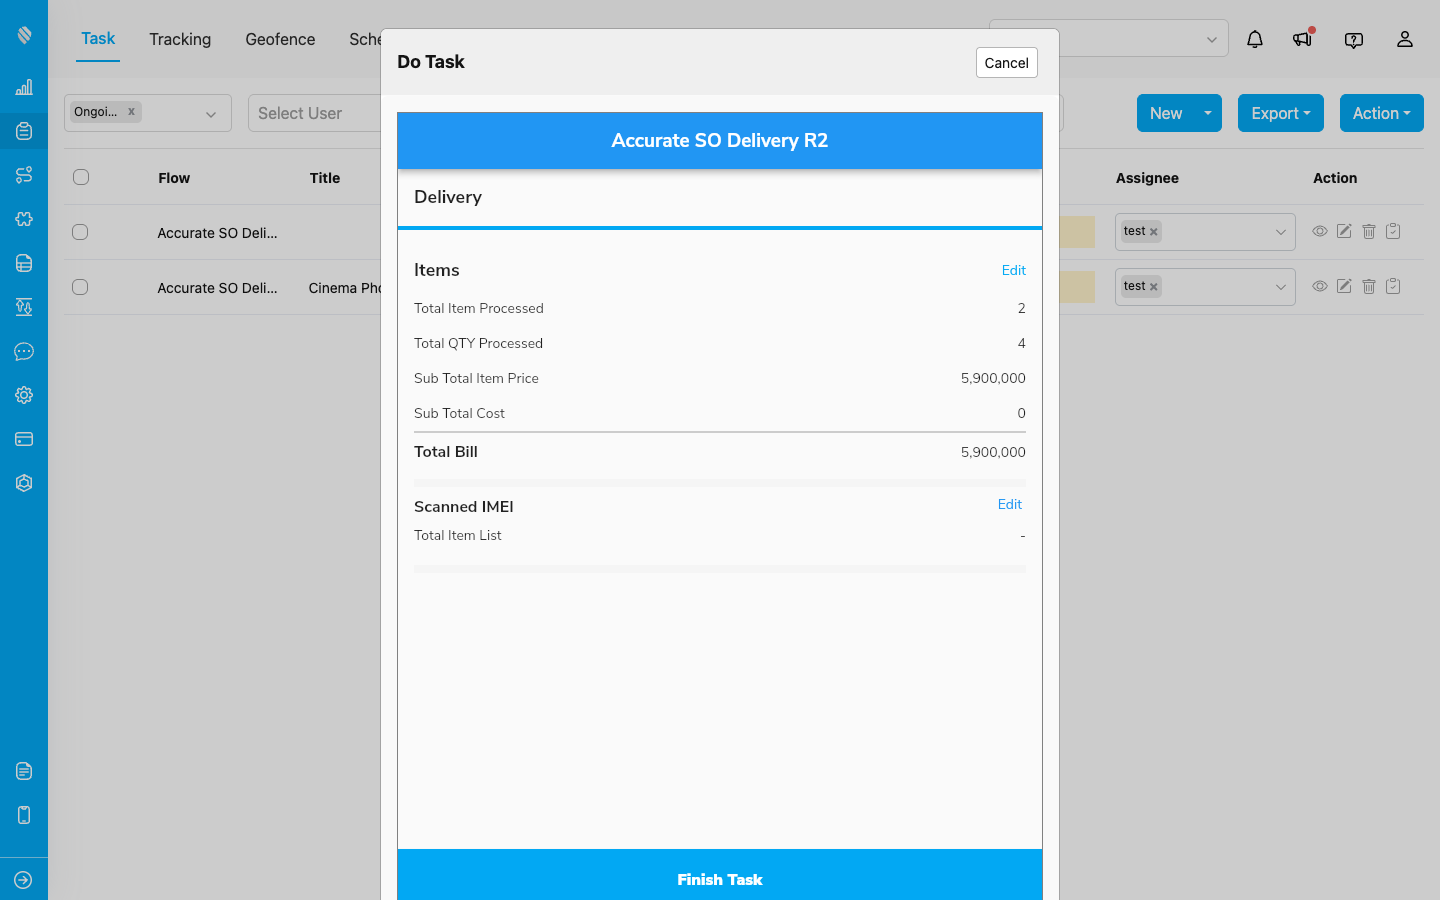
The Delivery page, with the order lines already carried over from the Sales Order.
On the process page the driver confirms what is actually being delivered. The stepper starts at the ordered quantity and can be adjusted down when the delivery is partial.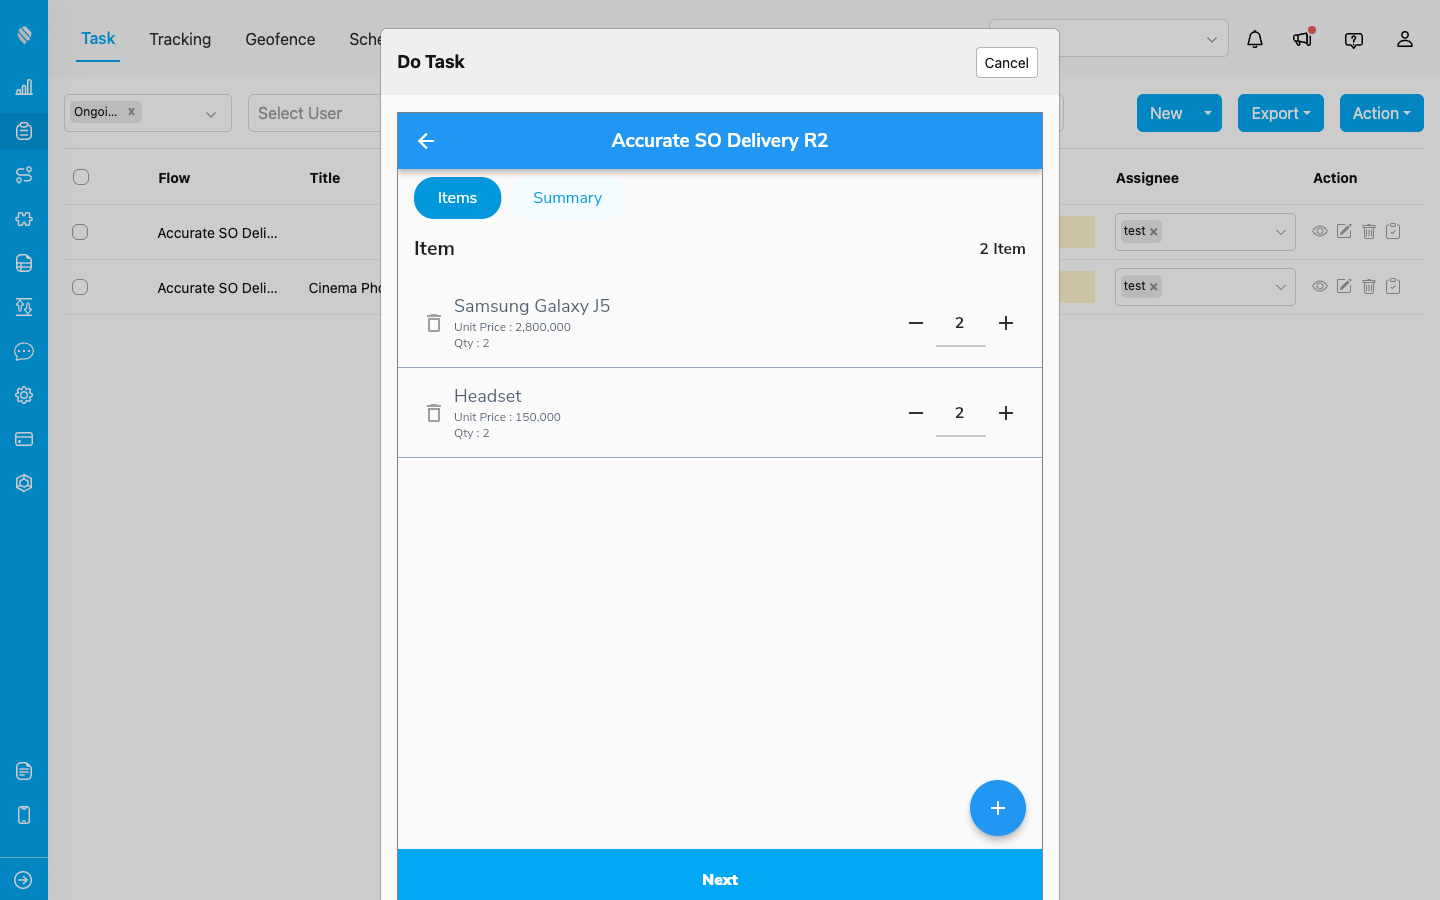
The delivered quantity is what gets pushed back, not the ordered quantity.
8. Serial numbers, when the goods carry them
For products tracked by serial number, add a List component to the flow and point the push rule’s serial source at it. The driver then records each unit as it is handed over, by typing it or by scanning the code, and the counter keeps the running total.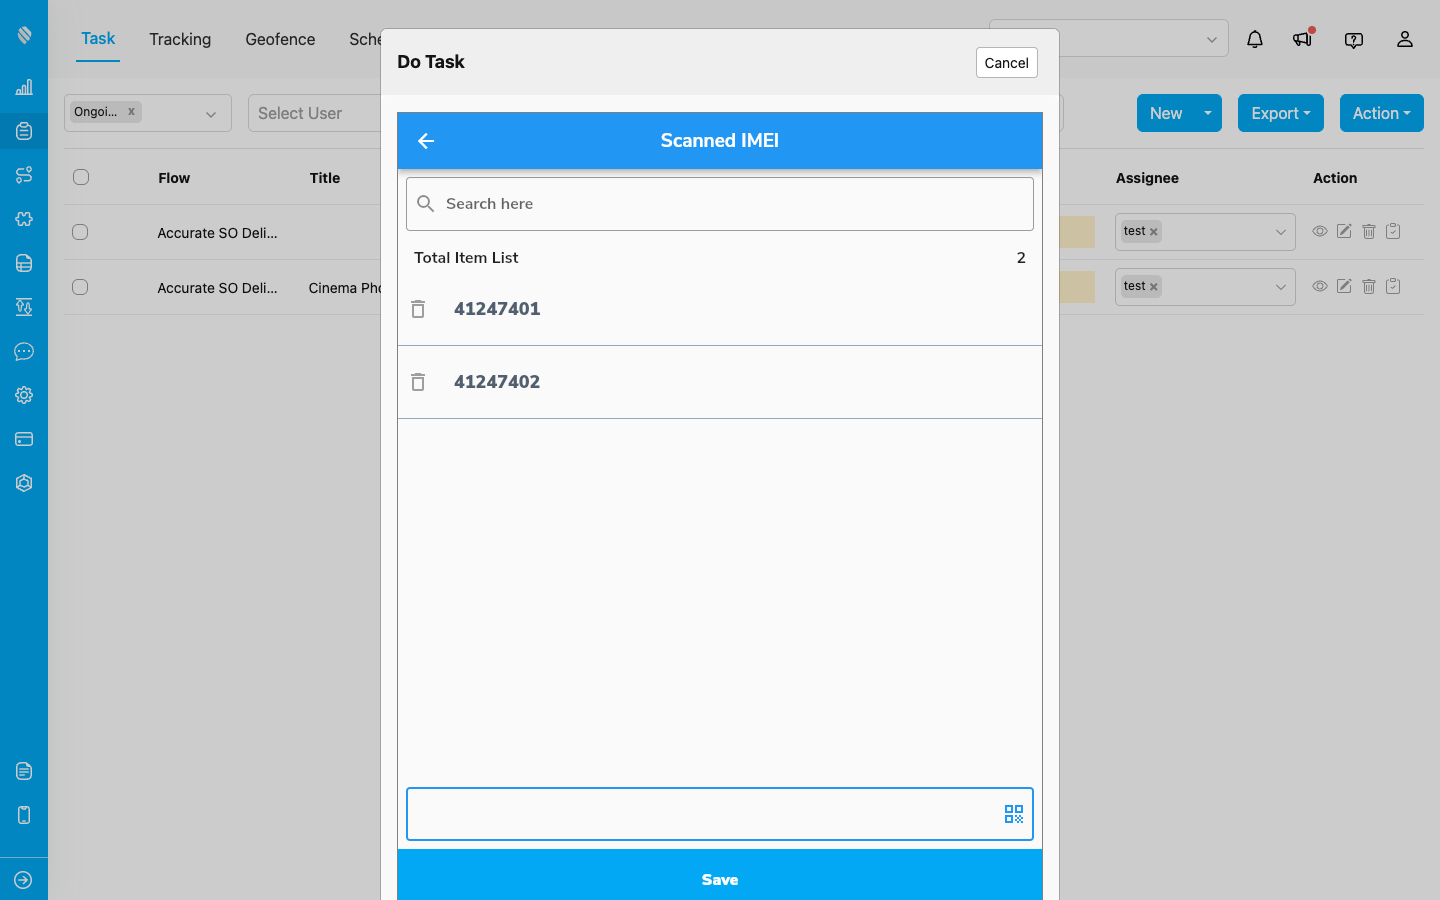
Two units delivered, two serials captured. They travel with the Delivery Order into Accurate.
You can also turn on Auto-pick serial numbers in the push rule, and MileApp selects the serials from the available stock for you, so the driver has nothing to enter.9. Finishing the task
Complete the flow and the task reaches DONE.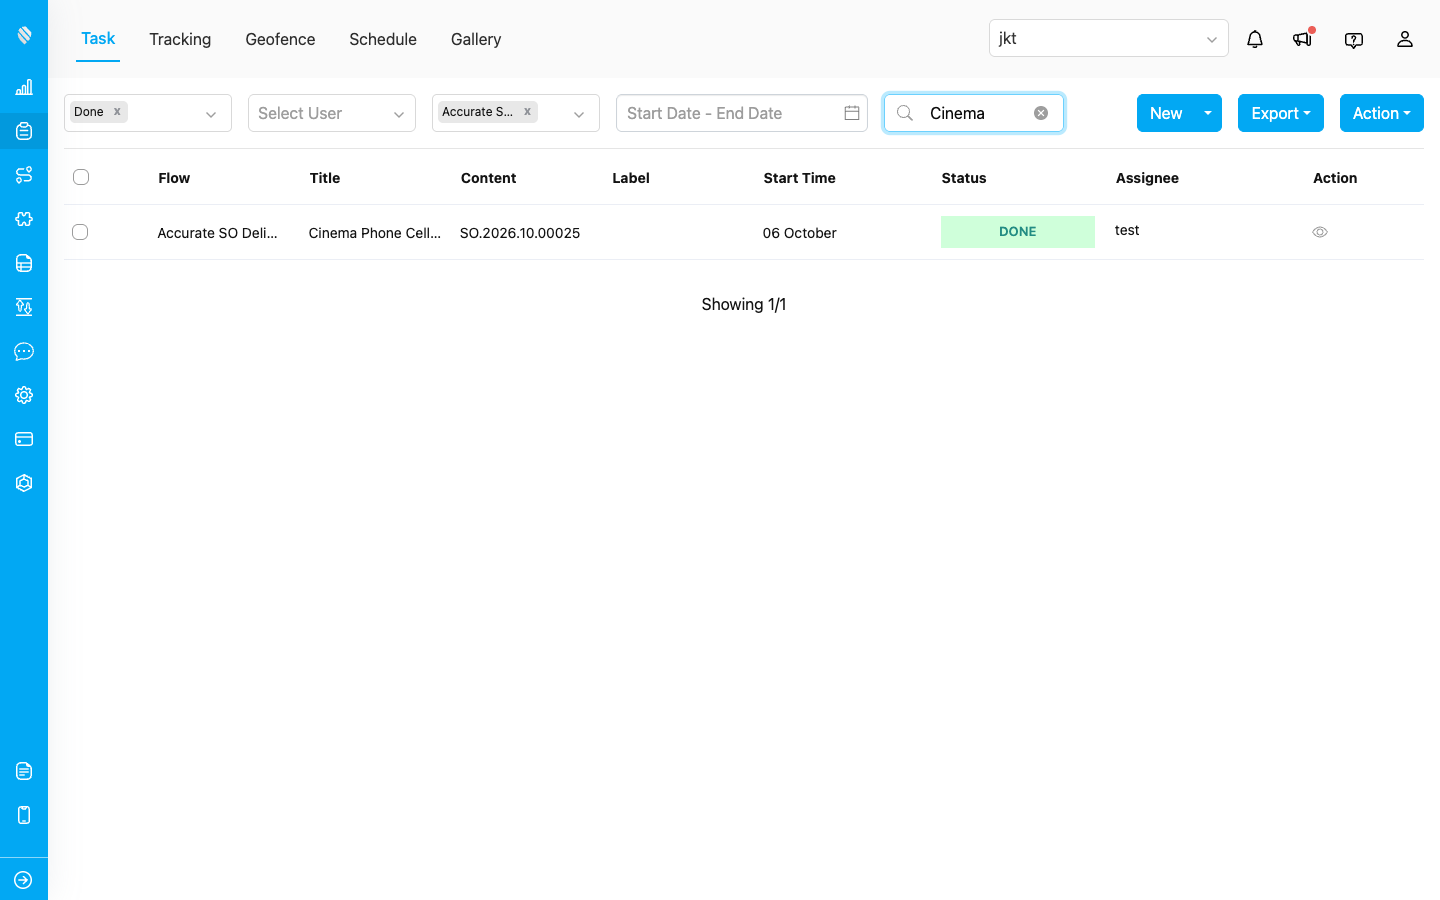
Finishing the task is what triggers the push.
10. The Delivery Order arrives in Accurate
A Delivery Order is created automatically, carrying the delivered items and quantities.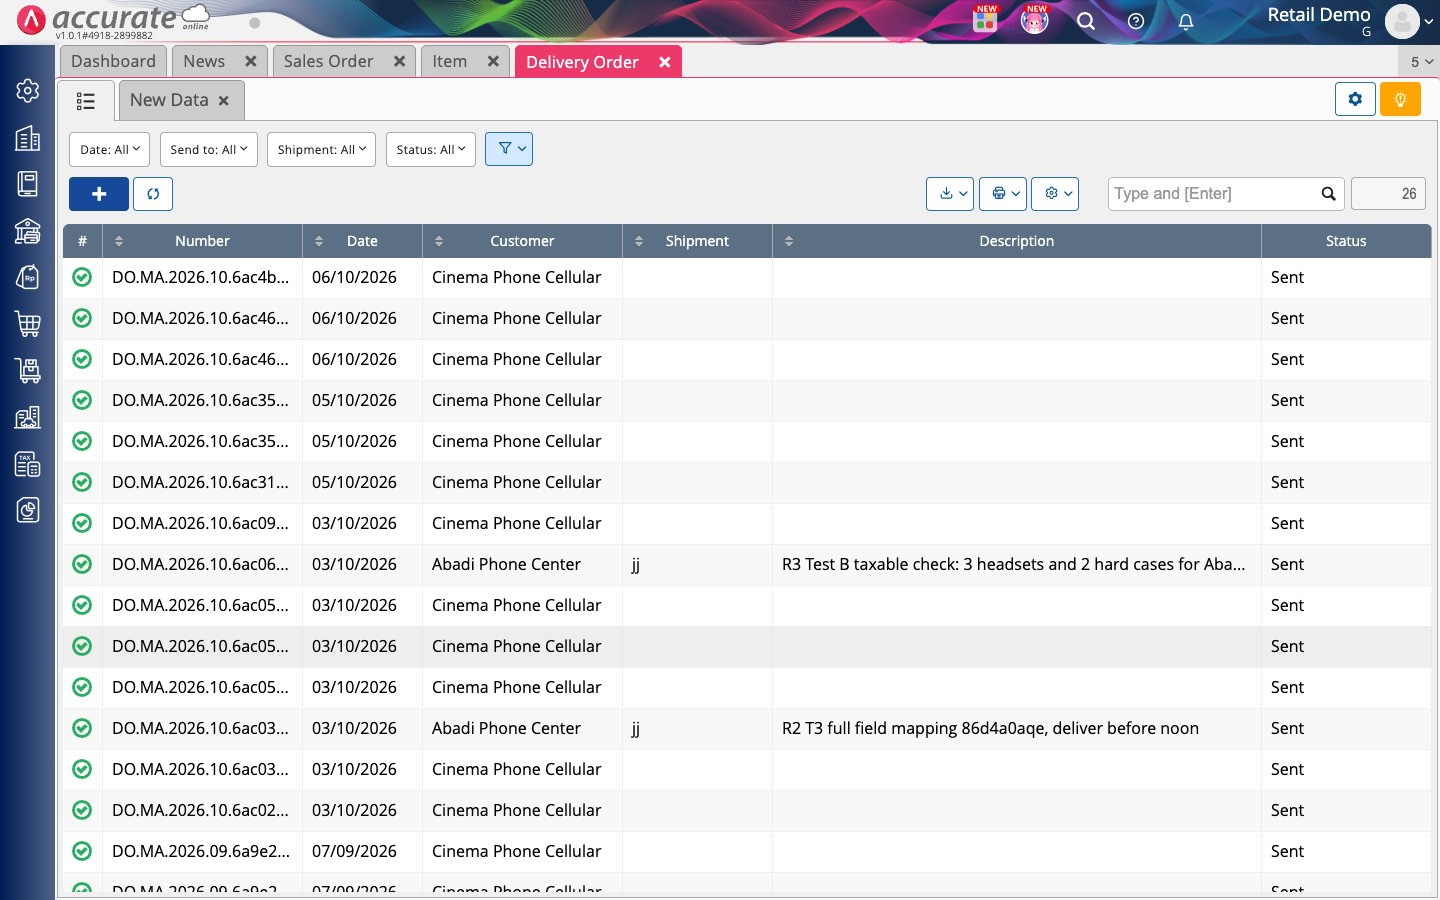
Created by the finished task, with no manual entry.
Open it to see the lines, matching what the driver actually delivered.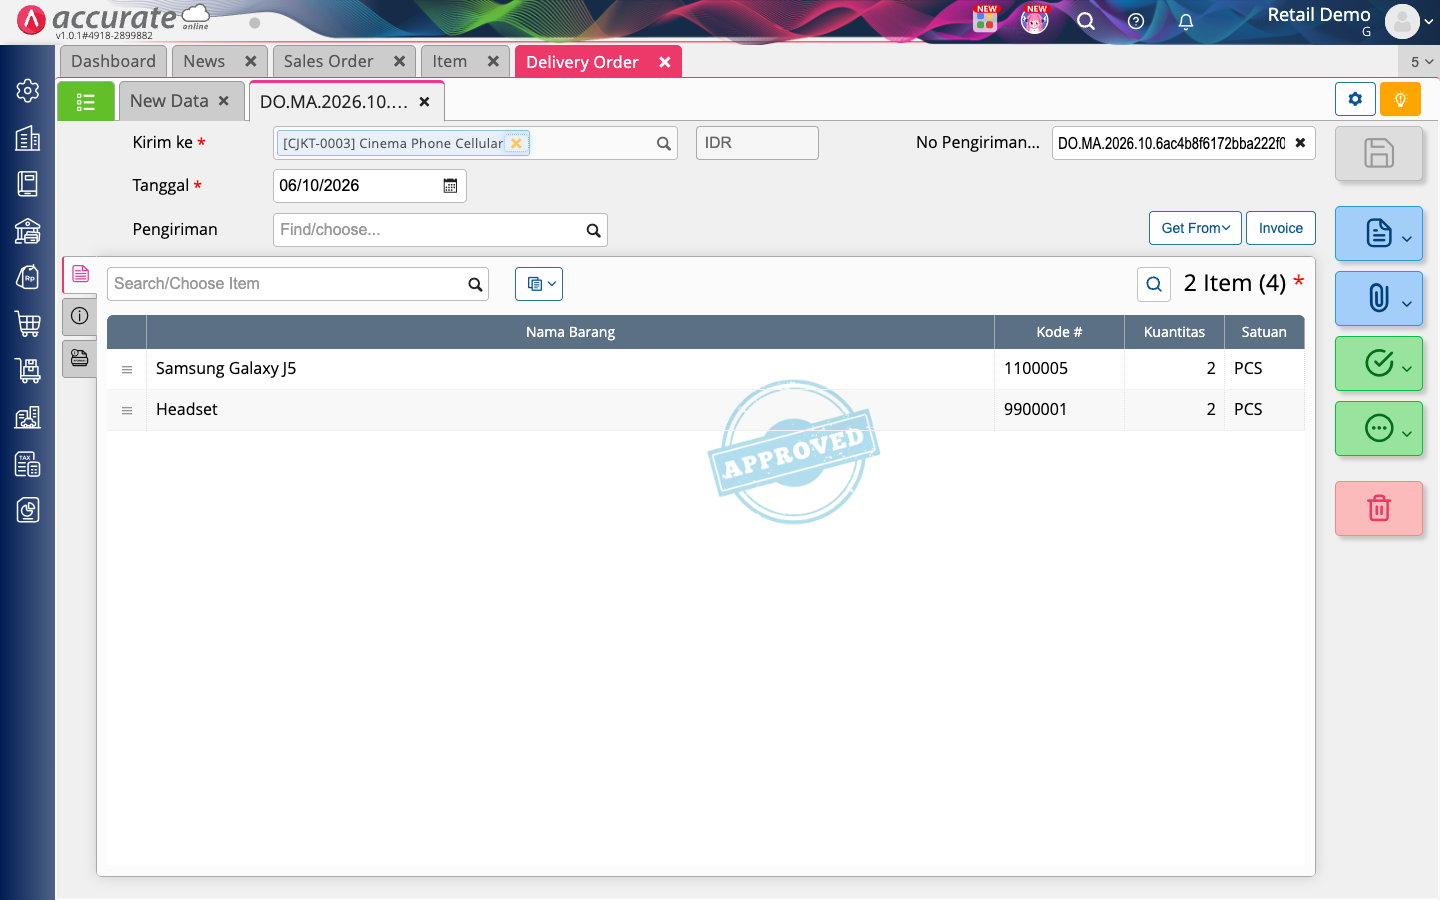
Item and quantity carried straight through from the task.
11. The Sales Order closes itself
Back on the Sales Order list, the order that started all this now reads Processed.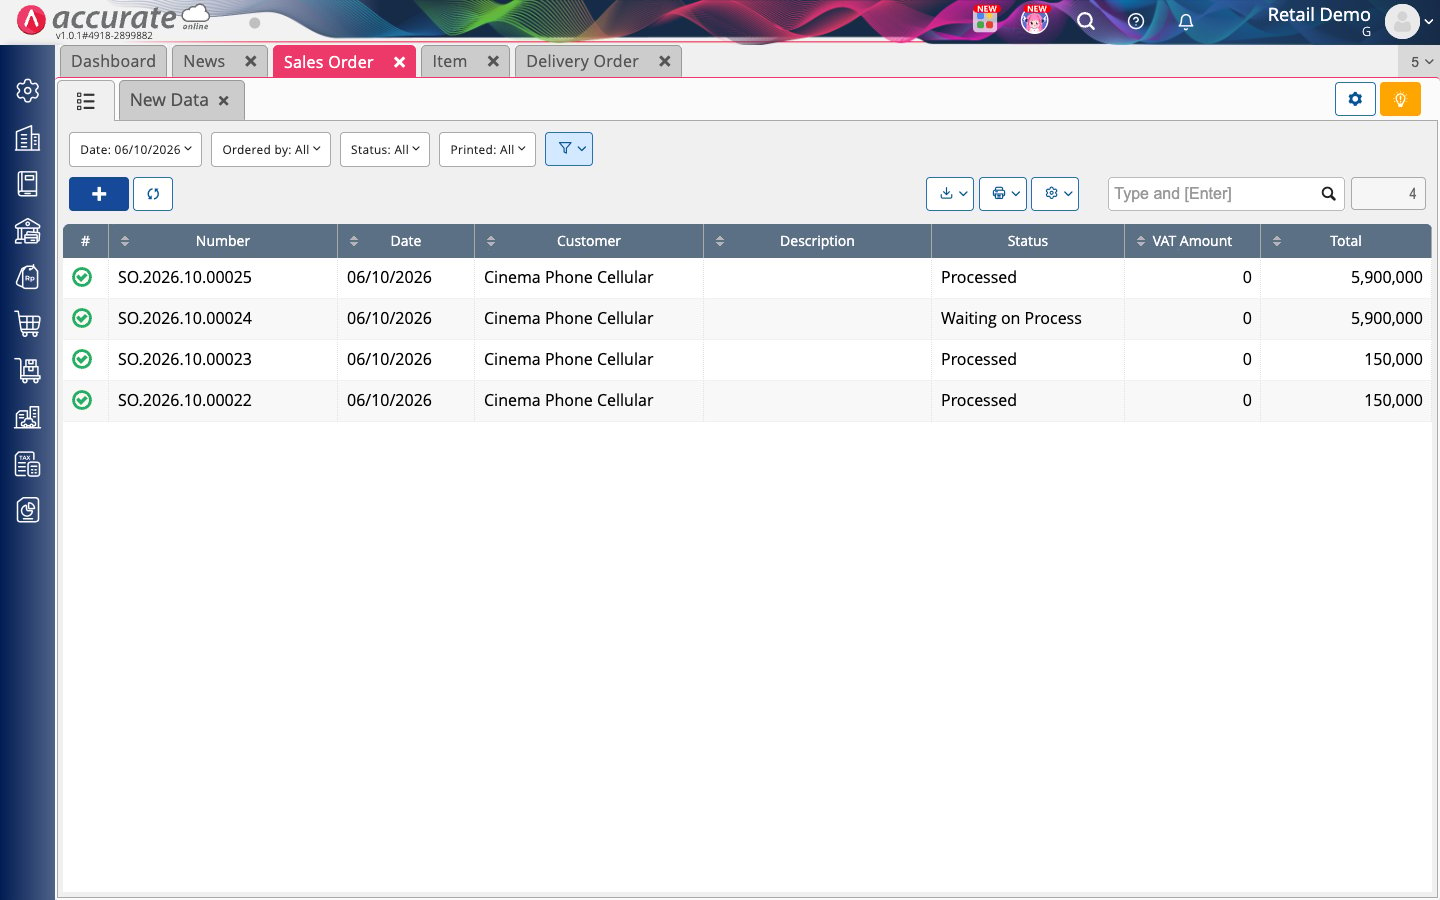
Order to delivery to accounting, with the driver’s app as the only place anyone typed anything.
What this gives you
- An order raised by your sales team reaches the driver without anyone re-keying it.
- The quantity the driver confirms is the quantity your books record.
- Serial numbers are captured at the moment of handover, by the person holding the goods.
- The Sales Order closes itself once delivery is complete, so your accounting stays current on its own.
Managing the Integration
Edit or delete a rule
Click the pencil icon on the card, find the rule, and click the edit or delete icon. Deleting a rule removes the configuration only, records already created in Accurate, and tasks already created in MileApp, are not affected.Automation health (MileApp → Accurate)
Each rule in this direction owns one webhook automation. The toggle on the rule row turns it on and off. If that automation is edited or deleted from the Automation page, the row says auto-sync is not active for the rule; click Fix and it is restored.Reconnect
A refresh icon appears on the card, next to the pencil, when your connection needs renewing, with a banner explaining why. Click it and authorize again. Reconnecting refreshes your account’s permissions and keeps every sync rule. Two things bring it up:- A new capability needs a permission your connection predates. MileApp marks the affected module in the pickers, and one reconnect grants it.
- Accurate ended the connection, which happens when the same Accurate account is connected somewhere else. Reconnect to resume syncing, and see the Prerequisites above on keeping one account per organization.
Disconnect
Click Disconnect and confirm. Your sync rules and business data are kept. Disconnecting clears the stored credentials and pauses every automation in both directions; connecting again reactivates them. Use Reconnect instead if you only need to refresh permissions. To also remove MileApp’s access from the Accurate side, open your Accurate account, go to Aplikasi Terhubung, and remove MileApp there.Good to Know
- A flow can carry both directions. The same flow can hold a Sales Order import rule (Accurate → MileApp) and a Delivery Order push rule (MileApp → Accurate), which is exactly the round trip shown above. Flows already claimed by the opposite direction for a document type are greyed out in the picker, with the reason on hover.
- Keep rules in step with your flows. If a flow is edited after a rule is saved and a mapped field is gone, open the rule and point that mapping at its new field.
- Syncing is go-forward. A rule starts working on the next order or task, so create the rule before the work you want synced.