Required permission:
- View Vehicle
- Create Vehicle
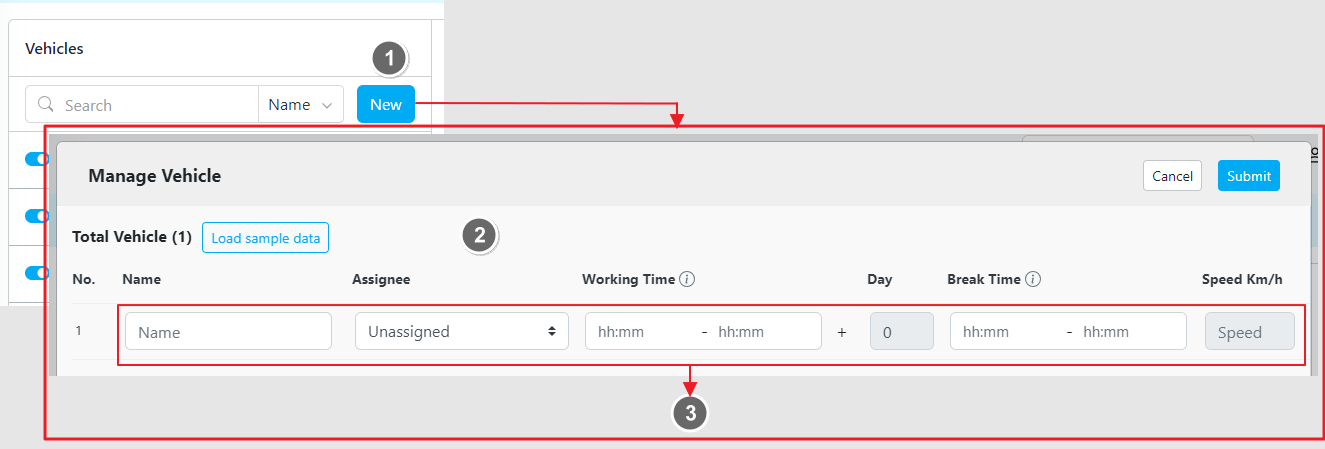
- Click the “New” button to add a new vehicle.
- Load Sample Data: Use this option to view an example of vehicle data.
- Fill in the Necessary Fields for each vehicle.
The newly created vehicle will be active by default. Below are detailed guidelines for each input:
- Name
Input the vehicle’s name, which can include identifiers like a police number
(e.g.B 1234 SYZ). - Assignee
Select the user to be assigned to this vehicle, or leave this empty.
You can assign the user later when routing is done. - Working Time
Specify the vehicle’s daily working hours.
If not specified, the default is 08:00 to 17:00.
Empty vehicles adopt the working hours of others if specified.
For more detail, please see the Working Time section below. - Break Time
Configure break time for the vehicle within the specified working start and end time.
For more detail, please see the Break Time section below. - Speed
Define the vehicle’s speed. The minimum value is 5 km/h.
Note: this field will be disabled if you activate Auto Speed in the Configuration page. - Cost Factor
The Cost Factor value ranges from 0 to 100, with the default set to0.
A lower number indicates a higher priority for routing optimization. - Vehicle Tags
Use tags to pair visits with vehicles.
Make sure one or more vehicle tags match the tags of the visit you wish to assign.
Please refer to the scenarios below for more understanding:- Scenario 1
If a vehicle has 2 tags ("a"and"b") while the visit has 3 tags ("a","b", and"c"),
then this visit will be dropped. - Scenario 2
If a vehicle has 3 tags ("a","b", and"c") while the visit also has 3 tags ("a","b", and"c"),
then this visit will be optimized. - Scenario 3
If a vehicle has 4 tags ("a","b","c", and"d") while the visit has 3 tags ("a","b", and"c"),
then this visit will be optimized.
- Scenario 1
- Capacity Constraint
Define the minimum and maximum capacity for each vehicle.
The capacity is based on the selected capacity in the Routing / Configuration menu.
Working Time
By default, the timeframe is set from 08:00 to 17:00.Users can adjust this according to their specific requirements. This parameter restricts any visits to occur within the specified timeframe.
Empty vehicles (vehicles without explicitly defined working hours) will adopt the working hours of other vehicles if specified. Additionally, if the Return to hub parameter is enabled, users have the option to set the working time for more than one day.
This allows route planning across multiple days at once.
Working Time Validation
When inputting working hours, ensure that the start time is earlier than the end time.Otherwise, a validation message will appear and you must correct the values before proceeding.

Break Time
When configuring breaks for multi-day operations, the break schedule remains consistent across all days. Example:If the Working Time spans from 07:00 to 17:00 (+1 day) and the Break Time is set from 12:00 to 13:00,
the vehicle will take a break from 12:00 to 13:00 each day. For a better understanding of how working time, break time, and multi-day settings interact, see the following scenarios:
- If the break start time falls after the end of the working time, the optimization will fail.
Example:- Working Time:
19:00 - 05:00 +1 day(7:00 PM - 5:00 AM) - Break Time:
06:00 - 07:00(6:00 AM - 7:00 AM):
- Working Time:
- If the break occurs within the working time, the optimization will succeed.
Example:- Working Time:
19:00 - 05:00 +1 day(7:00 PM - 5:00 AM) - Break Time:
00:00 - 01:00(12:00 AM - 1:00 AM):
- Working Time:
- If the break start time is earlier than the start of the working time, the optimization will fail.
Example:- Working Time:
19:00 - 05:00 +1 day(7:00 PM - 5:00 AM) - Break Time:
18:00 - 19:00(6:00 PM - 7:00 PM)
- Working Time: