> ## Documentation Index
> Fetch the complete documentation index at: https://docs.mile.app/llms.txt
> Use this file to discover all available pages before exploring further.
# How to Use Route Optimization
This page walks you through getting the most out of MileApp's Route Optimization. You will learn how to connect your task data to the routing engine through **Route As Mapping** in the Flow Configuration, and how to model common operational scenarios — zone-based planning, prioritizing your visits, using routing for pickup and delivery, and incremental re-routing — without disturbing routes that are already on the road.
If you are new to the feature, start with the [Introduction to Route Optimization](/pages/route-optimization/introduction-to-route-optimization) first.
## Configuring Route As Mapping in Flow Configuration
When a task is created through a Flow (whether on web, mobile, import, or API), the routing engine does not automatically know which form field corresponds to "address", "open time", or "weight". **Route As Mapping** is the bridge: it tells MileApp which component on your Flow's initial page should populate which visit field used by the routing engine.
Once mapped, every new task created through that Flow will automatically appear in the **Visit** menu with the routing fields filled in. You do not need to re-enter the visit data manually before each optimization run.
Required permission:
* Edit Flow
* View Flow
**To configure Route As Mapping:**
1. Go to **Flow** and select the Flow you want to use for routing.
2. Click the **Configuration** tab, then open the **Route** section.
3. For each routing field on the right, choose the matching Flow component on the left. Only components from the **initial page** of the Flow are eligible.
4. Click **Save** to apply the mapping.
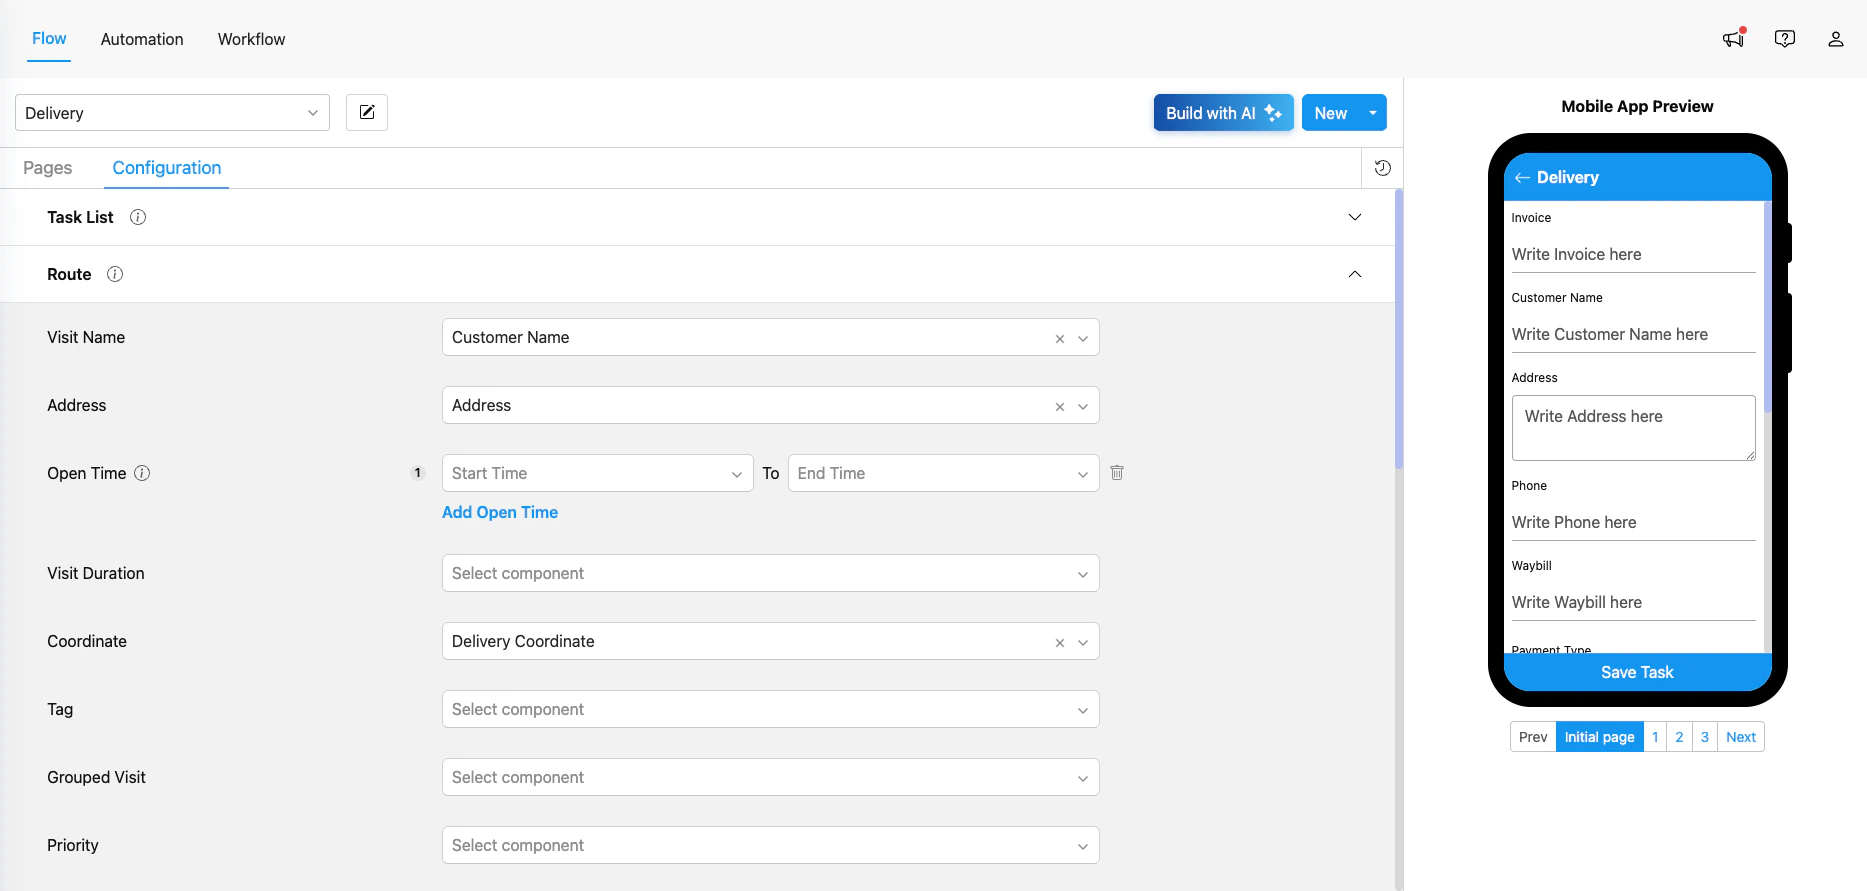
Flow → Configuration → Route — map each routing field to a Flow component on the initial page
### Mappable Fields
The fields below can be mapped under **Flow → Configuration → Route**. Once mapped, the values entered through the Flow will automatically populate the corresponding fields in the **Routing → Visit** menu.
| Field | What It Controls | Accepted Component Type |
| -------------- | ------------------------------------------------------------------------------------------------------------------------------------------------------- | ----------------------- |
| Visit Name | The display name for the visit (typically customer or store name). | String |
| Address | The physical address. Used for geocoding when coordinates are missing. | String, Address |
| Coordinate | Latitude and longitude of the visit. | Geolocation |
| Open Time | The start of the visit's time window. Supports up to three ranges. | Time, Datetime |
| Close Time | The end of the visit's time window. | Time, Datetime |
| Visit Duration | How long the vehicle is expected to spend at the visit (in minutes). | Numeric (integer) |
| Tag | Routing tag used to match a visit with a compatible vehicle. | String, Select |
| Visit Group | Identifier that pairs visits which must be served by the same vehicle. See [Visit Group](/pages/route-optimization/configuration/visit-group). | String |
| Priority | Execution order within a Visit Group. Integer 1–100; **lower number means higher priority**. Leave it empty if you do not need to prioritize any visit. | Numeric (integer) |
If a field is not mapped, the routing engine still works — it simply treats that field as empty for tasks created from this Flow. You can also fill these fields manually from the Visit menu before optimizing.
## Use Case Examples
The four examples below show how to combine the fields above to model real operational requirements. Each one explains the setup in MileApp and the result you can expect from the routing engine.
### 1. Planning by Zone Using Visit and Vehicle Tagging
When you want certain vehicles to only serve certain areas — for example, a fleet split into "North" and "South" zones — you combine three building blocks:
* **Geotagging** — draw a polygon on the map for each zone. Visits inside the polygon automatically receive the corresponding tag. See [Geotagging](/pages/route-optimization/configuration/geotagging) for the full setup.
* **Visit (Task) Tag** — the tag that lives on the visit, either applied manually or auto-assigned by Geotagging.
* **Vehicle Tag** — the tag set on each vehicle to declare which zones it can serve.
**How matching works:**
* A visit with a tag will only be served by a vehicle that has the **same tag**.
* A visit with **no tag** can be served by **any** vehicle, with or without a tag.
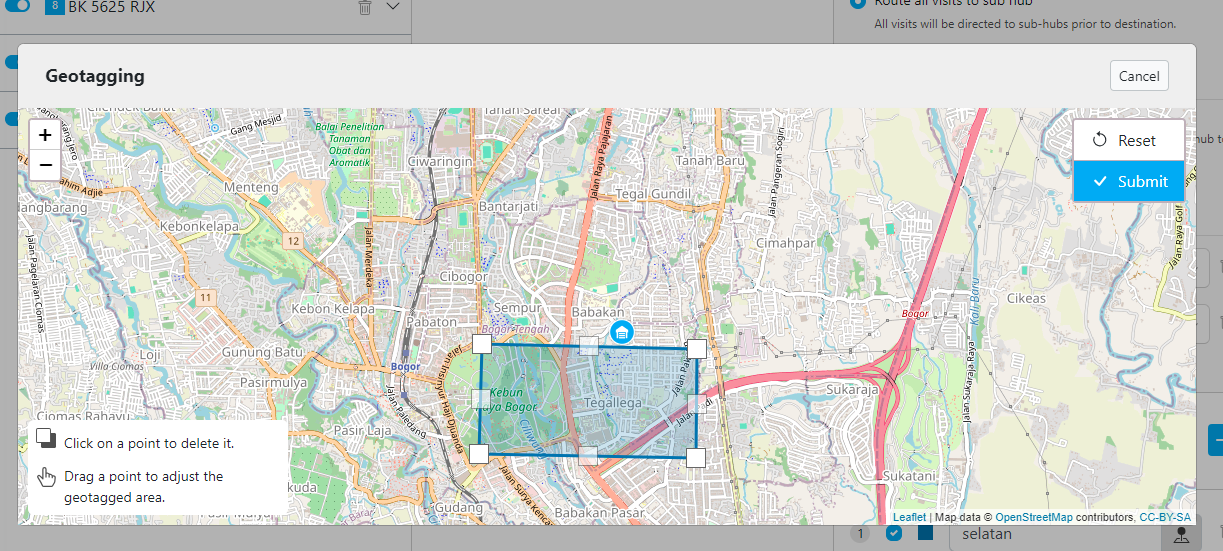
A geotagged area — visits inside the polygon receive the zone tag automatically
**Setup in MileApp:**
1. In **Routing → Configuration → Geotagging**, draw the polygon for each zone and give it a unique tag name (for example, `Selatan`).
2. Click the pinpoint icon to draw the polygon area on the map.
3. In **Routing → Vehicle**, add the same tag to every vehicle assigned to that zone.
4. Optimize. The engine will consider matching tag pairs when assigning visits to vehicles.
### 2. Prioritizing Your Visits
Not every visit is equal. Some need to be served first — a higher-priority visit, a stop with a narrow operating window, or a job that must happen before another. MileApp gives you two ways to express this:
**Way 1 — Time Window (when the visit can be served)**
If a visit can only be served inside a specific time range — for example, **06:00–08:00 AM** for a customer with limited operating hours — set the visit's **Open Time** and **Close Time** accordingly. The routing engine treats time window as a **hard constraint**: it will not schedule the visit outside that range.
**Way 2 — Priority (which visit comes first when ranking matters)**
A time window only sets when a visit *can* be served — it does not decide which visit comes first. If you need true ordering — for example, "serve this visit before any other visit in the same group" — use the **Priority** field on the visit:
* Priority is an **integer from 1 to 100**.
* A **lower number means higher priority**. Use `1` for the highest priority you want to express.
* If you leave Priority empty, the visit is treated as having no priority preference — visits with an explicit value in the same group go first.
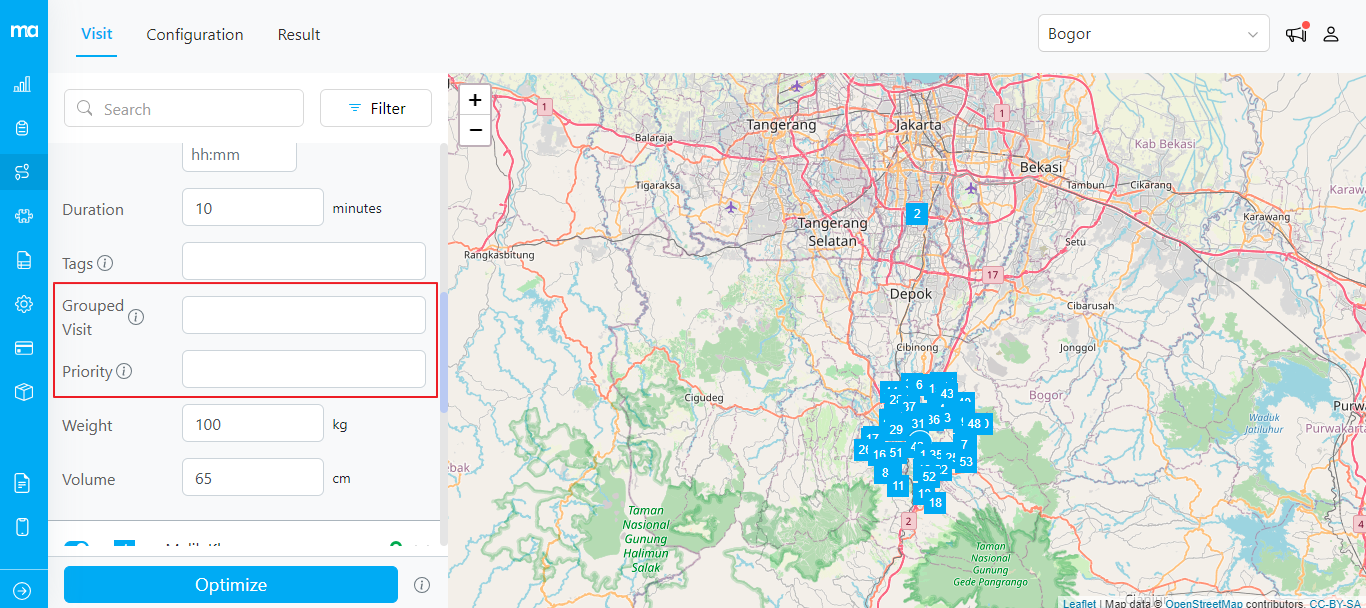
Grouped Visit and Priority inputs on the Visit edit panel
**Setup in MileApp:**
1. On the visit, set **Open Time** and **Close Time** if the visit must fall within a specific window (e.g. `06:00` to `08:00`).
2. Set **Priority** to a low integer (e.g. `1`) for visits you want served first.
3. (Optional) Put the visit in a **Visit Group** with related stops so the priority ranking applies inside that group. See [Visit Group](/pages/route-optimization/configuration/visit-group) for details.
### 3. Using Routing for Pickup and Delivery
When a single order requires both picking goods up from one location and dropping them at another, both stops should be handled by the same vehicle, in the correct order. MileApp handles this with a combination of **Visit Group**, **Priority**, and **directional Capacity** values.
**The pattern:**
| Field | Pickup visit | Delivery visit |
| ------------------ | --------------------------------- | --------------------------------- |
| Visit Group | Same ID, e.g. `clothing-order-42` | Same ID, e.g. `clothing-order-42` |
| Priority | `1` | `2` |
| Weight (or Volume) | `+100` (load on) | `-100` (unload) |
**Setup in MileApp:**
1. Group both visits by setting the same **Visit Group** value (e.g. `clothing-order-42`).
2. Set **Priority** = `1` on the pickup, `2` on the delivery. The engine will schedule pickup first because lower number means higher priority.
3. Set the **Weight** (or any active Capacity Constraint) to a **positive** value on the pickup and the **negative** of that value on the delivery. This way the on-board load goes up at the pickup and back down at the delivery.
#### Case Study — Pickup & Delivery Logistics
To make the setup above more concrete, here is how it plays out in a typical mixed operation.
A 3PL company runs a single vehicle that leaves the warehouse with 5 hub-loaded parcels for morning deliveries. Mid-route, the dispatcher receives 2 pickup orders from a vendor that need to be returned to the warehouse the same day.
Without modeling pickup and delivery together, the dispatcher would have to:
* Manually decide which driver collects the vendor pickups.
* Estimate whether the vehicle still has space after the morning deliveries.
* Hope the driver visits the pickup *before* attempting any related delivery.
With the pattern from section 3 applied — Visit Group pairing, Priority `1`/`2`, and `+/-` Weight — the routing engine handles all three decisions automatically:
| Concern | What the engine does |
| --------------------------- | -------------------------------------------------------------------------------------------- |
| Right driver picks up | Pickup and delivery share a Visit Group, so the same vehicle handles both. |
| Never deliver before pickup | Priority `1` on the pickup forces it to occur before its paired delivery (`2`). |
| Stays under capacity | Positive Weight at pickup raises on-board load; negative Weight at delivery releases it. |
| No empty (deadhead) trips | The optimizer slots return-pickups into the existing route instead of dispatching a new run. |
The dispatcher only models the data once. The engine produces a single mixed-flow route that respects sequence, capacity, and vehicle assignment — without any manual matching of pickups to deliveries.
### 4. Updating the Plan by Adding a Task Without Affecting Existing Routes
After you optimize and **dispatch** a routing result, every assigned visit appears with a **truck icon** in the Visit menu. The icon indicates that the visit is already part of a committed route and is being executed by a driver.
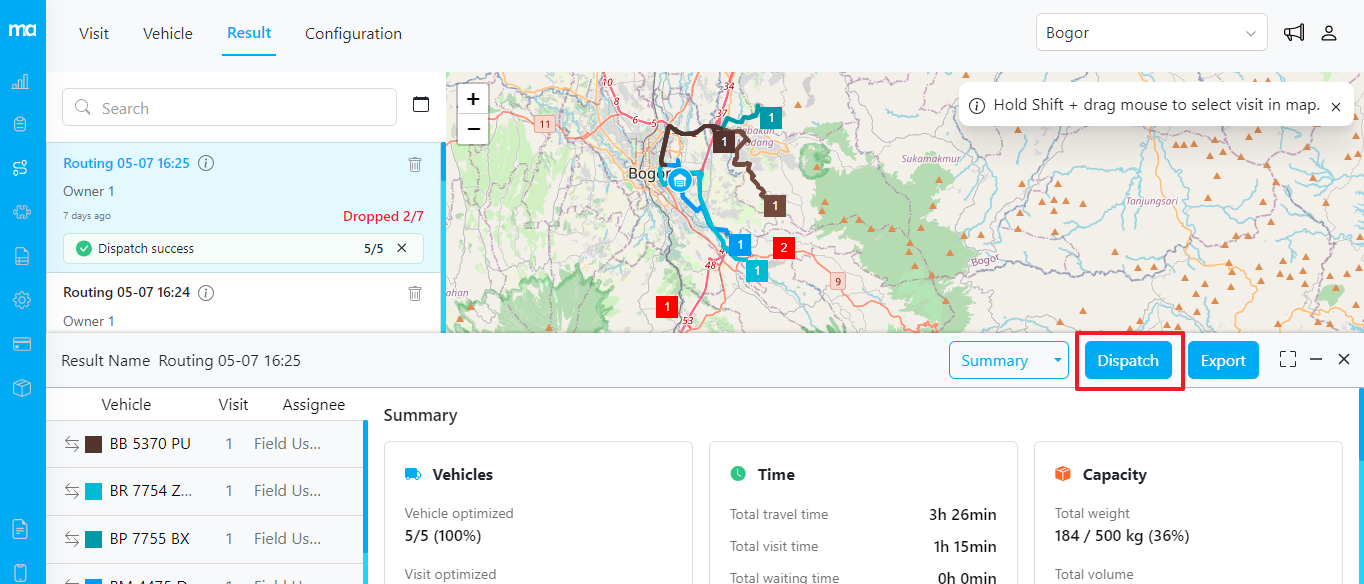
Once dispatched, tasks are marked as committed routes
When a new task needs to be added later in the day, you do not need to scrap and re-plan everything from scratch. The routing engine recognizes dispatched visits as **locked** — they keep their assigned vehicle and order — and only the **new, non-dispatched** visits are placed into the plan.
**Setup in MileApp:**
1. Add the new task to the Visit menu, making sure its data is complete (Name, Address, Coordinate, Time Window, Tag if needed).
2. Confirm the **status** of all relevant visits — visits with the truck icon are locked; the new visit should not have one yet.
3. Click **Optimize** again. The engine will preserve dispatched visits as-is and slot the new visit into the most efficient remaining position.
4. Review the result and dispatch when you are satisfied.
This way you can continuously add ad-hoc tasks throughout the day without disturbing routes that are already on the road.
## Frequently Asked Questions
**Do I have to map every field in the Route section of Flow Configuration?**
No. Map only the fields you want auto-populated from the Flow. Unmapped fields can be filled manually on the Visit panel before optimizing.
**What happens if a visit has a tag but no vehicle has that tag?**
The visit will not be assigned to any vehicle and will appear in the dropped-visit list. See [Dropped Visit](/pages/route-optimization/result/dropped-visit) for details.
**Can two visits in the same Visit Group be served by different vehicles?**
No. Visit Group is a hard constraint — all visits in the same group are guaranteed to be assigned to the same vehicle.
**If I set Priority on a visit but it has no Visit Group, does priority still apply?**
Priority ranking is most meaningful **within a group**. Without a group, the visit competes against all other visits according to time windows and overall route cost. For strict ordering, use Visit Group together with Priority.
**Will re-optimizing after dispatch change the routes of drivers already on the road?**
No. Dispatched visits (those with the truck icon) are locked. Re-optimization only places newly-added, non-dispatched visits.
## Related Documentation
* [Introduction to Route Optimization](/pages/route-optimization/introduction-to-route-optimization)
* [Filtering and Editing Visit](/pages/route-optimization/visit/filtering-and-editing-visit)
* [Geotagging](/pages/route-optimization/configuration/geotagging)
* [Visit Group](/pages/route-optimization/configuration/visit-group)
* [Capacity Constraint](/pages/route-optimization/configuration/capacity-constraint)
* [Dispatch](/pages/route-optimization/dispatch)
* [Dropped Visit](/pages/route-optimization/result/dropped-visit)
* [Flow Builder](/pages/flow/introduction-to-flow)